

P1442 on 1997-2006 Honda CR-V: EVAP Vacuum Switch Malfunction Causes and Fixes
On a 1997-2006 Honda CR-V, code P1442 typically points to a faulty EVAP Bypass Solenoid Valve. This is a common failure due to corrosion from road salt and moisture. Replacing the valve, which is located under the vehicle near the charcoal canister, is the most frequent fix, costing around $40-$80 for an aftermarket part.
- P1442 on a 1997-2006 CR-V almost always points to a problem with the EVAP system, not the gas cap.
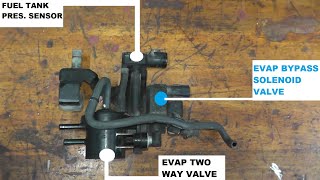
- The most likely culprit is a failed EVAP Bypass Solenoid Valve, which is located on or near the charcoal canister under the rear of the vehicle.
- This failure is well-documented and often caused by corrosion, especially in regions that use road salt.
- A key symptom pointing to this specific failure is difficulty starting the vehicle immediately after filling the gas tank.
- Before replacing parts, visually inspect the wiring and hoses for obvious damage, and consider a smoke test to rule out leaks.
What's Unique About the 1997-2006 Honda CR-V
The 1997-2006 CR-V, spanning the first (RD1) and second (RD4-RD7) generations, is susceptible to EVAP component failure, similar to other Hondas of this era like the Civic and Accord. A technical service bulletin (TSB) for the 1998-2001 CR-V highlights that the EVAP bypass solenoid valve is prone to failure from internal corrosion, especially in regions where road salt is used. This corrosion can cause the valve to stick or fail electrically, leading to the P1442 code. The components are located under the rear of the vehicle, making them highly vulnerable to this type of environmental damage.
Generation note: This guide covers the first generation (1997-2001) and second generation (2002-2006) Honda CR-V. While the diagnostic principles are the same, the exact part numbers for the EVAP bypass solenoid valve differ. For Gen 1 (1997-2001), the relevant part is often 17012-S01-A00 (or its successor). For Gen 2 (2002-2006), a common part number is 36163-PND-A01. A TSB specifically mentions the 1998-2001 models as being affected by a corrosion-prone EVAP bypass solenoid valve.
Symptoms You May Notice
- Check Engine Light is on
- A faint smell of fuel, particularly after parking the vehicle
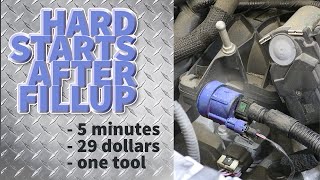
- Difficulty starting the engine immediately after refueling 🎬 See why your CR-V might start hard after getting gas.
- Slightly increased fuel consumption
- Rough or uneven idle in some cases
- Replacing the gas cap. While a loose or faulty gas cap can cause other EVAP codes (like P1456 or P1457), P1442 on a Honda typically points to a component malfunction rather than a system-wide leak.
Most Likely Causes
- Faulty EVAP Bypass Solenoid Valve 🔴 High Probability A Honda TSB confirms these valves are susceptible to internal corrosion from moisture and road salt, causing them to stick or fail electrically. Their location under the rear of the car exposes them to the elements.
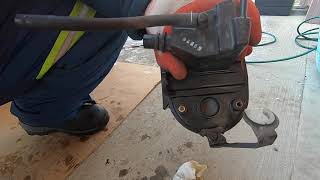
How to confirm: Use a bi-directional scan tool to command the solenoid on and off; listen for a clicking sound. Alternatively, apply 12V directly to the solenoid terminals and listen for a click. You can also test the internal resistance with a multimeter; a good valve will have a specific resistance (check service manual), while a failed one may show an open circuit ('OL'). A known good valve measured around 35 ohms. 🎬 Watch: How to test and replace the EVAP bypass solenoid.
Typical fix: Replace the EVAP bypass solenoid valve.
Est. part cost: $40-$80 - Damaged or Corroded Wiring/Connector 🟡 Medium Probability The EVAP components are located underneath the vehicle, exposing the wiring and connectors to moisture, road salt, and debris, which can lead to corrosion or physical damage over time.
How to confirm: Visually inspect the wiring harness and connector leading to the EVAP bypass solenoid valve for any signs of corrosion, frayed wires, or loose pins. Check for battery voltage at the connector with the key on. Clean any corrosion with a contact cleaner and ensure a snug fit.
Typical fix: Clean the connector terminals or repair the damaged section of the wiring harness.
Est. part cost: $5-$25 - Cracked or Disconnected EVAP Hoses ⚪ Low Probability The rubber hoses in the EVAP system can become brittle and crack with age and exposure to the elements, creating a vacuum leak.
How to confirm: Visually inspect all vacuum and vapor hoses connected to the charcoal canister and solenoid valves for cracks, splits, or loose connections. A smoke test is the most effective way to find small, hard-to-see leaks.
Typical fix: Replace the cracked or damaged hose.
Est. part cost: $10-$30
Rare But Worth Checking
- Faulty Powertrain Control Module (PCM): A TSB mentions that in rare cases, severe corrosion and shorting of the EVAP bypass solenoid can damage the driver circuit within the PCM, requiring replacement of both components. This should only be considered after all other causes have been ruled out.
- Clogged EVAP Canister: If the charcoal canister becomes saturated with fuel (often from overfilling the gas tank) or clogged with debris, it can disrupt the normal function of the EVAP system and may contribute to this code.
Diagnosis Steps
- Retrieve the P1442 code using an OBD-II scanner.
- Visually inspect the EVAP canister, bypass solenoid valve, and all associated hoses and wiring underneath the vehicle (typically located near the rear axle, driver's side). Look for obvious cracks, corrosion, or loose connections.
- If you have a bi-directional scanner, command the EVAP bypass solenoid valve to activate. Listen for an audible click.
- If no click is heard, check for battery voltage at the solenoid's electrical connector with the ignition on.
- If power is present, the solenoid is likely faulty. You can confirm by checking its resistance with a multimeter (a known good reading is ~35 ohms) or by applying power and ground directly to its terminals.
- If power is not present at the connector, inspect the wiring harness for breaks or shorts. Check the related fuse in the under-hood and under-dash fuse boxes.
- If the solenoid clicks and wiring is good, perform a smoke test on the EVAP system to check for leaks in the hoses or the canister itself. This is the most definitive way to find small leaks.
- If no leaks are found and the solenoid tests good, the issue could be a rare PCM failure, but this is highly unlikely.
Parts You'll Likely Need
- EVAP Bypass Solenoid Valve
(OEM #17012-S01-A00 (Gen 1), 36163-PND-A01 (Gen 2))— This is the most common failure point for code P1442 on this vehicle, often due to internal corrosion as documented in a Honda TSB. The original part 17012-S01-A00 for Gen 1 has been superseded by 17012-S01-A01.
Trusted brands: Honda (OEM), Denso, Standard Motor Products (SMP), Dorman
OEM price range: $60-$100
Aftermarket price range: $40-$80
Related Codes That Often Appear With This One
- P1457 — P1457 indicates a leak in the EVAP canister system. Since the bypass solenoid is part of this system, a failure of the valve or its associated hoses can trigger both codes. They are very commonly seen together 🎬 Watch this walkthrough on fixing P1457 and solenoid issues. on this platform.
- P1456 — P1456 indicates a leak in the fuel tank side of the EVAP system. While less common to see with P1442, a related component issue could potentially trigger both.
Technical Service Bulletins (TSBs) & Recalls
- Honda TSB 03-001 (January 28, 2003) - Directly addresses DTC P1457 but is the key document for the EVAP bypass solenoid valve failure from corrosion that also causes P1442. It notes the issue is most common in salt-belt regions and can, in rare cases, damage the PCM.
- Honda TSB 99-075 (Revised August 9, 2013) - Details the specific HDS scan tool troubleshooting procedures for EVAP codes on the 1998-2001 CR-V, including commanding the bypass solenoid.
Platform-Specific Known Issues
- A Honda Technical Service Bulletin (TSB 03-001) was issued for 1998-2001 CR-V models regarding the EVAP bypass solenoid valve failing due to corrosion from water and road salt intrusion.
Mechanic-Grade Diagnostic Values
- EVAP Bypass Solenoid Valve Coil Resistance — expected: ~35 ohms. Failure: An open circuit (OL) or infinite resistance indicates a failed coil.
- EVAP Bypass Solenoid Connector Voltage — expected: Battery Voltage (~12V) with key on, engine off.. Failure: No voltage suggests a blown fuse or a break in the power wire.
- Fuel Tank Pressure (FTP) Sensor Voltage (at rest) — expected: 2.45V - 2.55V. Failure: A reading outside this range indicates a faulty sensor or a problem in its circuit.
- Fuel Tank Pressure (FTP) Sensor Voltage (during vacuum test) — expected: Technician applies vacuum until voltage drops to ~1.5V, then observes if it holds.. Failure: If the voltage does not hold, it indicates a leak in the portion of the system being tested.
Hidden / Shadow Codes Worth Checking
- Mode $06: Mode $06 data can reveal the results of the PCM's self-tests on the EVAP system. A failing test result can appear here before the PCM triggers a full-blown Check Engine Light. For 2005 models, specific Test IDs (TID) like TID $26 and TID $36 correspond to EVAP leak checks. (see via A professional scan tool or an advanced DIY scanner with Mode $06 capability is required.)
Scan Tool Commands That Help
- Honda Diagnostic System (HDS) or equivalent bi-directional scanner: INSPECTION > EVAP TEST > SINGLE SOLENOIDS > BYPASS SOLENOID — This command is used to manually activate the EVAP bypass solenoid valve. The technician should listen for an audible 'click' from the valve, confirming the electrical circuit and the solenoid's mechanical function are working.
Wiring & Ground Locations
- EVAP Bypass Solenoid Connector Pin 2 — On the 2-pin connector at the EVAP bypass solenoid valve, under the rear of the vehicle near the charcoal canister.. This pin is checked for continuity to body ground as part of the diagnostic procedure to test the solenoid circuit.
- PCM Connector E, Pin E20 — On the Powertrain Control Module (PCM), which is typically located behind the glove box or in the passenger footwell area.. This is the specific pin on the PCM that controls the EVAP bypass solenoid valve on the 2002-2006 CR-V. A short in the wire between this pin and the solenoid will cause a fault.
- G401 / G402 — For the 2nd Gen CR-V (2002-2006), G401 is located behind the glove box and G402 is under the middle of the dash.. Poor ground connections can cause a wide range of electrical issues. While not exclusively for the EVAP system, checking the condition of major grounds in the area of the PCM is a valid step when troubleshooting persistent electrical faults.
Real Owner Repair Stories
- YouTube channel 'TN-525i' (2003 Honda CL (Uses a similar EVAP system design)) — Check Engine Light with code P1456 (often seen with P1442).
❌ Tried (didn't work) The video implies diagnosis led directly to the faulty part.
✅ What actually fixed it The problem was solved by replacing the EVAP bypass solenoid valve (referred to as the 'two-way valve' or 'vent valve' in the video). The owner also replaced the gas cap as a preventative measure.
OEM Part Supersession History
17012-S01-A00→17012-S01-A01— Likely an internal revision to improve durability and prevent the corrosion issue outlined in TSB 03-001.
Model Year Variations Within This Range
- 1997-2001 (Gen 1) vs 2002-2006 (Gen 2): While the primary cause (EVAP Bypass Solenoid) is the same, the part numbers are different. Additionally, the EVAP *Purge* Solenoid (a different part that can cause other EVAP codes) is located in the engine bay on Gen 2 models, whereas the Bypass Solenoid for both generations is under the vehicle near the canister.
- 1998-2001: Honda TSB 99-075 provides a specific troubleshooting procedure (Procedure B) for these model years, which differs from the procedure for later model Hondas, indicating a variation in the diagnostic logic or system response.
Diagnostic Flowchart
Other Known Issues on This Vehicle
Issues unrelated to this code that are worth knowing about as an owner of this generation:
- A/C Compressor Failure ('Black Death') 🔴 High — Very common on 2nd gen (2002-2006) models. The compressor can fail catastrophically, sending metal debris throughout the entire A/C system, requiring replacement of the compressor, condenser, drier, and expansion valve.
- Required Valve Adjustments 🟠 Medium — The B20 (Gen 1) and K24 (Gen 2) engines use solid lifters and require periodic valve lash adjustments. The recommended interval is often debated, but many suggest every 30,000-60,000 miles to prevent rough idle, misfires, and potential valve damage.
- Rear Differential 'Groan' or 'Chatter' 🟡 Low — Common on AWD models. A groaning or chattering noise from the rear when making tight turns indicates the differential fluid has broken down. The fix is a simple fluid change using Honda's Dual Pump Fluid II.
- Power Door Lock Actuator Failure 🟡 Low — Widespread across many Honda models of this era, including the CR-V. The actuators fail, causing doors to lock or unlock erratically or not at all.
- Faulty Ignition Switch 🔴 High — Primarily affects 1997-1998 models. The electrical portion of the ignition switch can fail, causing the vehicle to stall without warning while driving. This was subject to a recall. (Ref: NHTSA Campaign ID: 02V120000)
Used vs. New Parts: Buying Guide for This Vehicle
When a used part is the smart pick: For the EVAP bypass solenoid valve, a used part from a junkyard can be a cost-effective option, especially if it can be sourced from a vehicle in a dry, non-salt-belt region to minimize the risk of pre-existing corrosion.
Donor-vehicle mileage cap: roughly under 120000 miles for the part to have meaningful remaining life.
What to inspect on the donor part:
- Visually inspect the part for heavy rust or corrosion on the metal body and electrical connector pins.
- If possible, bring a multimeter to the junkyard and test the resistance. Look for a reading around 35 ohms.
- Check the rubber hose ports for cracks or brittleness.
- Ask for the vehicle's history if available, prioritizing donors from southern or western states with less road salt usage.
OEM-only on this vehicle (don't cheap out):
- Powertrain Control Module (PCM) - If the rare PCM failure occurs, a used unit must be professionally reprogrammed to the vehicle's VIN and immobilizer system. Due to this complexity, a new or professionally refurbished and programmed unit is recommended over a simple junkyard part.
Aftermarket brands forum-validated for this vehicle:
- Denso (often the OEM supplier)
- Standard Motor Products (SMP)
Brands owners have reported issues with on this vehicle:
- No specific brands are consistently cited as problematic in forums, but ultra-low-cost, unbranded parts from online marketplaces carry a higher risk of premature failure.
Real Owner Stories
Aggregated from forums and TSBs cited above. Mileages and costs reflect what owners reported in those sources.
2000 Honda CR-V (B20)
Symptoms: Check Engine Light was on with code P1442, and sometimes P1457 would appear as well. There was visible corrosion on the solenoid and its electrical connector under the car.
What fixed it: Replacing the EVAP bypass solenoid valve resolved the code.
Source hint: CRVOwnersClub.com
2004 Honda CR-V (K24)
Symptoms: The most noticeable problem was the engine struggling to start right after filling up the gas tank. The Check Engine Light was also on.
What fixed it: The issue was traced to a faulty EVAP bypass solenoid. Replacing the solenoid fixed both the starting problem and the check engine light.
Source hint: Reddit r/MechanicAdvice & r/Honda
1999 Honda CR-V (B20)
Symptoms: Check Engine Light came on, particularly in a salt-belt region. The code was P1442, which is caused by the same part failure described in a TSB for code P1457.
What fixed it: Following the guidance related to TSB 03-001, the corroded EVAP bypass solenoid valve was replaced, which fixed the problem.
Source hint: Honda TSB 03-001
Related OBD-II Codes
Frequently Asked Questions
I heard there's a TSB for EVAP issues on my CR-V. Does it cover the P1442 code?
Where is the EVAP bypass solenoid valve located on my 1997-2006 CR-V?
My CR-V is hard to start right after I get gas. Could this be related to the P1442 code?
How can I test the EVAP bypass solenoid valve myself before buying a new one?
What is the typical cost for just the EVAP bypass solenoid valve part?
Is this P1442 problem common on other Hondas from this era, or just the CR-V?
Helpful Videos

We Have This Part in Stock


The information in this article is provided for general reference and educational purposes only. Vehicle specifications, procedures, and part compatibility can vary by production date, trim level, and region. Always consult your vehicle's factory service manual and verify part numbers before purchasing or performing repairs. Safety-critical components such as airbags, seat belts, and braking systems should be installed by a qualified professional.
- Honda CR-V:
- 🎬 Helpful Videos
- 🛍️ Shop This Part
- What's Unique About the 1997-2006 Honda CR-V
- Symptoms You May Notice
- Most Likely Causes
- Rare But Worth Checking
- Diagnosis Steps
- Parts You'll Likely Need
- Related Codes That Often Appear With This One
- Technical Service Bulletins (TSBs) & Recalls
- Platform-Specific Known Issues
- Mechanic-Grade Diagnostic Values
- Hidden / Shadow Codes Worth Checking
- Scan Tool Commands That Help
- Wiring & Ground Locations
- Real Owner Repair Stories
- OEM Part Supersession History
- Model Year Variations Within This Range
- Diagnostic Flowchart
- Other Known Issues on This Vehicle
- Used vs. New Parts: Buying Guide for This Vehicle
- Real Owner Stories
- 2000 Honda CR-V (B20)
- 2004 Honda CR-V (K24)
- 1999 Honda CR-V (B20)
- Related OBD-II Codes
- Frequently Asked Questions
- 🎟️ Get 5% Off