

2016-2024 Ram Tailgate Camera Problems: Blue Screens, Flickering, and Fixes
Diagnose and fix common backup camera issues like flickering video, blue or black screens, and complete failure on your 2016-2018 Ram 1500, 2500, 3500, or 2019-2024 Ram 1500 Classic.
- The most common cause of camera failure is not the camera itself, but the wiring harness and connectors between the tailgate and the truck body.
- A blue screen almost always indicates a connection problem, while a black screen could be a lack of power or a dead camera.
- Before buying any parts, inspect and clean the main harness connectors under the truck and inside the tailgate access panel.
- Replacement is a simple DIY job requiring basic tools and about an hour of time.
- This guide applies to the 2016-2018 Ram 1500, 2500, 3500, and the 2019-2024 Ram 1500 Classic, which share the same body style and components.
Symptoms of a Failing Ram Backup Camera

When the tailgate camera on a 2016-2018 Ram 1500, 2500, 3500, or 2019-2024 Ram 1500 Classic begins to fail, the symptoms are usually obvious on the infotainment screen. Understanding these signs can help you determine if the problem is the camera itself, the wiring, or another part of the system.
🎬 Watch: Troubleshooting why your Ram backup camera isn't working- Black Screen: When you shift into reverse, the screen goes completely black. This often indicates a total loss of power or signal from the camera.
- Blue Screen: A solid blue screen is a common symptom on these Ram trucks. This typically means the display is powered on and trying to receive a signal, but no valid video feed is coming from the camera. This often points to a wiring or connection issue.
- Flickering or Distorted Image: The video feed may cut in and out, flicker, or appear scrambled and fuzzy. This suggests a poor electrical connection or a failing camera sensor.
- "Camera Unavailable" Message: The Uconnect system may display a text warning that the camera system is not available.
- Upside-Down or Mirrored Image: In some cases, the camera's internal processor can fail, causing the image to be flipped or inverted.
- Poor Image Quality: The image may become foggy, washed out, or have a purple tint, which can be caused by moisture getting inside the camera lens or the lens itself degrading over time.
Known Issues, Recalls, and Technical Service Bulletins (TSBs)

While many camera failures are due to age or wiring damage, there have been some official communications from the manufacturer regarding these systems. Problems are often traced back to the wiring harness that runs from the truck body to the tailgate, which flexes every time the tailgate is opened and closed.
Recalls
- NHTSA Campaign ID Number 18V398000 (Manufacturer Recall U56): This recall affected some 2018 Ram 1500, 2500, and 3500 models. The issue was that the backup camera image could be lost while backing up, increasing the risk of a crash. The remedy involved a software update or component replacement performed by a dealer.
- Other Software-Related Recalls: Newer model years outside the primary range of this guide have also seen recalls for software glitches that can cause the rearview image to not display or to stay on the screen too long. While these don't directly apply to the 2016-2018 hardware, they highlight the system's sensitivity to software issues.
- Wiring Harness Recall: A very small recall (affecting a single vehicle) was issued for a 2022 Ram 1500 Classic due to a defective wiring harness that could short circuit and disable the camera. This underscores the importance of the harness in the system's reliability.
Common Failure Points from Owner Reports
Forum discussions among Ram truck owners consistently point to a few key problem areas:
- Tailgate Wiring Harness: The most common culprit is the wiring harness. The wires can break or chafe where they pass from the truck bed into the tailgate.
- Electrical Connectors: The small coaxial connectors for the video signal are a frequent source of problems. There are typically three key connection points: one under the truck near the spare tire, one inside the tailgate behind the access panel, and another right at the camera module. These can become loose or corroded, leading to a blue screen or intermittent signal. Applying dielectric grease to these connections is a common preventative measure. 🎬 See this quick fix for common Ram camera connection problems
Pro Tip: Before replacing the camera, carefully inspect the wiring harness. Open and close the tailgate while a helper watches the screen to see if the image flickers. Also, try wiggling the connectors under the truck and inside the tailgate to see if you can make the image appear or disappear. 🎬 Watch: Real-world example of intermittent wiring harness failure This can save you from buying a camera you don't need.
Buying a Used Ram Tailgate Camera: What to Check
A used OEM camera can be a cost-effective solution, but it's important to inspect it carefully to avoid buying a part that's already failing.
- Check the Lens: Inspect the camera lens for deep scratches, haziness, or any sign of condensation behind it. A foggy lens indicates the seal has failed, and the camera will provide a poor image, especially at night or in the rain.
- Inspect the Connector Pins: Look closely at the electrical connector on the back of the camera. The pins should be straight, clean, and free of any green or white corrosion. Corroded pins are a major red flag.
- Verify the Part Number: While several part numbers supersede each other, ensure the camera you're buying is listed as compatible with your truck's year and model. The OEM part numbers include 68274731AB, 68274731AC, 68274731AD, and the latest version, 68274731AE.
- Ask About the Donor Vehicle: If possible, find out the mileage and condition of the truck it came from. A camera from a low-mileage, well-kept truck is always a better bet.
- Why Used OEM is Often Better: For a part like this, a used original equipment (OEM) camera is often preferable to a cheap new aftermarket one. OEM cameras are designed to integrate perfectly with the Uconnect system, providing the correct image quality, color accuracy, and dynamic gridlines. Some aftermarket cameras can have lower resolution, poor night vision, or may not display the gridlines correctly.
Cost to Replace a Ram Backup Camera
The cost can vary significantly depending on the route you take for the repair. Labor costs at a professional shop are typically estimated to be between $110 and $161.
| Part Type | Estimated Cost | Notes |
|---|---|---|
| New OEM (Mopar) | $285 - $436 | Highest cost but guarantees perfect fit and function. Part number 68274731AE is the most current replacement. |
| New Aftermarket | $40 - $120 | More affordable, but image quality and longevity can be inconsistent. May not include the entire tailgate handle assembly. |
| Used OEM | $75 - $200 | A good balance of cost and quality. Price depends on condition and seller. |
| Shop Labor | $110 - $161 | Typically 1-1.5 hours of labor at a repair shop. |
Installation Guide and Difficulty

Replacing the tailgate camera is a straightforward job that most DIYers can handle with basic tools.
- Difficulty Rating: 2 out of 5
- Estimated Time: 0.5 - 1 hour
- Tools Needed: Torx bit set (usually T25 or T30), socket set, trim removal tool.
Step-by-Step Replacement
- Lower the Tailgate: Open the tailgate and place it in the down position.
- Remove the Access Panel: On the inside of the tailgate, there is a large metal or plastic access panel. Remove the Torx screws holding it in place and carefully pry it off.
- Disconnect Wiring: Locate the wiring harness for the camera and the electronic tailgate lock. Disconnect the electrical connectors.
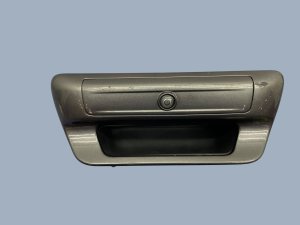
- Remove the Tailgate Handle: From inside the tailgate, you will see the nuts holding the handle assembly in place. Remove these nuts. The handle assembly, which contains the camera, can now be removed from the outside of the tailgate.
- Swap the Camera (If Needed): In some cases, you may be replacing just the camera module within the handle. In others, you'll replace the entire handle assembly. Follow the instructions with your new part.
- Installation: Installation is the reverse of removal. Mount the new handle/camera assembly, tighten the nuts, reconnect the wiring, and reinstall the access panel.
- Test the Camera: Turn the ignition on and shift the truck into reverse to confirm the new camera is working correctly before finishing up.
Frequently Asked Questions (FAQ)
Do I need to have the dealer program a new backup camera?
No, for a direct OEM replacement on these models, no special programming or dealer activation is required. The system is plug-and-play.
My screen is blue. Is the camera definitely bad?
Not necessarily. A blue screen is a very common symptom of a poor connection in the wiring, not a failed camera. Before buying a new camera, thoroughly check the wiring harness connectors under the truck and inside the tailgate for looseness or corrosion.
Can I upgrade to a higher-definition camera?
While some aftermarket companies offer higher-resolution cameras, their compatibility and performance with the factory Uconnect screen can vary. For a guaranteed result without potential compatibility issues, a direct OEM replacement is the safest option.
My camera works intermittently, especially after hitting a bump. What's the cause?
This is a classic sign of a loose connection. The shock from a bump or from closing the tailgate can be enough to temporarily break the connection. The most likely culprit is the main wiring harness connector located under the truck bed near the spare tire. Unplugging it, cleaning it, and reconnecting it securely often solves the problem.
Helpful Videos

Technical Specifications
OEM Part Numbers: 68274731AB 68274731AC 68274731AD 68274731AE
Mounts in tailgate handle assembly. Connects to main vehicle harness under the bed. Provides dynamic gridlines on Uconnect display.
We Have This Part in Stock




The information in this article is provided for general reference and educational purposes only. Vehicle specifications, procedures, and part compatibility can vary by production date, trim level, and region. Always consult your vehicle's factory service manual and verify part numbers before purchasing or performing repairs. Safety-critical components such as airbags, seat belts, and braking systems should be installed by a qualified professional.
- Ram 1500:
- Ram 2500:
- Ram 3500:
- Ram 1500 Classic:
- 🎬 Helpful Videos
- 🛍️ Shop This Part
- Symptoms of a Failing Ram Backup Camera
- Known Issues, Recalls, and Technical Service Bulletins (TSBs)
- Recalls
- Common Failure Points from Owner Reports
- Buying a Used Ram Tailgate Camera: What to Check
- Cost to Replace a Ram Backup Camera
- Installation Guide and Difficulty
- Step-by-Step Replacement
- Frequently Asked Questions (FAQ)
- 🎟️ Get 5% Off