

2017-2022 Kia Sportage Trunk Trim Panel: Fixing Rattles and Replacing Damaged Panels
Your complete guide to diagnosing noises, avoiding damage, and replacing the interior liftgate trim panel on the fourth-generation Kia Sportage.
- The most common issue with this panel is rattling, which can often be fixed by replacing inexpensive clips and adding foam tape rather than replacing the entire panel.
- When buying a used panel, the integrity of the mounting clips on the back is the most important factor to inspect; cosmetic scuffs are secondary.
- Replacement is a simple DIY task requiring only basic hand tools and a plastic pry tool kit to prevent damage.
- An important recall (NHTSA ID 21V-137) affects the tow hitch wiring in this area, which can cause a fire. Verify this has been addressed on your vehicle.
Symptoms of a Failing Trunk Trim Panel

As a largely cosmetic and protective part, the "failure" of a trunk trim panel is almost always related to physical damage or noise. There are no electronic codes associated with this part.
- Rattling or Buzzing Noises: This is the most common complaint. Noises from the rear of the vehicle, especially over bumps or on rough roads, can often be traced to a loose liftgate trim panel. This is usually caused by broken or weakened mounting clips that no longer hold the panel tightly against the metal liftgate structure.
- Visible Damage: Cracks, deep scratches, and gouges are common from loading and unloading bulky or sharp items. Over time, the plastic can also become brittle and may crack around high-stress areas like the pull handle.
- Poor Fitment: You may notice the panel sagging, having uneven gaps, or not sitting flush with the liftgate. This is a clear sign that mounting clips are broken or that the panel itself has been warped or improperly installed after a previous repair.
Known Issues, Recalls, and TSBs for 2017-2022 Kia Sportage

While there are no recalls or Technical Service Bulletins (TSBs) specifically for the interior trunk trim panel, several important issues for this Sportage generation are located in the rear of the vehicle.
- Tow Hitch Wiring Harness Recall (NHTSA ID 21V-137): A significant recall was issued for Sportage models from 2017-2022 equipped with a tow hitch harness. Moisture and debris can enter the harness module, causing an electrical short that can lead to a fire, even when the vehicle is turned off. Kia's remedy involves a new wire harness and fuse. Owners are advised to park their vehicles outside and away from structures until the repair is completed.
- General Rattles: Forum discussions among owners frequently mention chasing down rattles in the rear of the vehicle. While the trim panel is a common culprit, other sources include the license plate bracket, items in the spare tire well, and the adjustable rubber bump stops on the liftgate.
Pro Tip: If you are experiencing a rattle from the rear, have a passenger sit in the back with the seats folded down while you drive. They can often pinpoint the exact source of the noise by applying pressure to different trim pieces.
Buying a Used 2017-2022 Sportage Trunk Trim Panel

Since aftermarket options for this specific interior panel are virtually nonexistent, a used OEM panel is often the most cost-effective solution. Here’s what to look for to ensure you get a quality part.
Inspection Checklist:
- Check All Mounting Clips: This is the most critical inspection point. Carefully examine the back of the panel and ensure all the plastic clips and their mounting tabs are intact and free of cracks. A panel with broken clips will not install securely and will likely rattle.
- Inspect for Cracks: Look for hairline cracks, especially around the screw holes and the opening for the interior pull handle. Stress from use and removal can cause damage in these areas.
- Assess Cosmetic Condition: Note any deep scratches, scuffs, or discoloration. While minor scuffs are expected on a used part, deep gouges may be unacceptable depending on your standards.
- Verify the Color: The most common interior color is black. The OEM part number often ends in a color code, such as WK for black. Confirm the color of the used panel matches your vehicle's interior.
Cost Comparison for a 2017-2022 Sportage Trunk Trim Panel
| Part Type | Estimated Cost |
|---|---|
| New OEM | $20 - $150 (Varies by specific piece, upper vs main) |
| New Aftermarket | Not Commonly Available |
| Used OEM | $35 - $70 |
| Shop Labor | $50 - $100 |
Replacement Guide (Difficulty: 2/5)

Replacing the liftgate interior trim panel is a straightforward DIY job that typically takes less than an hour. The main challenge is removing the panel without breaking the delicate plastic clips.
Estimated Time: 30-45 minutes
Tools Needed:
- Plastic trim removal tool kit
- Phillips-head screwdriver
- Small flathead screwdriver or a ballpoint pen
Step-by-Step Instructions:
- Open the Liftgate: Start by opening the trunk fully.
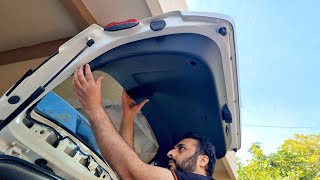
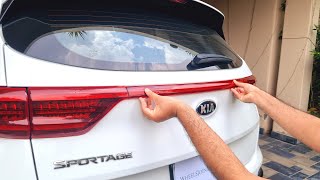
- Remove Upper and Side Trim: Use a plastic trim removal tool to gently pry off the smaller upper trim piece that sits against the window, followed by the two side trim pieces. They are held in by clips.
- Remove Screws and Retainers: Locate and remove the Phillips-head screws holding the main panel in place (typically four). There is also a plastic retainer clip near the bottom edge; the center pin may need to be carefully pried up with a small tool or even a ballpoint pen before the clip can be removed.
- Remove the Pull Handle: The interior pull handle has a small cover or tab. Pry this off with a trim tool or flathead screwdriver to reveal the handle, which can then be popped out.
- Detach the Main Panel: With all screws and retainers removed, start at one edge and use your trim tool to carefully pry the panel away from the liftgate. Work your way around, popping each clip. Pull the panel straight off.
- Inspect and Transfer: Before installing the new panel, inspect the clips on the old one. If any are broken, replace them. Transfer any necessary components, like the pull handle, to the new panel.
- Installation: Align the new panel with the holes in the liftgate and firmly press it into place, ensuring each clip engages with a 'pop'. Reinstall the screws, the retainer clip, the pull handle, and finally, the upper and side trim pieces.
Warning: Always use plastic trim removal tools. Using a metal screwdriver can easily scratch the plastic trim or chip the paint on the liftgate.
Frequently Asked Questions (FAQ)
My trunk panel is rattling. Do I need to replace the whole thing?
Not necessarily. The rattle is most likely caused by broken or loose clips. You can often fix this by removing the panel, replacing the damaged clips (which are inexpensive), and adding some felt or foam tape to the contact points on the back of the panel to dampen vibrations before reinstalling it.
Is the trunk trim panel the same for all 2017-2022 Sportage models?
For the most part, yes. The shape and fitment are generally the same across all trim levels (LX, EX, SX Turbo). However, there can be slight variations in color. Always verify compatibility by using your vehicle's VIN or matching the OEM part number, paying attention to the color code suffix (e.g., 81740-D9000WK for black).
What is the difference between the upper, side, and main trim panels?
The liftgate's interior is covered by a set of panels. The main, largest panel is what this guide focuses on. There are also smaller, separate trim pieces that run along the sides and top of the liftgate window. These must be removed first to access the main panel.
Can I repair a small crack in my trim panel?
Yes, for minor damage. Small cracks can often be repaired from the back side using a strong plastic epoxy or adhesive. This can reinforce the damaged area, but the crack will likely still be visible from the front. For best appearance and structural integrity, replacement is the recommended solution.
Helpful Videos

Technical Specifications
OEM Part Numbers: 81740-D9000WK 81740D9000
Material: Molded Plastic Color Code: WK (Black)
We Have This Part in Stock


The information in this article is provided for general reference and educational purposes only. Vehicle specifications, procedures, and part compatibility can vary by production date, trim level, and region. Always consult your vehicle's factory service manual and verify part numbers before purchasing or performing repairs. Safety-critical components such as airbags, seat belts, and braking systems should be installed by a qualified professional.
- KIA SPORTAGE:
- 🎬 Helpful Videos
- 🛍️ Shop This Part
- Symptoms of a Failing Trunk Trim Panel
- Known Issues, Recalls, and TSBs for 2017-2022 Kia Sportage
- Buying a Used 2017-2022 Sportage Trunk Trim Panel
- Inspection Checklist:
- Cost Comparison for a 2017-2022 Sportage Trunk Trim Panel
- Replacement Guide (Difficulty: 2/5)
- Step-by-Step Instructions:
- Frequently Asked Questions (FAQ)
- 🎟️ Get 5% Off