

1996-1997 Toyota RAV4 Tail Lamp: A Buyer's Guide to Compatibility and Common Failures
This guide covers the essential details for buying and replacing a tail lamp on a first-generation 1996-1997 Toyota RAV4, including how to spot common issues and avoid incompatible parts.
- Compatibility is critical: 1996-1997 RAV4 tail lamps are NOT interchangeable with the 1998-2000 facelift models, which use a different design.
- Water intrusion is the biggest enemy. When buying a used unit, inspect it carefully for any cracks, signs of moisture, or corrosion in the bulb sockets.
- Most failures are simple, such as burnt-out bulbs or cracks from minor impacts. There are no widespread factory defects or recalls for the OEM assemblies.
- Replacement is an easy DIY task that takes less than 20 minutes and requires only a screwdriver or 10mm socket.
Symptoms of a Failing Tail Lamp

Tail lamp failures on the 1996-1997 RAV4 are typically straightforward to diagnose. The issues usually stem from a few common causes. Here’s what to look for:
- Dim or Non-Functioning Bulbs: The most common issue is simply a burnt-out bulb. If one function (like the brake light) is out but the tail light works, it's often a dual-filament bulb that has partially failed. If all lights in the assembly are out, it could point to a wiring or fuse issue.
- Condensation or Water Inside the Lens: If you see fogging, moisture, or a "fish tank" of water inside the housing, the factory seal has failed. This is a serious problem, as the moisture will quickly corrode the bulb sockets and wiring, leading to intermittent or total failure.
- Cracked or Hazy Lens: Physical damage like cracks or chips will allow water to enter the housing. Over time, UV exposure can also cause the plastic lens to become cloudy or hazy, reducing light output and making your vehicle less visible to others.
- Flickering Lights: Lights that flicker, especially when driving over bumps, often indicate a loose bulb, a corroded socket, or a bad wiring connection. Corrosion increases electrical resistance and can cause intermittent function.
- Blown Fuses: If a tail light repeatedly blows a fuse, it's a sign of a short circuit within the housing or wiring, often caused by water intrusion.
Warning: A cracked or non-functional tail light is a safety hazard and can result in a traffic ticket. A broken lens that shows a white light instead of red can confuse other drivers and increases the risk of a collision.
Buying a Used 1996-1997 RAV4 Tail Lamp

Buying a used OEM tail lamp is an excellent way to save money while retaining factory quality and fit. However, it's important to inspect the part carefully. Here’s a detailed checklist:
Confirming Compatibility
This is the most critical step. The tail lamps for the 1996-1997 RAV4 are unique to those two model years.
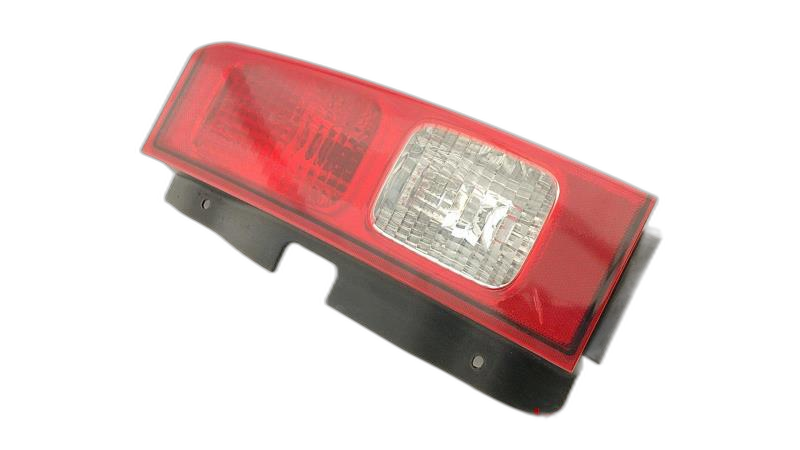
- 1996-1997 Style: Features a simple, rectangular design with distinct sections for the amber turn signal and red brake/tail lights.
- 1998-2000 Style: The facelifted 1998-2000 RAV4 uses a different tail lamp with circular lens patterns inside the housing. These are NOT interchangeable with the earlier models.
Pro Tip: Always compare a picture of the part you're buying to the existing lamp on your vehicle. The visual difference between the 1996-1997 and 1998-2000 lamps is obvious once you know what to look for.
Physical Inspection Checklist
- Check for Cracks: Carefully inspect the entire lens and housing for cracks, even hairline fractures. Pay special attention to the edges and mounting points. A cracked lens will leak.
- Look for Signs of Water Intrusion: Check inside the lens for a faint white residue, water lines, or mineral deposits. Examine the bulb sockets for any white or greenish corrosion. If you see any signs of corrosion, it's best to find a different unit.
- Inspect Mounting Points: Ensure all mounting tabs and bolt holes are intact and not cracked or broken. A lamp with broken tabs will not sit securely and will eventually fail.
- Examine the Seal: Look at the foam or rubber gasket that seals the lamp against the vehicle's body. It should be pliable and intact. A dried-out or crumbling gasket won't seal properly.
- Check the Wiring Harness: If the lamp includes the wiring pigtails, inspect them for any cuts, brittleness, or signs of previous repair. The connectors should be clean and free of corrosion.
Known Issues, Recalls, and Service Bulletins
For the 1996-1997 Toyota RAV4, there are no specific recalls or Technical Service Bulletins (TSBs) from Toyota related to the tail lamp assemblies themselves. Failures are almost always related to age, physical damage, or bulb burnout rather than a manufacturing defect.
One recall (NHTSA ID: 09E012000) was issued for certain aftermarket combination lamps that did not include the required amber side reflectors, but this applied to non-OEM parts made by Sabersport, not genuine Toyota parts.
Replacement Guide
Replacing a tail lamp on a 1996-1997 RAV4 is a very simple job that any DIYer can handle. The process for both sides is nearly identical.
- Difficulty: 1/5 (Beginner)
- Estimated Time: 15-20 minutes
- Tools Needed: Phillips head screwdriver or a 10mm socket/wrench.
Step-by-Step Instructions:
- Open the Rear Cargo Door: Access to the tail lamp fasteners is from inside the cargo area.
- Remove the Interior Access Panel: On the side of the cargo area, directly behind the tail lamp, there is a small plastic panel. Pry this open to expose the back of the tail lamp assembly.
- Disconnect the Wiring: Reach inside and twist each bulb socket about a quarter-turn counter-clockwise and pull it out of the housing. You can let them hang for now.
- Remove the Mounting Fasteners: The assembly is held in by a few screws or 10mm nuts. Remove these fasteners.
- Remove the Tail Lamp Assembly: The lamp is also held in by one or two plastic guide pins that pop into grommets in the body. Gently but firmly pull the assembly straight back, away from the vehicle. You may need to wiggle it a bit to get the pins to release.
- Install the New Assembly: Transfer the bulb sockets from your old lamp to the new one. Line up the guide pins and push the new assembly into place until it snaps in. Re-install the mounting fasteners from inside the cargo area, being careful not to over-tighten them.
- Test and Close Up: Before closing the access panel, have a helper confirm that the tail lights, brake lights, and turn signals all work correctly. Then, snap the interior panel back into place.
Cost Comparison
Prices for a single tail lamp assembly can vary. Labor at a repair shop is typically minimal, often around 0.5 hours.
| Part Type | Estimated Price Range (per side) |
|---|---|
| New OEM | $130 - $185 |
| New Aftermarket | $90 - $180 |
| Used OEM | $40 - $85 |
| Shop Labor | $50 - $100 |
Technical Specifications & Part Numbers

The primary bulbs used in the 1996-1997 RAV4 tail lamp assembly are standard types available at any auto parts store.
- Brake/Tail Light Bulb: Type 1157
- Turn Signal Bulb: Type 1156 or 1157 (confirm with your vehicle)
- Reverse Light Bulb: Type 1156
The following OEM part numbers are for the complete lens and housing assembly. Part numbers can supersede over time, but these are the known originals.
| Side | Part Number(s) |
|---|---|
| Right (Passenger) | 81550-42010, 81550-42011, 81550-42030 |
| Left (Driver) | 81560-42010, 81560-42030, 81561-42030 |
Frequently Asked Questions (FAQ)
Can I just replace the cracked outer lens?
No, the lens and the housing are manufactured as a single, sealed unit. If the lens is cracked, the entire tail lamp assembly must be replaced.
My lights are flickering. Is it the tail lamp or something else?
Flickering is most often caused by a poor connection. Before replacing the whole assembly, remove the bulb, check the socket for corrosion, clean it with a small wire brush if necessary, and apply a small amount of dielectric grease to the bulb's base before reinstalling it. If that doesn't work, the problem may be in the wiring harness.
Why are my tail lights not working but my brake lights are?
This is a classic symptom of a failed dual-filament bulb (like the 1157 type). The bulb has two separate filaments inside—one for the low-intensity tail light and one for the high-intensity brake light. One filament can burn out while the other still works. Simply replacing the bulb should fix the issue.
Is it okay to drill a drain hole in a water-filled tail light?
While some people drill a small hole at the bottom of the housing as a temporary fix to let water out, it is not a recommended long-term solution. The hole allows moisture and dust to enter freely, which will still lead to corrosion and bulb failure. The correct fix is to replace the compromised assembly.
Technical Specifications
OEM Part Numbers: 81550-42010 81550-42011 81550-42030 81560-42010 81560-42030 81561-42030
Bulb Types: 1157 (Brake/Tail), 1156 (Turn/Reverse)
We Have This Part in Stock


The information in this article is provided for general reference and educational purposes only. Vehicle specifications, procedures, and part compatibility can vary by production date, trim level, and region. Always consult your vehicle's factory service manual and verify part numbers before purchasing or performing repairs. Safety-critical components such as airbags, seat belts, and braking systems should be installed by a qualified professional.
- Toyota RAV4:
- 🛍️ Shop This Part
- Symptoms of a Failing Tail Lamp
- Buying a Used 1996-1997 RAV4 Tail Lamp
- Confirming Compatibility
- Physical Inspection Checklist
- Known Issues, Recalls, and Service Bulletins
- Replacement Guide
- Step-by-Step Instructions:
- Cost Comparison
- Technical Specifications & Part Numbers
- Frequently Asked Questions (FAQ)
- 🎟️ Get 5% Off