

2011-2012 Land Rover LR2 Tail Lamp: A Guide to Water Leaks, Failures, and Replacement
This guide details the common failure points, replacement steps, and how to choose the correct used tail lamp for your 2011-2012 Land Rover LR2.
- Compatibility is critical: This part only fits 2011-2012 Land Rover LR2 models and is NOT interchangeable with the 2013+ LED versions.
- Water leakage is the most common failure mode, leading to corrosion and bulb issues. Inspect any used part for signs of moisture.
- Replacement is very easy and DIY-friendly, requiring only a screwdriver and about 20 minutes.
- When buying used, ensure all mounting tabs are intact and the main connector is free of corrosion.
Symptoms of a Failing Tail Lamp

Tail lamp issues on the LR2 can range from simple bulb failures to more complex problems. Here’s what to look for:
- Dim or Non-Functioning Lights: The most obvious symptom is a bulb that won't light up. This could be a burned-out bulb, a bad fuse, or a problem with the bulb socket or wiring.
- "Bulb Out" Warning on Dash: Your vehicle's computer monitors the lighting system and will often display a warning message if it detects a failed bulb.
- Condensation or Water Inside the Lens: Seeing moisture, fog, or standing water inside the tail lamp is a clear sign that the housing's seal has failed. This is a common issue and can lead to corroded sockets, wiring, and frequent bulb failures.
- Cracked or Damaged Housing: Physical damage from a minor impact can break the lens or housing, allowing water to enter and compromising the lamp's function.
- Brake Lights or Turn Signals Work, but Tail Lights Don't: This often points to a dual-filament bulb where one filament has burned out, or a specific issue with the tail light circuit, such as a fuse or switch.
Warning: The 2011-2012 Land Rover LR2 uses a specific, non-LED tail lamp assembly. It is not interchangeable with the facelifted 2013 and newer models which feature a different design with LED technology. Attempting to fit a 2013+ lamp will not work.
Known Issues, TSBs, and Recalls
While no specific recalls or widespread Technical Service Bulletins (TSBs) target the 2011-2012 LR2 tail lamps directly, a common complaint among owners is water ingress. The seals on the lamp assembly can degrade over time, or develop leaks from minor impacts, allowing moisture to collect inside. This leads to corrosion on the bulb holders and electrical connectors, causing intermittent or total failure of the lights. Some owners resort to drilling a small drain hole in the bottom of the housing as a temporary fix, though replacing the faulty unit is the only permanent solution.
Buying a Used 2011-2012 LR2 Tail Lamp: What to Check

Purchasing a used OEM tail lamp is a cost-effective way to get a quality part. Here’s how to inspect a recycled unit:
- Confirm the Year Range: First and foremost, ensure the part is from a 2011-2012 LR2. It has a distinct 4-pocket, non-LED design. A lamp from a 2013+ model will not fit or function correctly.
- Inspect for Cracks: Carefully check the entire lens and housing, paying close attention to the mounting points. Hairline cracks, especially around the edges or screw holes, can compromise the seal and lead to future water leaks.
- Look for Signs of Water Intrusion: Check the inside of the lens for a hazy film, water stains, or mineral deposits. These are tell-tale signs that the lamp had a leak in its previous life. Avoid units with obvious moisture damage.
- Check the Mounting Tabs: Ensure all mounting tabs and guide pins are intact and not cracked or broken. These are essential for securing the lamp tightly to the vehicle's body.
- Examine the Electrical Connector: Look at the main electrical connector socket on the back of the housing. The pins should be clean and free of green or white corrosion.
- Ask About the Bulb Harness: Clarify if the used assembly includes the bulb holder harness and bulbs. Often they are sold separately. You may be able to reuse your old harness if it is in good condition.
Pro Tip: Choosing a used OEM lamp over a cheap aftermarket one is often a better value. Genuine Land Rover parts generally use higher-quality plastics and seals that are more resistant to fading and leaking than many aftermarket copies.
Replacement Guide (DIY)

Replacing the tail lamp on a 2011-2012 LR2 is a straightforward job that most DIYers can complete in under 30 minutes with basic tools.
- Difficulty: 1 out of 5
- Tools Needed: Phillips or Torx screwdriver (depending on model year)
- Estimated Time: 15-20 minutes
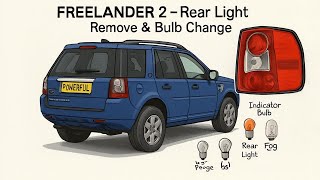
Step-by-Step Instructions: 🎬 Watch this step-by-step video on removing the rear light assembly
- Open the Rear Hatch: Access to the tail lamp fasteners is inside the trunk area.
- Remove Fasteners: Locate and remove the two screws holding the tail lamp assembly to the body of the vehicle.
- Pull the Assembly Rearward: Gently but firmly pull the tail lamp assembly straight back, away from the side of the vehicle. There are locating pins that hold it in place, so a steady pull is required to release them.
- Disconnect the Electrical Plug: With the assembly free, locate the main electrical connector on the back. Press the release tab and unplug it.
- Swap Components (if needed): If your new lamp did not come with the bulb harness, twist the harness to release it from the old housing and install it into the new one. Now is a great time to replace any old bulbs.
- Installation: Installation is the reverse of removal. Connect the electrical plug, line up the guide pins, press the assembly into place, and reinstall the two screws. Do not overtighten.
- Test All Functions: Before finishing, have a helper confirm that the tail light, brake light, and turn signal all function correctly.
Cost Comparison
| Part Type | Estimated Cost |
|---|---|
| New OEM (Dealer) | $400 - $570 |
| New Aftermarket | $150 - $260 |
| Used OEM (Recycled) | $150 - $300 |
| Shop Labor Cost | $50 - $100 |
Part Number Reference
These part numbers are for the 2011-2012 pre-facelift models. Always verify the part number and side (Left/Driver vs. Right/Passenger) before purchasing.
| Side | Part Number(s) |
|---|---|
| Right (Passenger) | LR022050, LR022051, LR023970, LR031757 |
| Left (Driver) | LR022053, LR022054, LR023971 |
Frequently Asked Questions (FAQ)
Why is there water inside my LR2 tail light?
Water gets inside the tail light when the seal between the lens and the housing fails, or if the housing itself has a crack. This is a common problem as the vehicle ages. The moisture can cause electrical shorts and corrosion.
Can I just replace the bulb, or do I need the whole assembly?
If your only problem is a burned-out bulb and the housing is not cracked or leaking, you can simply replace the bulb. The most common bulb type is a 7528 (P21/5W). However, if the housing is damaged or leaking water, it's best to replace the entire assembly to prevent ongoing electrical issues.
Will a tail light from a 2013 LR2 fit my 2012 model?
No. The 2013 Land Rover LR2 received a facelift which included new LED tail lamps. These have a different shape, mounting points, and electrical connectors, and are not compatible with 2011-2012 models.
Is the left tail light the same as the right one?
No, they are not interchangeable. The left (driver's side) and right (passenger's side) tail lamps are mirror images of each other and have unique part numbers.
Helpful Videos
Technical Specifications
OEM Part Numbers: LR003851 LR022010 LR022050 LR022051 LR022053 LR022054 LR023970 LR023971 LR031757
Bulb Type: 7528 (P21/5W) for Stop/Tail functions.
We Have This Part in Stock


The information in this article is provided for general reference and educational purposes only. Vehicle specifications, procedures, and part compatibility can vary by production date, trim level, and region. Always consult your vehicle's factory service manual and verify part numbers before purchasing or performing repairs. Safety-critical components such as airbags, seat belts, and braking systems should be installed by a qualified professional.
- Land Rover LR2: