

2005-2009 Hummer H2 Tail Lamp: Solving SUV vs. SUT Fitment Issues
This guide clarifies the critical differences between SUV and SUT tail lamps and shows you what to inspect on a used part before you buy.
- The most critical mistake is buying the wrong part; tail lamps for the H2 SUV and H2 SUT (truck) are NOT interchangeable.
- When buying a used lamp, inspect it carefully for cracks and signs of past water leaks, like fogging or mineral stains.
- Replacement is a very easy DIY job, requiring only a T30 Torx driver and about 20 minutes.
- The OEM assembly is a complete unit with the wiring harness and bulb sockets, making replacement a simple plug-and-play process.
Key Compatibility Warning: SUV vs. SUT Models

Warning: The single most important factor when purchasing a tail lamp for a 2005-2009 Hummer H2 is the body style. The tail lamps for the standard H2 SUV are different from those for the H2 SUT (Sport Utility Truck) and they are NOT interchangeable.
The tail lamps on the SUT models are physically taller than those on the SUV models. Attempting to install an SUV lamp on an SUT (or vice-versa) will not work without significant modification. Always verify the body style of your H2 before ordering a replacement part. Many aftermarket and used parts listings will specify 'SUV Models Only'.
Symptoms of a Failing Tail Lamp

A failing tail lamp can present several distinct symptoms. Identifying them correctly can help determine if you need a new bulb or a complete assembly.
- Water Inside the Housing: You may see condensation, fogging, or even standing water inside the lens. This indicates a failed seal or a crack in the housing, which can lead to corrosion and electrical shorts.
- Dim or Flickering Lights: Bulbs that are dim, flicker, or work intermittently often point to a bad connection, a failing bulb, or corrosion in the socket.
- One or More Functions Not Working: If the brake light works but the turn signal doesn't (or vice-versa), it could be a dual-filament bulb failure or an issue with the wiring harness or circuit board.
- Blown Fuses: If all tail light functions suddenly stop working, the first thing to check is the fuse. A recurring blown fuse often points to a short circuit within the tail lamp assembly caused by water intrusion.
- Visible Cracks or Damage: Physical damage from a minor impact can break the lens or housing, compromising the seal and allowing moisture to enter.
Buying a Used OEM Tail Lamp: What to Inspect

Purchasing a used OEM tail lamp is an excellent way to save money while retaining factory quality and fitment. However, a careful inspection is crucial to ensure you get a good part.
Inspection Checklist:
- Confirm Fitment: Double-check that the part is from an SUV or an SUT to match your vehicle. They are not the same.
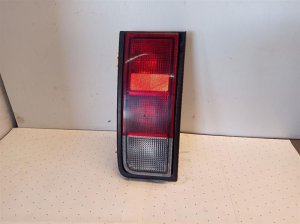
- Lens Inspection: Examine the plastic lens for any cracks, even hairline fractures. Pay close attention to the edges and corners. Also, look for 'crazing' (a network of fine cracks) or heavy fading from sun exposure, which can make the light less visible.
- Housing and Mounting Points: Turn the assembly over and inspect the black plastic housing. Look for cracks, especially around the mounting screw holes. Ensure all mounting tabs are intact and not broken off.
- Check for Water Intrusion: Look for a 'water line' or mineral deposits on the inside of the lens or in the reflective chrome areas. This is a clear sign the lamp had a leak. A foggy appearance also indicates moisture. A part with a history of leaks is likely to have corroded sockets and should be avoided.
- Wiring and Sockets: Inspect the wiring harness that comes with the assembly. Check that the main connector plug is clean, with no green or white corrosion on the pins. Ensure the bulb sockets are clean and free of rust or burn marks. The OEM assembly should include the harness and sockets, making it a plug-and-play replacement.
Known Issues, Recalls, and TSBs

As of mid-2024, there are no specific recalls or Technical Service Bulletins (TSBs) from GM or the NHTSA for the main body-mounted tail lamp assemblies on the 2005-2009 Hummer H2.
The most common owner-reported issue is water leaking into the assembly due to aging seals. While not specific to the tail lamps, the H2 is known for water leaks in various areas like the roof marker lights, which can sometimes be misdiagnosed. Additionally, the separate, smaller lights located in the lower bumper on 2005+ models are highly susceptible to socket corrosion from road spray, but this is a different part from the main tail lamp assembly.
Cost Comparison: New vs. Used H2 Tail Lamps
Prices can vary based on condition and supplier. This table provides an estimated range for a single tail lamp assembly.
| Part Type | Estimated Price Range |
|---|---|
| New OEM (Dealer) | $210 - $275 |
| New Aftermarket | $90 - $250 (Standard), $250 - $500+ (Custom/LED) |
| Used OEM (Recycled) | $100 - $175 |
Tail Lamp Replacement Guide (DIY)
Replacing the tail lamp on a 2005-2009 Hummer H2 is a straightforward job that most owners can do at home in under 30 minutes.
- Difficulty: 1 out of 5
- Time: 15-20 minutes per side
- Tools Needed: T30 Torx driver, plastic trim removal tool (optional, but recommended).
Step-by-Step Instructions:
- Open the Rear Hatch: Open the main rear cargo door (or tailgate) to gain access to the two screws on the inner side of the tail lamp.
- Remove the Screws: Using a T30 Torx driver, remove the two screws holding the tail lamp assembly in place. If you have the optional chrome tail light guards, these screws hold them on as well.
- Release the Lamp: This is the most important step. Do not simply pull the lamp straight back. It is held by clips on the outer edge. Gently pull the inner edge of the lamp away from the body, then slide the entire assembly inward, toward the center of the vehicle, to release it from the clips. Using a plastic pry tool can help, but be gentle to avoid scratching the paint.
- Disconnect the Bulbs: With the assembly free, twist each of the three bulb sockets about a quarter-turn counter-clockwise and pull them out of the housing.
- Install in New Assembly: Insert the bulb sockets into the new tail lamp housing and turn them clockwise to lock them into place.
- Reinstall the Lamp: Align the clips on the outer edge of the new lamp with the slots in the body, slide the lamp outward to engage them, and then press the assembly into place.
- Secure the Screws: Reinstall the two T30 Torx screws. Do not overtighten, as you could crack the plastic housing.
- Test All Functions: Before finishing, have a helper confirm that the tail lights, brake lights, and turn signals are all working correctly.
OEM Part Numbers
This list contains known OEM part numbers for the 2005-2009 Hummer H2 SUV. Note that part numbers can be superseded over time. Always verify fitment with the seller using your vehicle's VIN.
- 15193458 (Right/Passenger Side, SUV)
- 15193459 (Left/Driver Side, SUV)
- 10367731
- 10367732
- 25874014
- 25874015
- 25952325
Frequently Asked Questions (FAQ)
Will this tail lamp fit my H2 SUT (truck)?
No. The tail lamps for the H2 SUV and H2 SUT are different sizes and are not interchangeable. This guide and the associated part numbers are for the SUV model only.
Does the assembly come with new bulbs?
A new OEM or used OEM assembly typically includes the housing and wiring sockets, but not always new bulbs. It's a good practice to install new bulbs (standard type 3157) when replacing the assembly to ensure longevity.
What is the difference between the body-mounted and bumper-mounted lights?
For 2005 and newer models, the main tail lamp assembly is mounted high on the body corners. There is also a separate, smaller set of lights located in the rear bumper. These bumper lights are a completely different part and are known to have issues with socket corrosion.
My tail light has water inside. Do I need to replace the whole thing?
Yes, replacement is the best long-term solution. While you can drill a drain hole or try to reseal the lamp, water inside means the factory seal has failed. This will lead to chronic bulb failures, socket corrosion, and potential electrical shorts. A used, sealed OEM unit is a reliable and cost-effective fix.
My H2 has chrome guards over the tail lights. Does that change the installation?
No, it does not significantly change the process. The factory chrome guards are held in place by the same two T30 Torx screws that secure the tail lamp. You simply remove them along with the lamp and reinstall them with the new one.
Technical Specifications
OEM Part Numbers: 10367731 10367732 15100038 15113248 15113249 15172452 15193458 15193459 21998862 25822105 25874014 25874015 25952324 25952325
Bulb Type: 3157 (for brake, tail, and turn signal functions)
We Have This Part in Stock




The information in this article is provided for general reference and educational purposes only. Vehicle specifications, procedures, and part compatibility can vary by production date, trim level, and region. Always consult your vehicle's factory service manual and verify part numbers before purchasing or performing repairs. Safety-critical components such as airbags, seat belts, and braking systems should be installed by a qualified professional.
- Hummer H2:
- 🛍️ Shop This Part
- Key Compatibility Warning: SUV vs. SUT Models
- Symptoms of a Failing Tail Lamp
- Buying a Used OEM Tail Lamp: What to Inspect
- Inspection Checklist:
- Known Issues, Recalls, and TSBs
- Cost Comparison: New vs. Used H2 Tail Lamps
- Tail Lamp Replacement Guide (DIY)
- Step-by-Step Instructions:
- OEM Part Numbers
- Frequently Asked Questions (FAQ)
- 🎟️ Get 5% Off