

2006-2007 Mazda 5 Sun Visor: Your Guide to Fixing the Common Sag
This guide details the common causes of sun visor failure in the 2006-2007 Mazda 5, how to buy a quality used replacement, and how to install it in under 30 minutes.
- The most common failure is the visor sagging because the internal pivot wears out; tightening screws is only a temporary fix if it works at all.
- Replacement is extremely easy, requiring only a screwdriver and about 15 minutes, making it a perfect DIY repair.
- When buying a used visor, the most important check is to test the pivot's stiffness to ensure it will hold its position.
- The driver (left) and passenger (right) side visors are different parts; ensure you are buying the correct one for your needs.
Symptoms of a Failing Sun Visor

The sun visor on the 2006-2007 Mazda 5 is prone to a few common, easy-to-spot issues. The primary failure is almost always related to physical wear and tear on the pivot mechanism.
- Sagging or Drooping: The most frequent complaint is a visor that will not stay in its fully raised position. It may sag slightly or drop down completely, obstructing the driver's view. This is caused by wear inside the pivot joint, where friction components lose their ability to hold the visor's weight.
- Loose at the Pivot: The visor may feel floppy or loose when you move it. While it might still hold its position, there will be excessive play at the mounting point. In some cases, tightening the mounting screws can help, but often the internal mechanism is the problem.
- Cracked Mirror or Broken Cover: The vanity mirror can crack from impact, and the small plastic hinge on the mirror cover can become brittle and break over time.
- Vanity Light Failure: The light may flicker or fail to turn on when the mirror cover is opened. This can be due to a burnt-out bulb, a faulty switch in the mirror assembly, or a problem with the electrical connector where the visor plugs into the headliner.
Known Issues, TSBs, and Recalls
As of this writing, there are no official recalls or Technical Service Bulletins (TSBs) from Mazda or the National Highway Traffic Safety Administration (NHTSA) specifically for sun visor failure on the 2006-2007 Mazda 5. While sagging visors are a common annoyance, they have not been deemed a widespread safety defect requiring a recall for this model year. The failures are typically due to normal wear and tear over time.
Pro Tip: Before replacing the entire visor for a light that won't turn on, check the bulb first. If the bulb is good, use a multimeter to check for power at the electrical connector in the headliner to rule out a vehicle wiring issue.
Buying a Used 2006-2007 Mazda 5 Sun Visor

A used OEM sun visor is an excellent, cost-effective alternative to an expensive new part. Because aftermarket support for this specific part is limited, a quality used visor is often the best choice. Here’s what to look for.
How to Verify Compatibility
- Part Numbers: The driver (left) and passenger (right) side visors have different part numbers and are not interchangeable. Part numbers for the 2006-2007 Mazda 5 are typically in the format CC33-69-320... for the left side and CC33-69-270... for the right side.
- Color Matching: Most Mazda 5 models from this generation came with a gray interior. To be certain, locate your vehicle's identification sticker in the driver's side door jamb. The sticker will list an interior trim code. Providing this code to the seller can help guarantee a perfect color match.
- Features: Ensure the replacement visor has the same features as your original, specifically the lighted vanity mirror. The visors were standard across trim levels and fit models with or without a sunroof.
What to Inspect Before Buying
When inspecting a used sun visor, perform these critical checks:
- Test the Pivot Stiffness: This is the most important test. Hold the mounting base and try to pivot the visor. It should move smoothly but with significant resistance. It should hold firmly at any angle without any sign of drooping. If it feels loose or floppy, it will fail soon.
- Check the Vanity Mirror and Light: Open and close the mirror cover several times. The hinge should feel secure, not loose. If possible, ask the seller to test the vanity light to confirm it works.
- Inspect the Fabric/Vinyl: Check for stains, tears, or peeling on the vinyl covering. Also, look for cracks in the plastic body of the visor, especially around the mounting points.
- Examine the Mounting Points: Look at the plastic base where the screws go. Ensure it is not cracked or stripped, which could prevent a secure installation.
Sun Visor Replacement Guide (DIY)

Replacing the sun visor on a 2006-2007 Mazda 5 is a very simple DIY job that requires only basic tools and about 15 minutes of your time.
Tools Needed:
- Phillips head screwdriver
- Small flathead screwdriver or plastic trim removal tool
Step-by-Step Instructions:
- Pry Open the Screw Cover: Position the sun visor so you can see the base where it mounts to the headliner. You will see a small plastic cover. Use a small flathead screwdriver or a trim tool to gently pry this cover open. It is hinged and will swing out of the way, revealing two screws.
- Remove the Mounting Screws: While holding the sun visor to prevent it from falling, use a Phillips head screwdriver to remove the two mounting screws.
- Disconnect the Electrical Connector: Gently pull the visor down from the headliner. You will see a small electrical wire leading to a connector. Depress the tab on the connector and pull it apart to disconnect the power for the vanity light. The old visor is now free.
- Connect the New Visor: Plug the electrical connector from the new visor into the vehicle's harness. You should hear a click.
- Install the New Visor: Align the new visor with the mounting holes in the headliner. Start both screws by hand to avoid cross-threading, then tighten them snugly with the screwdriver. Do not overtighten, as this can crack the plastic base.
- Close the Cover: Snap the plastic screw cover shut. Test the visor's movement and check that the vanity light works correctly.
Cost of Replacement
The cost to replace a sun visor can vary significantly depending on the source of the part and whether you do the work yourself.
| Part Source / Service | Estimated Cost |
|---|---|
| New OEM (Dealer) | $85 - $110 |
| New Aftermarket | $40 - $75 |
| Used OEM (Salvage) | $30 - $60 |
| Shop Labor Cost | $30 - $60 |
Frequently Asked Questions (FAQ)
My visor is just a little loose. Can I tighten it?
Sometimes, the two mounting screws that hold the visor to the roof can become loose. Before buying a new part, try popping the cover open and tightening these screws. If that doesn't fix the sag, the internal pivot mechanism is worn out, and the visor needs to be replaced.
Is the driver's side visor the same as the passenger's side?
No. The driver's side (left) and passenger's side (right) visors are mirror images of each other and have different part numbers. They are not interchangeable.
How can I be sure I'm buying the right color visor?
The vast majority of 2006-2007 Mazda 5s have a gray interior. However, to be 100% certain, check the manufacturer's sticker located on the driver's side door jamb. It will list an "Interior Trim" code that you can use to verify the exact shade.
Will a sun visor from a newer Mazda 5 (2008-2015) fit my car?
While some parts for the first-generation Mazda 5 overlap into later years, there may be slight differences in color, texture, or mounting. For example, part number CC43-69-270D-75 is listed for 2008-2015 models. It is always best to source a visor specifically listed for the 2006-2007 model years to ensure a perfect fit and match.
Technical Specifications
OEM Part Numbers: CC33-69-270B-75 (Right/Passenger, Gray) CC43-69-270C-77 (Right/Passenger, Gray) CC43-69-270D-75 (Right/Passenger, Gray) CC33-69-320B-75 (Left/Driver, Gray - unverified, but follows pattern) CC43-69-320D-77 (Left/Driver, Gray - unverified, but follows pattern)
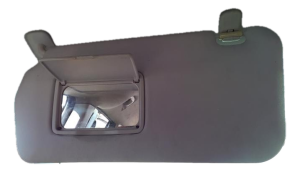
Finish: Gray Vinyl. Features: Integrated lighted vanity mirror. Connection: Single electrical plug.
We Have This Part in Stock

The information in this article is provided for general reference and educational purposes only. Vehicle specifications, procedures, and part compatibility can vary by production date, trim level, and region. Always consult your vehicle's factory service manual and verify part numbers before purchasing or performing repairs. Safety-critical components such as airbags, seat belts, and braking systems should be installed by a qualified professional.
- Mazda 5:
- 🛍️ Shop This Part
- Symptoms of a Failing Sun Visor
- Known Issues, TSBs, and Recalls
- Buying a Used 2006-2007 Mazda 5 Sun Visor
- How to Verify Compatibility
- What to Inspect Before Buying
- Sun Visor Replacement Guide (DIY)
- Tools Needed:
- Step-by-Step Instructions:
- Cost of Replacement
- Frequently Asked Questions (FAQ)
- 🎟️ Get 5% Off