

2010-2013 Range Rover Sport Sun Visor: Fixing Droop, Lights & Color Matching
A complete guide to diagnosing a sagging sun visor, fixing vanity light issues, and finding the correct replacement for your L320-chassis Range Rover Sport.
- This sun visor only fits the 2010-2013 Range Rover Sport (L320). It does not fit 2014+ models or the full-size Range Rover.
- Drooping is the most common failure due to internal pivot wear and requires replacement of the entire unit.
- You must verify your interior color (e.g., Ivory, Ebony) using the code on the driver's door jamb sticker before buying a replacement.
- Replacement is a very simple DIY job that takes less than 30 minutes and only requires a Torx driver.
Symptoms of a Failing Sun Visor
When a sun visor on a 2010-2013 Range Rover Sport begins to fail, the symptoms are usually obvious and can become a daily annoyance or even a safety hazard. Failures are typically due to mechanical wear and tear from frequent use and exposure to interior heat.
Drooping or Sagging
The most common problem is a drooping sun visor that will not stay in its upright position against the headliner. The internal pivot mechanism, which provides friction to hold the visor in place, wears out over time. This can cause the visor to sag slightly, or in more severe cases, swing down and obstruct the driver's vision, especially when turning or driving with the windows down. This issue is not repairable; the entire sun visor assembly must be replaced.
🎬 Watch: Range Rover Sport sun visor and panel removal guideVanity Mirror Light Failure
The lights for the vanity mirror may flicker or stop working entirely. This can be caused by a burnt-out bulb, a faulty switch inside the mirror cover's hinge, or a problem with the wiring that runs through the visor's pivot point. If the lights on both visors and other interior lights fail simultaneously, the problem could be a blown fuse, possibly fuse #31 in the passenger compartment fuse box.
Broken Mirror, Cover, or Retaining Clip
The vanity mirror itself can crack from impact, or the plastic cover and its hinge can become brittle and break. A broken cover might prevent the light from turning off, leading to a drained battery. Additionally, the outboard plastic clip that holds the end of the visor can break, leaving the visor unsecured on one side.
Buying a Used Sun Visor: A Buyer's Guide
Due to the high cost of new OEM parts and the lack of quality aftermarket alternatives, a used OEM sun visor is often the best choice for this repair. It ensures a perfect match in color, material, and electrical function. Here’s what to look for.
CRITICAL: Verifying Compatibility
Fitment for these visors is extremely specific. Ordering the wrong part will result in a mismatch with your interior. Before purchasing, you must verify the following:
- Model & Year: These visors are specifically for the 2010-2013 Range Rover Sport (L320 chassis). They will NOT fit the 2014+ Range Rover Sport (L494) or the full-size Range Rover (L322).
- Side: The driver's (Left) and passenger's (Right) side visors are different and not interchangeable.
- Color: The most common interior colors were Ivory and Ebony (black). To find your vehicle's exact interior color, check the VIN sticker on the driver's side door jamb. This sticker contains a trim code that specifies the color.
- Features: Almost all Range Rover Sports of this era came with illuminated vanity mirrors. Ensure the replacement visor has the electrical connector if your original one does.
Pro Tip: When in doubt, provide the seller with your vehicle's VIN. They can often use it to confirm exact compatibility for color and features.
Physical Inspection Checklist
When inspecting a used sun visor, either in person or through photos, check these key areas:
- Pivot Stiffness: Ask the seller to confirm that the main pivot is stiff and holds its position. It should not feel loose or floppy. This is the primary reason for replacement, so it's the most important check.
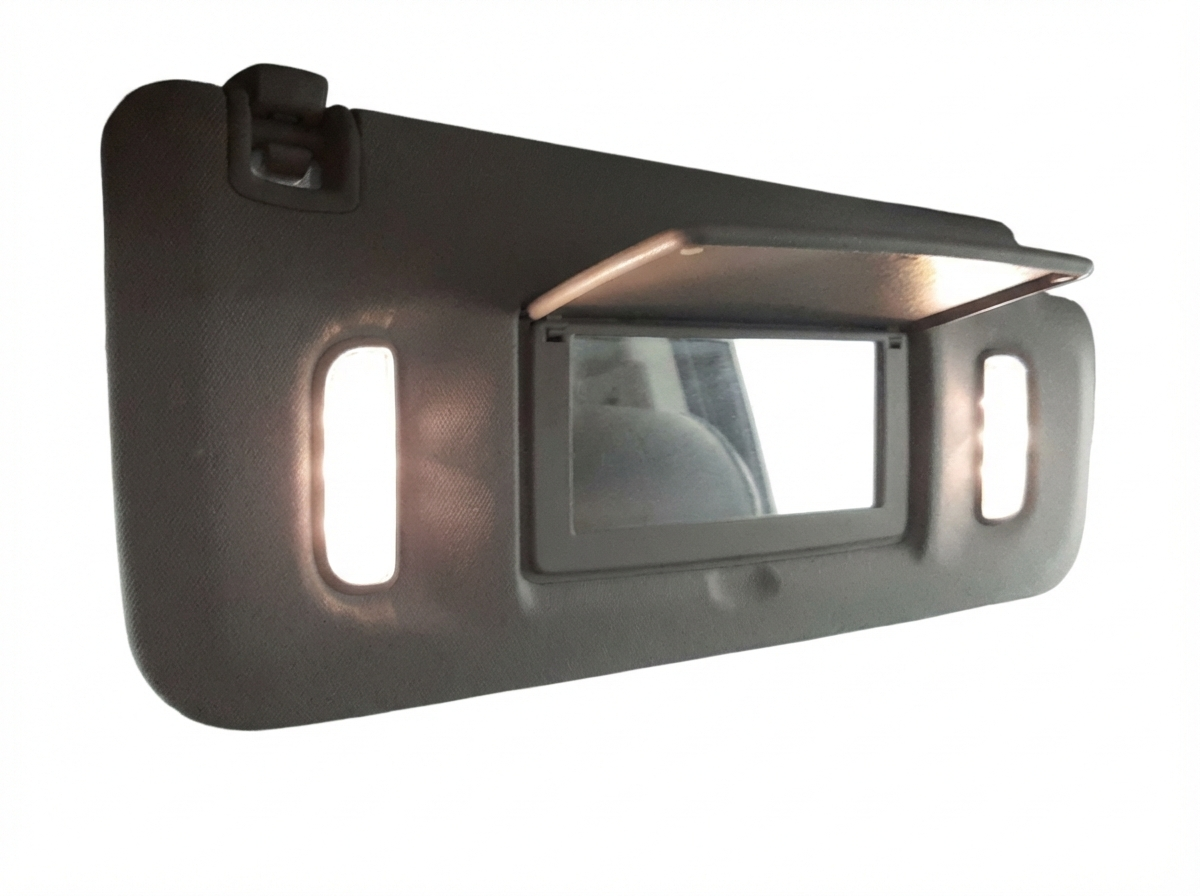
- Vanity Mirror Hinge: Open and close the mirror cover. It should move smoothly and the hinge should be free of cracks. This hinge often contains the switch for the light.
- Fabric Condition: Look for any stains, tears, or signs of the fabric separating from the board underneath.
- Electrical Connector: Ensure the plastic connector and the wires leading to it are undamaged.
Replacement Guide
Replacing the sun visor is a simple DIY task that can be completed in about 15-20 minutes with basic tools.
Tools Needed:
- Torx Driver (typically a T20 or T25)
- Small flathead screwdriver or trim removal tool
Step-by-Step Instructions: 🎬 Watch: Step-by-step L320 sun visor removal video
- Expose the Screws: Swing the sun visor down. At the base where it pivots against the headliner, there is a small plastic cover. Use a trim tool or flathead screwdriver to carefully pry this cover off.
- Disconnect Wiring: Once the cover is off, you will see the electrical connector. Press the small tab on the connector to release it and unplug the wiring harness.
- Remove the Visor: Use your Torx driver to remove the screws holding the visor's mounting bracket to the roof. Support the visor as you remove the last screw.
- Install the New Visor: Position the new visor, plug in the electrical connector, and secure it with the Torx screws. Do not overtighten.
- Test and Finish: Before snapping the plastic cover back on, test the vanity light to ensure it works. Once confirmed, snap the cover back into place.
Cost Comparison
The cost of replacing a Range Rover Sport sun visor can vary significantly depending on the source of the part.
| Part Source | Estimated Cost |
|---|---|
| New OEM | $260 - $400 |
| New Aftermarket | Generally not available; universal options will not match. |
| Used OEM | $75 - $150 |
| Shop Labor | $50 - $100 |
Known Issues, TSBs, and Recalls
There are no active recalls from the NHTSA specifically for sun visor failure on the 2010-2013 Range Rover Sport. However, Land Rover did issue Technical Service Bulletin LTB00665NAS1 in June 2014, which introduced a service kit for replacing just the vanity mirror assembly (part numbers LR063681 for Ivory, LR063682 for Ebony) instead of the entire visor. This repair involves cutting wires and crimping new connectors, and may be more complex than simply swapping the whole unit.
Frequently Asked Questions (FAQ)
Why is my Range Rover Sport sun visor drooping?
A drooping sun visor is caused by wear and tear in the internal friction mechanism at the pivot point. It can no longer hold the weight of the visor. The only solution is to replace the entire sun visor assembly.
How do I find my interior color code to get a matching sun visor?
The interior trim code is printed on the vehicle information sticker, which is typically located on the driver's side door jamb. This code will identify your specific interior color, such as Ivory (often code 'NUG') or Ebony (black, code 'PVA').
Can I just replace the bulb in the vanity mirror? 🎬 See how to upgrade your interior lights to LEDs
While the bulb itself can be replaced (often a T5 type bulb), accessing it can be difficult. Sometimes the issue is the switch in the mirror lid, not the bulb. Given the risk of shorting a fuse during replacement, and the availability of complete used units, most owners choose to replace the entire visor if the light fails.
Is the driver's side sun visor the same as the passenger's side?
No, they are not interchangeable. They are mirrored parts and have different part numbers for the left (driver) and right (passenger) sides.
Helpful Videos
Technical Specifications
OEM Part Numbers: AH3204100BA LR014657 LR014661 LR014667 LR030689 LR040209 LR063681 LR063682
Features illuminated vanity mirror. Common colors include Ivory and Ebony. Attaches with Torx screws.
We Have This Part in Stock





The information in this article is provided for general reference and educational purposes only. Vehicle specifications, procedures, and part compatibility can vary by production date, trim level, and region. Always consult your vehicle's factory service manual and verify part numbers before purchasing or performing repairs. Safety-critical components such as airbags, seat belts, and braking systems should be installed by a qualified professional.
- Land Rover Range Rover Sport:
- 🎬 Helpful Videos
- 🛍️ Shop This Part
- Symptoms of a Failing Sun Visor
- Drooping or Sagging
- Vanity Mirror Light Failure
- Broken Mirror, Cover, or Retaining Clip
- Buying a Used Sun Visor: A Buyer's Guide
- CRITICAL: Verifying Compatibility
- Physical Inspection Checklist
- Replacement Guide
- Cost Comparison
- Known Issues, TSBs, and Recalls
- Frequently Asked Questions (FAQ)
- 🎟️ Get 5% Off