

2017-2020 Maserati Levante Seat Trim Panel: Broken Clips, Replacement, and Wiring Recall Guide
Your complete guide to diagnosing a loose front seat side panel, finding a quality used replacement, and understanding the related wiring harness recall.
- The most common failure is broken mounting clips, often caused by stress from sliding out of the seat.
- A major safety recall (NHTSA #342) for seat wiring requires removal of this panel, so inspect used parts carefully for damage from prior service.
- When buying used, verifying all mounting points are intact is more important than cosmetic condition.
- Replacement is DIY-possible, but accessing the bottom screws is difficult and may require a ratcheting screwdriver.
Known Issues: NHTSA Safety Recall 342
Important: A significant safety recall impacts the front seats of the 2017 Maserati Levante. NHTSA Recall #342 (Maserati Recall 342) was issued for an improperly routed seat wiring harness. This harness can rub against the metal seat frame during normal seat adjustments. Over time, this can cause the power seat controls to stop working and, in rare cases, create an electrical short with a risk of fire.
The official remedy involves inspecting the harness, re-routing it with new fasteners, and applying protective tape. Crucially, this repair procedure requires a technician to remove the outer seat trim panel to gain access. This means a large number of vehicles have had these panels removed and reinstalled, increasing the likelihood of finding used panels with stressed or broken mounting clips from the service.
Symptoms of Failure
The most common failure of the Levante's seat trim panel is physical damage, not electronic failure. The issues are almost always noticeable by sight or touch.
Loose, Rattling, or Detached Panel
This is the number one symptom. The panel may feel loose, rattle over bumps, or completely detach from the side of the seat. This is typically caused by broken mounting clips or screw bosses on the panel itself. The primary cause is repeated stress from the driver or passenger sliding out of the seat and putting weight on the panel's edge. Over time, the plastic mounting points fatigue and snap.
Inoperative Seat Adjustment Switches
While the switches themselves are generally reliable, if the panel becomes extremely loose or detached, it can pull on the wiring harness connected to the switches. This can strain the wires or connectors, leading to intermittent or complete failure of the seat adjustment controls. This is a less common symptom but can occur if a loose panel is ignored.
Buying a Used Seat Trim Panel
A used OEM panel is an excellent, cost-effective solution for a broken one, but careful inspection is key. Given the high cost of a new panel from Maserati, a quality recycled part offers significant value.
1. Inspect All Mounting Points
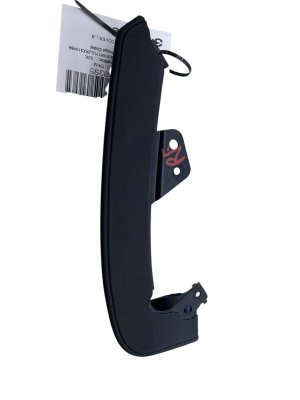
This is the most critical step. Ask for clear, high-resolution photos of both the front and, most importantly, the back of the panel. Look for:
- Main Mounting Clips: Check that all plastic clips and tabs that push into the seat frame are present and not broken.
- Screw Bosses: There are typically Phillips head screws that secure the panel from underneath. Ensure the plastic loops or bosses where these screws go are intact and not cracked or broken off.
- Stress Marks: Look for thin white lines in the plastic around the mounting points. This indicates the plastic has been bent or stressed and is likely to break soon.
Pro Tip: Remember that many of these panels have been removed for the NHTSA wiring harness recall. Be extra diligent when checking for damage that may have occurred during a previous repair.
2. Verify Switch Compatibility
Maserati may use the same basic panel shape for seats with different options. Before you buy, confirm the panel is for a seat with your exact features (e.g., memory seats, specific adjustment controls). While you will likely transfer your existing switches to the new panel, the cutouts must match. Some models may have blanking plates where switches are not present.
3. Match Color and Finish
Ensure the color (e.g., black, tan) and texture of the plastic match your vehicle's interior. While most are a standard black, variations can exist. Compare the seller's photos to your existing panel in good lighting.
Replacement Overview
Replacing the seat trim panel is a feasible DIY project for someone with patience and the right tools. The main challenge is accessing the screws underneath the panel without completely removing the seat from the vehicle.
Installation Difficulty: 3 out of 5
Estimated Time: 1 - 1.5 hours
Required Tools:
- Phillips Head Screwdriver (a short, stubby, or ratcheting one is highly recommended for access)
- T6 Torx Driver (for transferring the switch pack to the new panel)
- Plastic Trim Removal Tools
- Flashlight and/or a small mirror
Step-by-Step Process:
- Raise the Seat: Use the power seat controls to move the seat to its highest and most forward position. This creates the maximum possible space to work underneath.
- Disconnect Battery (Recommended): To avoid setting airbag or seat position error codes, it's wise to disconnect the negative battery terminal. If you choose not to, be aware that disconnecting the seat switches may trigger a fault code that needs to be cleared with a compatible scan tool.
- Remove Screws: Locate and remove the Phillips head screws that secure the bottom of the panel to the seat frame. This is often the most difficult step due to tight access.
- Unclip the Panel: Gently pry the panel away from the seat frame using plastic trim tools. It is held in by several push-in clips.
- Disconnect Switches: Once the panel is loose, carefully reach behind it and disconnect the electrical connectors for the seat adjustment switch module.
- Transfer Switches: Place the old panel on a workbench. Using a T6 Torx driver, remove the screws holding the switch module in place and transfer it to the new trim panel.
- Installation: Installation is the reverse of removal. Connect the switches, align the clips and press the panel firmly into place, and then reinstall the difficult-to-reach bottom screws.
- Reconnect and Test: Reconnect the battery if you disconnected it. Test all functions of the power seat. Clear any stored fault codes if necessary.
Cost Comparison
| Part/Service | Estimated Cost |
|---|---|
| New OEM Panel | $250 - $400+ (dealer price) |
| Used OEM Panel | $40 - $120 |
| Shop Labor | $150 - $250 (1-1.5 hours) |
Frequently Asked Questions (FAQ)
Is the driver's side panel the same as the passenger's side?
No, they are not interchangeable. They are mirror images of each other and have different part numbers. The driver's side panel also typically has more complex switch cutouts for memory functions.
My panel is loose. Do I need to replace the whole thing?
Not always. First, check if it has simply popped off its clips. If you can snap it back into place and it feels secure, you may be fine. However, if it continues to come loose, it's almost certain that the mounting points on the panel itself are broken, and the panel will need to be replaced for a secure fit.
Can I just glue the broken clips back on?
This is generally not recommended. There is very little surface area for an adhesive to bond to, and the stress of daily use will likely cause the repair to fail quickly. Replacing the panel with an undamaged used part is a much more reliable and long-lasting solution.
Does the NHTSA Recall 342 replace my seat trim panel?
No. The recall is to fix a wiring harness issue. The dealer will remove and reinstall your existing panel as part of the service. If the technician breaks your panel during the recall service, the dealership should replace it, but the recall itself does not include a new panel.
Technical Specifications
OEM Part Numbers: 670042322
Material: Molded ABS Plastic. Houses seat control switches.
We Have This Part in Stock

The information in this article is provided for general reference and educational purposes only. Vehicle specifications, procedures, and part compatibility can vary by production date, trim level, and region. Always consult your vehicle's factory service manual and verify part numbers before purchasing or performing repairs. Safety-critical components such as airbags, seat belts, and braking systems should be installed by a qualified professional.
- Maserati Levante:
- 🛍️ Shop This Part
- Known Issues: NHTSA Safety Recall 342
- Symptoms of Failure
- Loose, Rattling, or Detached Panel
- Inoperative Seat Adjustment Switches
- Buying a Used Seat Trim Panel
- 1. Inspect All Mounting Points
- 2. Verify Switch Compatibility
- 3. Match Color and Finish
- Replacement Overview
- Required Tools:
- Step-by-Step Process:
- Cost Comparison
- Frequently Asked Questions (FAQ)
- 🎟️ Get 5% Off