

2003-2005 Honda Pilot Radio Bezel: Fixing Scratches, Peeling, and Broken Vents
Your complete guide to diagnosing and replacing the worn, peeling, or damaged center dash trim on your first-generation Honda Pilot.
- This bezel is ONLY for 2003-2005 Pilot models WITHOUT the factory navigation system; the parts are not interchangeable.
- The most common failures are cosmetic, such as peeling paint, and structural, like broken mounting clips on the back which cause rattles.
- When buying a used part, the most important thing to check is the condition of the mounting clips on the back.
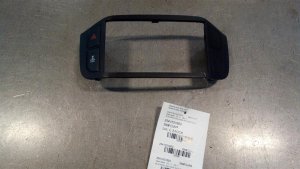
- Replacement is a simple DIY job requiring only a trim tool and a screwdriver; you must transfer the vents, clock, and switches from your old bezel.
Symptoms of a Failing Radio Bezel
Failure of the radio bezel is almost always cosmetic or structural. Because it's a high-touch area and constantly exposed to sunlight, wear and tear is common. Here are the most frequent signs that it's time for a replacement:
- Peeling or Flaking Finish: The most common issue is the 'graphite black' or silver painted finish flaking off, especially around the climate control knobs and radio buttons. This exposes the lighter-colored plastic underneath and can feel sticky or rough to the touch.
- Scratches and Gouges: Deep scratches from keys, tools, or general use can mar the surface, making the interior look worn out.
- Broken or Loose Air Vents: The plastic louvers of the integrated air vents can become brittle and break, or the entire vent assembly can become loose within its housing.
- Cracked Plastic: Over time, the plastic can become brittle and develop stress cracks, often originating from the corners of the radio or vent openings.
- Rattling Noises: If the bezel is loose, it will rattle and buzz as you drive. This is almost always caused by broken mounting clips on the back of the panel, which are essential for a snug fit.
Compatibility Warning: This radio bezel is for 2003-2005 Honda Pilot models WITHOUT the factory navigation system. Models equipped with the optional navigation screen have a completely different dashboard layout and use a different bezel. Always verify your vehicle's configuration before ordering.
Buying a Used 2003-2005 Pilot Radio Bezel
Given that new OEM bezels can be expensive or discontinued, a high-quality used OEM part is often the best value. However, you need to inspect it carefully. Here’s what to look for:
- Check All Mounting Clips: This is the most critical inspection point. Turn the bezel over and inspect the back. There should be a series of plastic tabs and slots for metal clips around the perimeter. If these are cracked or broken, the bezel will not sit flush against the dash and will inevitably rattle. Ask the seller for clear photos of the back of the part.
- Examine the Finish Quality: Look closely at photos for peeling paint, especially around the circular cutouts for the climate controls. Minor scuffs may be acceptable, but widespread flaking means the part will likely continue to degrade.
- Inspect the Air Vents: Make sure the vent louvers are all present and move together smoothly. Check for any cracks in the vent housing itself.
- Verify Included Components: Most used bezels are sold as the bare panel. The air vents, clock, hazard switch, and any other buttons must be transferred from your old bezel. Confirm with the seller exactly what is included. Sometimes they are sold with the switches still attached.
- Why Used OEM is a Smart Choice: For a trim piece like this, original equipment (OEM) quality matters. A used OEM bezel will have the exact color, texture, and fit as the original. Aftermarket bezels, which are typically just installation kits for aftermarket stereos, are often made from cheaper, more brittle plastic and may not match the color and sheen of your other interior panels perfectly, leading to a less professional-looking repair.
Known Issues, Recalls, and TSBs
While there are no recalls or Technical Service Bulletins (TSBs) specifically for the radio bezel, several significant safety recalls affect the 2003-2005 Honda Pilot. If you are working on the dashboard, it's a good time to be aware of these issues and check if your vehicle has had the required repairs.
- Ignition Switch Interlock Defect: A recall was issued for 2003-2004 Pilot models where a faulty ignition switch could allow the key to be removed when the transmission is not in Park. This could lead to the vehicle rolling away. The fix involves installing an updated shift interlock lever.
- Takata Airbag Inflator Recall: Like millions of other vehicles, the 2003-2005 Pilot was included in the massive Takata airbag recall. This involves replacing the passenger-side frontal airbag inflator, which can rupture during deployment.
- VSA System Unexpected Activation: Certain 2005 Pilot models were recalled because a defect in the Vehicle Stability Assist (VSA) module could cause the brakes to apply unexpectedly without driver input, increasing the risk of a crash.
You can check if your specific vehicle is affected by these recalls by entering your VIN on the NHTSA website.
Replacement Cost Comparison
The cost can vary significantly depending on the source of the part. Labor for this job is minimal if you do it yourself.
| Part Source | Estimated Cost |
|---|---|
| New OEM | $150 - $220 (if available) |
| New Aftermarket | $20 - $40 (Typically install kits, not direct replacements) |
| Used OEM | $30 - $80 |
| Shop Labor | $75 - $150 |
Installation Guide
Replacing the radio bezel is a straightforward job suitable for a DIYer with basic tools. The entire process should take less than an hour.
Difficulty: 2 out of 5
Tools Required:
- Plastic trim removal tool (highly recommended to avoid scratching panels)
- Phillips head screwdriver
Step-by-Step Replacement
- Prepare the Vehicle: It's good practice to disconnect the negative battery terminal to prevent any electrical shorts while working with connectors.
- Pry the Bezel Loose: Using a plastic trim removal tool, carefully pry around the outer edges of the radio bezel. It is held in place by several metal clips. Start from the bottom and work your way up the sides.
- Disconnect Electrical Components: Once the bezel is loose, don't pull it away completely. Reach behind it and disconnect the electrical connectors for the hazard switch and the digital clock. These connectors have small tabs that you press to release them.
- Remove the Bezel: With the connectors unplugged, you can now fully remove the bezel from the dashboard.
- Transfer Components: Place the old bezel on a soft surface. You will need to transfer the air vents, clock, and hazard switch to the new bezel. They are typically held in by small Phillips head screws or plastic clips. Be gentle, as the plastic can be brittle.
- Install the New Bezel: Connect the clock and hazard switch to their respective connectors on the new bezel. Align the bezel with the opening in the dashboard and line up the metal clips with their slots.
- Secure the Bezel: Press firmly and evenly around the perimeter of the bezel until you hear and feel the clips snap into place. Ensure it is seated flush with no gaps.
- Final Check: Reconnect the battery if you disconnected it. Turn the key to test the clock, hazard lights, and radio to ensure everything is working correctly.
Pro Tip: When buying a used bezel, the finish may be dull. Before installing, clean it thoroughly with an interior-safe cleaner and apply a quality UV-protectant dressing. This will restore some of the sheen and help protect it from future sun damage.
Frequently Asked Questions (FAQ)
Will this bezel fit my 2005 Pilot that has the factory navigation screen?
No, it will not. The radio bezel for models with the factory navigation system is a different shape and has different cutouts to accommodate the screen and relocated radio controls. You must source a part specifically for the navigation-equipped model.
Do I need special tools to replace the radio bezel?
A Phillips head screwdriver is required. While you can use a flathead screwdriver to pry the panel off, it is highly recommended to use a set of plastic trim removal tools. They are inexpensive and significantly reduce the risk of scratching or cracking the bezel and surrounding dashboard panels.
Does the replacement bezel come with the air vents and hazard button?
Typically, no. Whether you buy a new or used bezel, it is usually just the bare panel. You will need to carefully remove the air vents, digital clock, and hazard switch from your old bezel and install them onto the new one.
My bezel isn't broken, but the paint is peeling. Are there other repair options?
Yes. If the underlying plastic is in good shape, you have a few options. You can buy decal kits to cover peeling buttons. Alternatively, you can purchase adhesive-backed vinyl wrap kits in various finishes like carbon fiber or brushed aluminum to apply over the entire bezel for a custom look. This is a more affordable option than full replacement if the damage is purely cosmetic.
Technical Specifications
OEM Part Numbers: 77250-S9V-A01ZA 77250-S9V-A11ZA
Material: Molded Plastic Finish: Graphite Black (Color Code *NH167L*)
We Have This Part in Stock

The information in this article is provided for general reference and educational purposes only. Vehicle specifications, procedures, and part compatibility can vary by production date, trim level, and region. Always consult your vehicle's factory service manual and verify part numbers before purchasing or performing repairs. Safety-critical components such as airbags, seat belts, and braking systems should be installed by a qualified professional.
- Honda Pilot: