

2012-2013 Honda CR-V Park Assist Camera: Fixing a Blurry or Black Screen
A complete guide to diagnosing common backup camera failures, choosing a quality used replacement, and step-by-step installation for your CR-V.
- The most common failure is a blurry/foggy image caused by moisture getting inside the camera; replacement is the only permanent fix.
- Verify the OEM part number is 39530-T0A-A01 before buying a used replacement to ensure full compatibility and retain multi-angle views.
- Avoid cheap aftermarket cameras, as they often have lower resolution and may disable the factory multi-angle view feature.
- Replacement is a simple DIY job that takes about an hour and only requires basic hand tools and trim removal tools.
Symptoms of a Failing 2012-2013 CR-V Park Assist Camera


When the park assist camera in a 2012-2013 Honda CR-V begins to fail, the symptoms are usually obvious. The most common issue reported by owners is a blurry, foggy, or distorted image, which often points to moisture getting inside the camera's sealed housing. Over time, the seal can degrade, allowing condensation to form on the inside of the lens.
- Blurry or Foggy Image: The video feed looks out of focus or as if you're looking through a foggy window. This is the most prevalent symptom and is almost always caused by a failed lens seal.
- Black Screen: When you shift into reverse, the screen is completely black. This can indicate a total camera failure, a blown fuse, or a problem with the wiring connecting the camera to the display.
- Flickering or Intermittent Video: The image may flash, cut in and out, or switch between a normal picture and a black screen. This often points to a loose connection or frayed wiring.
- "No Signal" Message: The display powers on but shows a "no signal" error, which typically suggests a wiring issue or a blown fuse. 🎬 Watch: Troubleshooting common CR-V backup camera issues
Diagnosing the Problem

Before buying a replacement part, perform these simple checks to rule out other issues:
- Clean the Lens: The camera is exposed to the elements. Use a soft, clean cloth to gently wipe away any dirt, mud, or water spots from the lens. If the image is still blurry, the problem is internal.
- Check the Fuse: A blown fuse can cause the camera to stop working entirely, resulting in a black screen. For the 2012-2013 CR-V, the fuse for the rearview camera is located in the under-hood fuse box. It is fuse number 21, a 10-amp fuse.
- Restart the Vehicle: Sometimes, a simple electronic glitch can be solved by turning the car off and on again, which reboots the infotainment system.
- Inspect Wiring (If Accessible): If you're comfortable, open the rear tailgate and look for any obviously loose or damaged wires near the camera's connection point.
Known Issues, Recalls, and Technical Service Bulletins (TSBs)
As of mid-2024, there are no specific recalls or Technical Service Bulletins (TSBs) from Honda or the NHTSA that directly address camera failure on the 2012-2013 CR-V model years. The most common problem—a blurry image from moisture intrusion—is a well-documented component failure among owners but has not led to an official recall campaign for this generation. Later model year Hondas have had recalls for software issues causing camera problems, but these do not apply to the 2012-2013 CR-V.
Warning: While some aftermarket cameras claim to be compatible, many owners report that cheaper options result in a lower resolution image or the loss of the multi-angle view feature. To retain all factory functions, a direct OEM replacement is recommended.
Buying a Used Park Assist Camera for Your 2012-2013 CR-V
Purchasing a used OEM camera is often the most cost-effective way to restore factory function. Here’s what to look for to ensure you get a quality part.
Why Choose a Used OEM Camera?
A used Original Equipment Manufacturer (OEM) camera is identical to the part your CR-V came with from the factory. This guarantees perfect fitment, proper connection to the existing wiring harness, and full compatibility with the vehicle's display system, including the multi-angle view modes. Many cheap aftermarket cameras are lower resolution and may disable the ability to switch between wide, normal, and top-down views.
Inspection Checklist Before You Buy
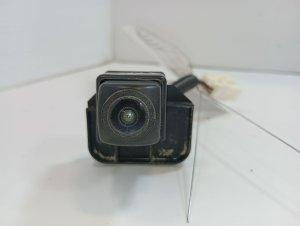
- Verify the Part Number: The most critical step is to match the part number. The correct OEM part number for the 2012-2013 Honda CR-V is 39530-T0A-A01. You may also see variants like 39530-T0A-A011-M1. Always confirm this number before purchasing.
- Inspect the Lens: Look closely at the camera lens. It should be perfectly clear with no signs of haziness, cloudiness, or a milky ring around the edge. Any internal fogginess indicates the seal has already failed, and the camera will produce a blurry image.
- Check the Housing and Connector: Ensure the plastic housing is not cracked or damaged. Inspect the electrical connector pins to make sure they are straight, clean, and free of corrosion.
Cost Comparison: New vs. Used vs. Aftermarket
| Part Type | Estimated Cost |
|---|---|
| New OEM | $315 - $480 |
| New Aftermarket | $40 - $100 |
| Used OEM | $75 - $200 |
| Shop Labor | $85 - $125 |
Park Assist Camera Replacement Guide
Replacing the park assist camera on a 2012-2013 CR-V is a straightforward job that most DIYers can complete in under an hour with basic tools.
- Difficulty: 2/5 (Easy to Moderate)
- Estimated Time: 0.5 - 1 hour
Tools Needed:
- Phillips head screwdriver
- 8mm socket or wrench
- Plastic trim removal tool (recommended to avoid scratching panels)
Step-by-Step Installation:
- Open the Tailgate: Start by opening the rear tailgate.
- Remove Interior Trim Panels: You will need to remove the large plastic trim panels from the inside of the tailgate to access the camera. Start with the upper panel, then the side panels, and finally the large lower panel. These are mostly held on by clips, so use a trim removal tool to pry them off carefully. There is also one Phillips head screw inside the tailgate pull handle that must be removed.
- Remove Exterior Garnish: With the interior panels off, you can access two 8mm bolts that hold the exterior chrome or black trim piece (garnish) where the camera is mounted. Remove these bolts, then carefully pry the garnish off from the outside.
- Disconnect and Remove the Camera: The camera is now exposed. Disconnect the single electrical connector. There are small plastic tabs holding the camera in its housing; gently push these in to release the old camera assembly.
- Install the New Camera: Snap the new camera into the housing, reconnect the electrical plug, and test it by putting the car in reverse (with the ignition on) to ensure it works before reassembling everything.
- Reassemble: Follow the steps in reverse to reinstall the exterior garnish and all interior trim panels.
Pro Tip: Before fully snapping the large interior tailgate panel back on, reconnect the tailgate pull handle and test it to make sure everything is aligned correctly. It's easy to misalign the clips.
Frequently Asked Questions (FAQ)
Do I need to program or calibrate the new camera?
No. For the 2012-2013 CR-V, the park assist camera is a plug-and-play component. As long as you use the correct OEM part, no programming or calibration is required after installation.
Why is my screen black but there's no "check system" warning?
A black screen without a warning message often points to a complete failure of the camera unit itself or a blown fuse. The system recognizes it should be on, but it's not receiving a video signal. A wiring issue could also be the cause.
🎬 Watch: How to fix a blank rear camera displayCan I just clean the inside of my foggy camera lens?
While technically possible, it is not recommended. The camera housing is factory-sealed. Attempting to open it will likely break the housing, and it is very difficult to reseal it effectively to prevent future moisture intrusion. Replacement is the only reliable, long-term solution.
Will a cheap aftermarket camera work?
It might provide an image, but many owners who have tried cheaper aftermarket cameras report issues. These can include a lower-quality, distorted image, a black bar on the screen, or the loss of the factory multi-angle view options. For full functionality, an OEM or high-quality OEM-style replacement is the best choice.
Technical Specifications
OEM Part Numbers:
- 39530-T0A-A01
- 39530-T0A-A011-M1
- 39530T0AA01
Connector Type: 6-pin electrical connector
Helpful Videos

Technical Specifications
OEM Part Numbers: 39530-T0A-A01 39530-T0A-A011-M1 39530T0AA01
Connector: 6-pin plug. Mounting: Rear tailgate garnish.
We Have This Part in Stock

The information in this article is provided for general reference and educational purposes only. Vehicle specifications, procedures, and part compatibility can vary by production date, trim level, and region. Always consult your vehicle's factory service manual and verify part numbers before purchasing or performing repairs. Safety-critical components such as airbags, seat belts, and braking systems should be installed by a qualified professional.
- Honda CR-V:
- 🎬 Helpful Videos
- 🛍️ Shop This Part
- Symptoms of a Failing 2012-2013 CR-V Park Assist Camera
- Diagnosing the Problem
- Known Issues, Recalls, and Technical Service Bulletins (TSBs)
- Buying a Used Park Assist Camera for Your 2012-2013 CR-V
- Why Choose a Used OEM Camera?
- Inspection Checklist Before You Buy
- Cost Comparison: New vs. Used vs. Aftermarket
- Park Assist Camera Replacement Guide
- Tools Needed:
- Step-by-Step Installation:
- Frequently Asked Questions (FAQ)
- Technical Specifications
- 🎟️ Get 5% Off