

2014-2020 Acura MDX Rear Camera: Solving Failures for Surround View Systems
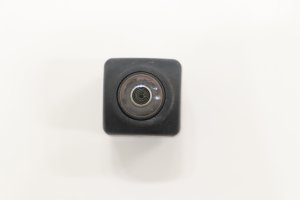
This guide covers the unique multi-view rear camera (36530-TZ6-H01) for Advance and Hybrid trims, explaining common failures, diagnosis, and critical replacement information.
- This guide is ONLY for the multi-view camera (36530-TZ6-H01) on MDX models with Surround View (Advance/Hybrid trims). It is NOT interchangeable with the standard camera (39530-TZ5-A11).
- A black screen is the most common failure symptom, but you should first check for broken wires in the tailgate hinge boot before replacing the camera.
- Aftermarket replacements for the multi-view camera are not readily available, making used OEM the most cost-effective option.
- DIY replacement is possible, but professional calibration with special tools is required afterward for the 360-degree view to function correctly.
Compatibility Warning: Match Your Part Number Exactly

Critical: This guide is for the Multi-View Rear Camera (part number 36530-TZ6-H01) found on 2014-2020 Acura MDX models with the Surround View system, typically the Advance and Sport Hybrid trim levels. It will NOT work on models with a standard backup camera. If your MDX does NOT have the 360-degree top-down view, you likely need the standard camera, part number 39530-TZ5-A11. These two parts are not interchangeable. Installing the wrong camera will result in it not functioning.
Symptoms of a Failing MDX Rear Camera

When the rear multi-view camera begins to fail, you may experience one or more of the following symptoms:
- Black Screen: The most common symptom is the infotainment display turning completely black when you shift into reverse.
- Intermittent Operation: The camera may work sometimes and not others, often starting with flickering or a fuzzy image before failing completely.
- "Camera System Error" Message: The vehicle's information display may show an error message indicating a problem with the camera system.
- Loss of 360-Degree View: If the rear camera fails, the surround view system cannot generate the top-down view, as it is missing a critical video feed.
- Poor Image Quality: While many owners report the factory camera's resolution is unimpressive, a sudden degradation, excessive graininess (especially at night), or a blurry image can be a sign of a failing camera sensor or water intrusion.
Diagnosing the Problem: Is It the Camera or the Wiring?

Before buying a replacement camera, it's worth checking for a simpler, and more common, problem. On many Acuras and Hondas, the wiring that passes from the vehicle body to the tailgate can break from repeated opening and closing.
- Open the tailgate and locate the black rubber boot(s) at the top hinge area that protect the wiring harness.
- Carefully pull the boot away from the body or tailgate to expose the wires inside.
- Inspect the wires for any signs of cracking, fraying, or complete breaks. A broken wire here will cause a total loss of signal, mimicking a dead camera.
- If a wire is broken, repairing it with a butt connector and heat shrink may restore camera function without needing to replace the unit itself.
Known Issues, TSBs, and Recalls
While there are no specific recalls for the 36530-TZ6-H01 camera on the 2014-2020 MDX, there are related issues to be aware of:
- Tailgate Light Moisture Recall: Acura issued a recall for 2014-2020 MDX models because a faulty body seal could allow moisture into the tailgate lid light assembly. This indicates a known issue with water intrusion in the same area where the camera is mounted, which could potentially lead to camera failure from corrosion or short-circuiting.
- Poor Weather Performance: The placement of the rear camera makes it highly susceptible to being obscured by rain, snow, and road grime, a common complaint among owners. This is a design characteristic rather than a part failure, and requires frequent cleaning to maintain visibility.
Buying a Used 36530-TZ6-H01 Camera

Since new OEM cameras are costly and direct-fit aftermarket alternatives for the multi-view system are generally not available, a used OEM camera is often the most practical solution. Here’s what to look for:
- Verify the Part Number: Double-check that you are buying 36530-TZ6-H01. Ask the seller for a clear photo of the part number sticker. Do not purchase a 39530-TZ5-A11, as it will not work with your system.
- Inspect the Lens: Look for deep scratches, haziness, or yellowing on the camera lens. Check for any signs of moisture or fogging behind the lens, which indicates a failed seal.
- Check the Connector: Ensure the electrical connector and its pins are clean, straight, and free of any green or white corrosion.
- Ask About the Source Vehicle: If possible, find out the mileage of the vehicle the part came from. A lower-mileage part is always preferable.
- Warranty and Returns: Purchase from a reputable seller that offers at least a 30-day warranty and a clear return policy in case the part is defective.
Cost of Replacement
Pricing can vary, but here is a general cost comparison to help you make an informed decision.
| Part Type | Estimated Cost | Notes |
|---|---|---|
| New OEM | $450 - $680 | Price varies between dealer MSRP and discounted online retailers. |
| Used OEM | $150 - $350 | Dependent on condition, mileage, and seller. Check online marketplaces. |
| New Aftermarket | Not Available | Aftermarket options typically exist only for the standard (non-surround view) camera. |
| Shop Labor | $150 - $450 | Includes physical installation (approx. 1-1.5 hours) and may include aiming/calibration, which can add significant time and cost. |
Replacement and Calibration
Physically replacing the camera is a straightforward task for a DIYer with basic tools.
- Open the tailgate.
- Remove the inner tailgate trim panel. This is typically held on by a series of clips and may have a few screws, often near the pull handle. Use a plastic trim removal tool to avoid scratching the panel.
- Once the panel is off, locate the camera. Disconnect its electrical connector.
- Remove the nuts or bolts holding the camera to the tailgate garnish.
- Install the new camera, reconnect the electrical plug, and reinstall the trim panel.
Pro Tip: Before reinstalling the trim panel, test the new camera by turning on the ignition and shifting into reverse to ensure it powers on and displays an image.
Critical Step: Aiming and Calibration
For vehicles with the Surround View System, simply swapping the camera may not be the final step. According to I-CAR, the official collision repair industry resource, replacing any camera that is part of the 360° view system requires an aiming procedure. This process ensures the new camera's view aligns perfectly with the other three cameras to create a seamless top-down image. Failure to calibrate may result in a distorted or misaligned 360-degree view.
This calibration requires specialized dealer-level scan tools (like the Acura i-HDS) and physical targets placed at precise locations around the vehicle. While you can perform the physical installation yourself, you will likely need to visit a dealer or a qualified independent shop with ADAS (Advanced Driver-Assistance Systems) calibration equipment to complete the job correctly.
Frequently Asked Questions (FAQ)
My screen is black. Is the camera definitely broken?
Not necessarily. The most common cause after the camera itself is a broken wire in the rubber harness between the tailgate and the body. Always inspect this wiring for damage before ordering a new camera.
Do I have to get the new camera calibrated?
For the Surround View System to work correctly, yes. Official repair procedures state that aiming is required after replacing the rear camera to ensure the 360-degree view is stitched together properly. Without it, your backup view might work, but the bird's-eye view could be misaligned.
Why is my camera image so blurry and grainy?
This is a very common complaint, even with fully functional cameras on this MDX generation. The original camera technology was not high-definition. However, if the image is significantly worse than it used to be, the lens could be hazed or there could be internal failure. Also, ensure the lens is clean, as dirt and water droplets severely impact image quality.
Can I use a cheaper standard backup camera instead of the expensive multi-view one?
No. The multi-view camera (36530-TZ6-H01) and the standard camera (39530-TZ5-A11) have different connectors and software protocols. They are not interchangeable. You must use the correct part for your vehicle's system.
Technical Specifications
OEM Part Numbers: 36530-TZ6-H01 36530TZ6H01
Rear-mounted, multi-view camera for Surround View System.
We Have This Part in Stock


The information in this article is provided for general reference and educational purposes only. Vehicle specifications, procedures, and part compatibility can vary by production date, trim level, and region. Always consult your vehicle's factory service manual and verify part numbers before purchasing or performing repairs. Safety-critical components such as airbags, seat belts, and braking systems should be installed by a qualified professional.
- Acura MDX:
- 🛍️ Shop This Part
- Compatibility Warning: Match Your Part Number Exactly
- Symptoms of a Failing MDX Rear Camera
- Diagnosing the Problem: Is It the Camera or the Wiring?
- Known Issues, TSBs, and Recalls
- Buying a Used 36530-TZ6-H01 Camera
- Cost of Replacement
- Replacement and Calibration
- Critical Step: Aiming and Calibration
- Frequently Asked Questions (FAQ)
- 🎟️ Get 5% Off