

2021-2025 Toyota Mirai Overhead Console: Functions, Part Numbers, and Replacement Guide
Learn to identify issues with your Mirai's overhead console, find the correct replacement part, and understand the simple installation process.
- Failures of this part are rare, but typically manifest as non-working lights or switches.
- Part number compatibility is critical; 81260-62070-B0 is for 2021-23 models and 81260-62071-B0 is for 2024-25 models.
- Replacement is a very easy DIY task, requiring only a trim tool and about 15 minutes.
- When buying used, inspect all plastic mounting clips and test the feel of the buttons before purchase.
Symptoms of a Failing Overhead Console
Because the Toyota Mirai is a relatively new and low-volume vehicle, widespread, common failures of the overhead console are not documented. However, like any electronic component, it can fail. Problems are almost always electrical and will manifest in specific, noticeable ways. If your console is malfunctioning, you will likely experience one or more of the following symptoms:
- Inoperative or Flickering Lights: The map or dome lights may fail to turn on, flicker intermittently, or stay on permanently. This is the most common sign of a problem, which could be a bad switch, a faulty circuit board, or a loose connection.
- Moonroof Switch Failure: If your Mirai has a moonroof, the switch located in the console may stop working. The moonroof might not open, close, or respond to any input from the switch.
- Bluetooth Microphone Issues: People you call may complain that they cannot hear you or that your voice is muffled or distant. This points to a failure of the integrated microphone in the console.
- SOS or Safety Connect Malfunction: A fault in the console can trigger a warning message on your instrument panel related to the SOS system. The light on the SOS button itself may also indicate a problem by flashing or changing color.
- Rattling Noises: While less common, the plastic housing or internal components can become loose over time, causing rattling or buzzing sounds from the headliner area, especially when driving on rough roads.
Known Issues, TSBs, and Recalls
As of mid-2026, there are no specific recalls or Technical Service Bulletins (TSBs) issued by Toyota or the NHTSA that directly pertain to the overhead console of the 2021-2025 Toyota Mirai. Searches for common problems or owner complaints in forums and repair databases show no pattern of failure for this specific part. This indicates that the original OEM console is a reliable component.
It is important to note a recall (NHTSA ID: 26V341) was issued in May 2026 for certain 2024-2025 Mirai vehicles related to the instrument cluster display. This issue can cause the main display to go blank, preventing warnings and indicators from being shown. This is a software issue with the instrument panel, not the overhead console, but it's a significant safety item for owners to be aware of. The fix is a software update performed by a dealer.
Pro Tip: Before assuming the console is bad, always check the simple things first. Check the related fuse in the vehicle's fuse box to ensure it hasn't blown. A single fuse often protects multiple interior components, so if other items like vanity mirror lights are also out, a fuse is a likely culprit.
Buying a Used Overhead Console
Purchasing a used OEM overhead console is a smart, cost-effective way to fix a faulty unit. Since aftermarket options are virtually nonexistent for this vehicle, a recycled original part is your best choice. Here’s what to look for:
1. Verify the Part Number
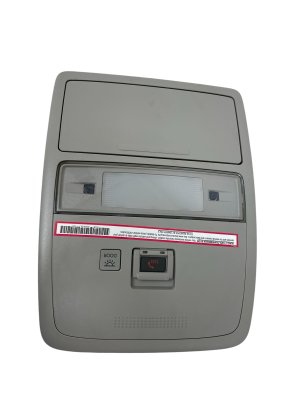
This is the most critical step. The Mirai overhead console comes in a few variations depending on the model year and options. The two primary part numbers are:
- 81260-62070-B0: Fits 2021-2023 Toyota Mirai models.
- 81260-62071-B0: Fits 2024-2025 Toyota Mirai models.
These parts may look identical but could have internal electronic differences. Always match the part number from your original console to the replacement unit. Using the wrong part could result in incompatible features, particularly with the Safety Connect and moonroof functions.
2. Physical Inspection Checklist
When you have the part in hand, perform a careful inspection:
- Check for Broken Clips: The console is held in place by delicate plastic clips. Inspect all mounting points to ensure none are cracked or broken. A unit with broken tabs will not sit flush against the headliner and will likely rattle.
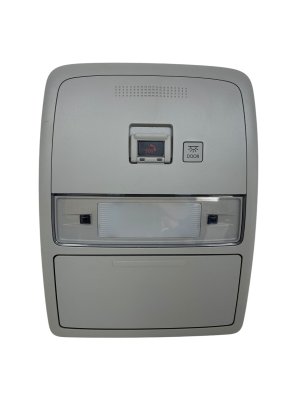
- Inspect the Lenses: Ensure the plastic lenses for the map lights are clear, without cracks, deep scratches, or yellowing.
- Test the Buttons: Press every button (lights, moonroof, SOS). They should move freely and provide a solid, tactile 'click'. Mushy or stuck buttons are a red flag.
- Examine the Connectors: Look at the electrical connector ports on the back. Make sure there are no bent pins, signs of corrosion (green or white powder), or melted plastic.
- Color and Finish: The part number suffix (-B0) often denotes the color. Ensure the color and texture of the plastic match your vehicle's interior to avoid a mismatched look.
Cost Comparison
Fixing your overhead console with a used part offers significant savings.
| Part Type | Estimated Cost |
|---|---|
| New OEM | $230 - $340 |
| Used OEM | $50 - $150 |
| New Aftermarket | Not Available |
| Shop Labor for Installation | $50 - $100 |
Replacement Difficulty: 1 out of 5
Replacing the overhead console is a straightforward DIY job that most owners can complete in under 15 minutes. It does not require any programming or special calibration.
Estimated Time: 15 minutes
Tools Required:
- Plastic trim removal tool (recommended to prevent scratches)
- Small flathead screwdriver (use with caution)
Step-by-Step Replacement Guide
- Pry Down the Console: Start at the edge closest to the windshield. Gently insert a plastic trim tool between the headliner and the overhead console. Carefully pry downwards to release the front clips.
- Release the Rear Clips: Once the front is loose, slide the console slightly toward the windshield to disengage the rear tabs, then pull it down. Do not pull straight down, as this can break the rear tabs.
- Disconnect the Wiring: With the console hanging, you will see one or more electrical connectors. Press the release tab on each connector and pull it out. The console is now free.
- Install the New Console: Connect the wiring harness to the replacement console. You should hear a click as it locks in place.
- Test Before Mounting: Before snapping the console back into the headliner, turn the car's ignition to the 'ON' position and test all functions—lights, moonroof switch, etc. This ensures the new part works correctly before you finish the installation.
- Secure the Console: Align the rear tabs first, then push the console up firmly until the front clips snap securely into place. Ensure it is flush with the headliner and does not move or rattle.
Warning: When prying on the console, use a plastic trim tool. Using a metal screwdriver can easily scratch or gouge the plastic of the console or tear the fabric of the headliner.
Frequently Asked Questions (FAQ)
Do I need to disconnect the car battery to replace the overhead console?
While it is always the safest practice to disconnect the negative battery terminal when working on any vehicle electronics, it is not strictly necessary for this simple replacement. The circuits are low voltage, and the risk is minimal. If you are not comfortable working with live circuits, disconnecting the battery is a good precaution.
The lights work, but my moonroof doesn't. Is the console the problem?
It's possible, but not guaranteed. The problem could be the switch in the console, the moonroof motor itself, or the wiring in between. If the switch is the only thing not working on the console, it's a good place to start the diagnosis. A used console is often cheaper than a standalone diagnostic fee at a dealership.
Why did my SOS light start flashing after I replaced the console?
This usually means there is a compatibility issue. You may have installed a console from a different year or trim level that is not communicating correctly with your vehicle's Safety Connect system. Double-check that the part number you installed is the correct one for your vehicle's VIN and model year.
Can I just replace a single broken button or light?
No, the individual components of the overhead console are not sold separately by Toyota. The buttons and internal circuit board are integrated into the assembly. If any single part fails, the entire console module must be replaced.
Technical Specifications
OEM Part Numbers: 81260-62070-B0 8126062070B0 81260-62071-B0 8126062071B0
Houses map/dome lights, moonroof switch, Bluetooth microphone, and SOS button. Connects via integrated wiring harness.
We Have This Part in Stock

The information in this article is provided for general reference and educational purposes only. Vehicle specifications, procedures, and part compatibility can vary by production date, trim level, and region. Always consult your vehicle's factory service manual and verify part numbers before purchasing or performing repairs. Safety-critical components such as airbags, seat belts, and braking systems should be installed by a qualified professional.
- Toyota Mirai:
- 🛍️ Shop This Part
- Symptoms of a Failing Overhead Console
- Known Issues, TSBs, and Recalls
- Buying a Used Overhead Console
- 1. Verify the Part Number
- 2. Physical Inspection Checklist
- Cost Comparison
- Replacement Difficulty: 1 out of 5
- Step-by-Step Replacement Guide
- Frequently Asked Questions (FAQ)
- 🎟️ Get 5% Off