

Bentley Continental & Flying Spur Overhead Console Guide (2012-2019): Sticky Buttons and Compatibility
A complete guide to diagnosing common failures, replacing the overhead console, and finding the correct used part for your 2012-2018 Bentley Continental or 2013-2019 Bentley Flying Spur.
- Compatibility is critical: Consoles for Coupe (Continental GT) and Convertible (GTC) models are not interchangeable.
- The most common failure is 'sticky buttons' from a degrading soft-touch coating, which can sometimes be cleaned.
- When buying used, verify the part number and inspect carefully for broken mounting tabs and sticky surfaces.
- Replacement is a simple DIY task, typically requiring only basic trim tools and a Torx screwdriver.
Common Symptoms of a Failing Overhead Console
Failures of the overhead console in the 2012-2018 Bentley Continental and 2013-2019 Bentley Flying Spur are typically related to material degradation or electrical issues. While not a common point of catastrophic failure, these problems can be an annoyance.
- Sticky or Gummy Buttons: This is the most prevalent issue. Like many luxury cars of the era, the soft-touch coating on the buttons can break down over time due to exposure to heat, humidity, and skin oils. The buttons become tacky to the touch, attract dirt, and can be unpleasant to use.
- Unresponsive Buttons: The switches for the sunroof, interior lights, or garage door opener may stop working intermittently or altogether. This can be due to a failure in the switch itself or a problem with the console's internal circuit board.
- Flickering or Inoperative Lights: The map or dome lights may flicker or fail to turn on. While this can sometimes be a simple bulb issue, it can also point to a fault within the console's wiring or circuitry.
- Rattling Noises: The plastic housing or its mounting clips can become brittle and break, leading to rattling or buzzing sounds from the headliner area while driving.
Pro Tip: Sticky buttons can often be cleaned as a temporary fix. Using a high-quality isopropyl alcohol (70% or higher) on a microfiber cloth or a gentle makeup remover wipe can remove the degraded coating without damaging the button graphics if done carefully. Always test in an inconspicuous area first.
Variant and Compatibility Guide
Verifying compatibility is critical when purchasing a replacement console for these vehicles. The main differences depend on the body style and optional features.
| Vehicle / Feature | Compatibility Notes | Known Part Numbers |
|---|---|---|
| Bentley Continental GT (Coupe) | These consoles include controls for the sunroof. They are not physically compatible with convertible models. | 3W0907135G |
| Bentley Continental GTC (Convertible) | These consoles do not have a sunroof switch. Instead, they may integrate with the convertible top's roof control module. The shape and mounting points differ from the coupe version. | 3W7959527N |
| Garage Door Opener (HomeLink) | Consoles were available with or without the garage door opener buttons. Ensure the replacement unit has the same feature set as your original. A console without this feature cannot be easily upgraded. | Varies |
| Color / Trim | The console housing was produced in various colors to match the vehicle's headliner. While functionally interchangeable, you will want to match the color for a proper aesthetic result. | Varies |
Warning: The outer trim molding or bezel that surrounds the console is often a separate part. Most used consoles are sold as the core unit only. Verify with the seller if the trim is included before purchasing.
Buying a Used Overhead Console: What to Inspect
Buying a used OEM console is the most cost-effective solution, as new aftermarket units are not available for these vehicles. Here’s what to check before you buy:
- Verify the Part Number: This is the most important step. Match the part number from your old console to the replacement unit to guarantee compatibility, especially between Coupe and Convertible models.
- Inspect for Sticky Buttons: Ask the seller for clear, well-lit photos of the button surfaces. Look for a shiny, gummy, or peeling appearance, which indicates the soft-touch coating is failing. If possible, press the buttons to feel for tackiness.
- Check All Mounting Tabs: Carefully inspect the back and sides of the console housing for any broken or cracked plastic mounting tabs. A unit with broken tabs will not sit securely in the headliner and will likely cause rattles.
- Examine the Electrical Connectors: Look for any signs of corrosion, bent pins, or damage to the connector housings.
- Confirm the Options: Double-check that the console includes the features your car has, such as the garage door opener buttons and the correct switch layout for your body style (sunroof or no sunroof).
Replacement Guide
Replacing the overhead console is a relatively straightforward task for a DIYer with the right tools. It primarily involves carefully removing trim pieces without damaging them.
- Disconnect the Battery: As a safety precaution, disconnect the negative battery terminal before working on any electrical components.
- Remove Mounting Screws: There are typically two mounting screws holding the console to the roof bracket. These may be hidden behind small covers or the sunglass holder door.
- Unhook the Console: Once the screws are removed, gently slide the console forward (towards the windshield). This will disengage the hooks that secure it to the roof bracket.
- Disconnect Wiring: Carefully lower the console to access the electrical connectors on the back. Press the release tabs on each connector and pull them straight out. Do not pull on the wires themselves.
- Installation: Installation is the reverse of removal. Connect the wiring harnesses to the new console, hook it onto the roof bracket, slide it back into position, and secure it with the mounting screws. Reconnect the battery and test all functions.
Cost Comparison
This table provides an estimated cost breakdown for replacing the overhead console.
| Part/Service | Estimated Cost | Notes |
|---|---|---|
| New OEM | $800 - $1,500+ | Must be purchased from a Bentley dealer. Prices can be very high depending on the specific configuration. |
| New Aftermarket | Not Available | Aftermarket manufacturers do not produce this part for Bentley vehicles. |
| Used OEM | $250 - $500 | The most common and affordable option. Prices vary based on condition and features. |
| Shop Labor | $100 - $200 | An independent shop can typically perform the replacement in under an hour. |
Known Issues, TSBs, and Recalls
As of mid-2024, there are no specific recalls issued by the NHTSA for the overhead console on the 2012-2018 Bentley Continental or 2013-2019 Flying Spur. While a Technical Service Bulletin (TSB) from Bentley mentions "roof console(s)," the specific details of the issue are not publicly available. The most widely documented problem remains the cosmetic degradation of the button surfaces.
Frequently Asked Questions (FAQ)
Do I need to program a replacement overhead console?
For most functions like interior lighting and sunroof control on coupe models, a replacement console is typically plug-and-play and does not require programming. However, systems related to the convertible top on GTC models can be more complex and may require calibration if the roof control module is part of the assembly.
Will a console from a Continental GT fit my Flying Spur?
Yes, within the specified year ranges (2012-2018 for Continental, 2013-2019 for Flying Spur), the overhead consoles are shared between the two models as they are built on the same platform. The critical factor is ensuring the replacement is from a coupe if you have a coupe, or a convertible if you have a convertible.
Can a bad overhead console drain my car's battery?
It is possible, though not common. An internal short circuit or a faulty switch that prevents a module from going to "sleep" could theoretically cause a parasitic battery drain. If you are experiencing battery drain issues, the overhead console could be a potential, but unlikely, culprit.
What tools do I need to replace the console?
You will typically need a set of plastic trim removal tools to avoid scratching the headliner, and a Torx screwdriver (usually a T20 or similar size) for the mounting screws.
Technical Specifications
OEM Part Numbers: 3W0907135G 3W7959527N 3W5959527T 3W5959527AD 3W0959527M
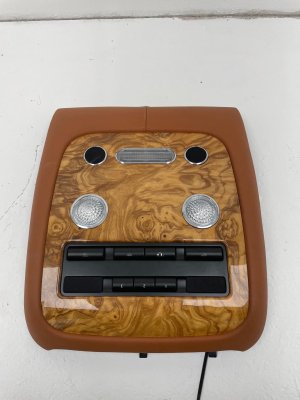
Houses controls for interior lighting, sunroof (coupe), and optional HomeLink garage door opener. Available in multiple colors to match vehicle interior.
We Have This Part in Stock


The information in this article is provided for general reference and educational purposes only. Vehicle specifications, procedures, and part compatibility can vary by production date, trim level, and region. Always consult your vehicle's factory service manual and verify part numbers before purchasing or performing repairs. Safety-critical components such as airbags, seat belts, and braking systems should be installed by a qualified professional.
- Bentley Continental:
- Bentley Flying Spur: