

2013-2018 Audi A6, A7, S6, S7 & RS7 Overhead Console: Fixing Sunroof & Light Failures
This guide covers the common failures of the overhead console in your Audi C7 platform vehicle, and how to choose the right used replacement part.
- Compatibility is critical: You must buy a used console that has the exact same buttons (sunroof, HomeLink, SOS) and color as your original part.
- The most common failures are an inoperative sunroof switch and malfunctioning interior lights.
- Replacement is an easy DIY job that takes less than 15 minutes and only requires a trim tool and a Torx driver.
- Water damage from clogged sunroof drains is a frequent cause of failure; check your drains to prevent repeat issues.
Symptoms of a Failing Overhead Console
When the overhead console in a 2013-2018 Audi A6, A7, S6, S7, or RS7 begins to fail, the symptoms are usually straightforward and related to the functions it controls. You may experience one or more of the following issues:
- Sunroof Becomes Inoperative: The most common complaint is that the sunroof switch stops working entirely. The sunroof may get stuck open, closed, or in the tilt position, with no response from the control knob. This is often a failure of the switch itself, not the sunroof motor.
- Interior Lights Malfunction: The dome light or individual map lights may stop working when you press the button. In some cases, they may not turn on when a door is opened, or they may stay on continuously. Some owners report intermittent operation that can be temporarily fixed by pressing on the console housing, indicating a loose connection or failing solder joint on the internal circuit board.
- Dead or Intermittent Buttons: The HomeLink (garage door opener) buttons or the SOS button may become unresponsive.
- Parasitic Battery Drain: While less common, a short circuit within the console's electronics can cause a small but constant drain on the battery, leading to a dead battery if the car sits for several days.
Known Issues, Recalls, and Technical Service Bulletins (TSBs)
For the 2013-2018 C7 platform, which includes the A6, S6, A7, S7, and RS7, there are no specific recalls or Technical Service Bulletins (TSBs) issued by Audi or the NHTSA for the overhead console assembly itself. However, owners should be aware of two unrelated issues that can cause confusion:
- Gateway Control Module Recall: A recall (NHTSA 22V-861) was issued for some later model Audis for a gateway control module located under the rear seat that is vulnerable to liquid spills. This is not related to the overhead console but highlights the sensitivity of electronic modules in these vehicles.
- Passenger Seat Sensor Recall: A recall was issued for 2012-2018 A6 and A7 models for a faulty passenger seat sensor that could deactivate the passenger airbag, illuminating the airbag warning light. If you have an airbag light on, this is a more likely cause than the overhead console.
Pro Tip: A common cause of overhead console failure is water damage. The drains for the sunroof can become clogged with debris, causing water to overflow and drip directly onto the console's electronics. If you are replacing your console, it is a good idea to check and clear your sunroof drains at the same time.
Buying a Used 2013-2018 Audi Overhead Console: What to Check
Buying a used overhead console is an excellent way to save a significant amount of money, as new OEM units are very expensive. However, careful inspection is crucial because these parts have many variations. A mismatched console may not work at all or may cause electrical issues.
1. Match the Features and Buttons EXACTLY
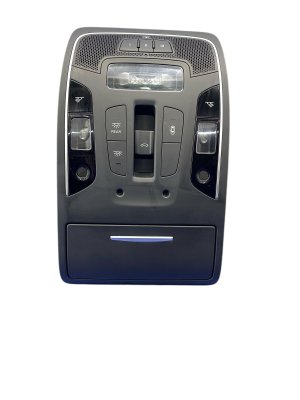
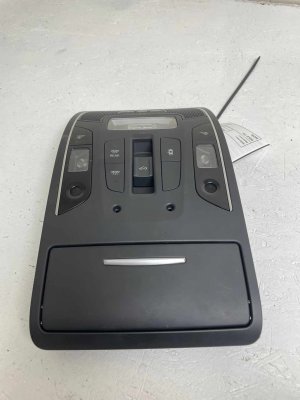
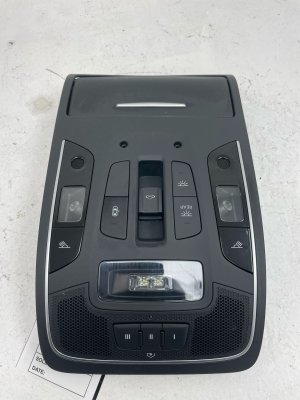
This is the most important step. Before you buy, compare the used part to your original console and verify that every button and feature is identical. Look for:
- Sunroof Controls: Does your car have a standard sunroof or a panoramic one? The switch is different.
- HomeLink Buttons: Does it have the three buttons for the garage door opener?
- SOS Button: Some models are equipped with an emergency call button. Ensure the replacement has it if your original does.
- Ambient Lighting Controls: If your vehicle has the premium ambient lighting package, there may be additional controls on the console.
- Color: Consoles come in different colors like black, gray, and beige to match the headliner. While a different color will function, it will not match your interior.
Warning: You cannot add features by swapping consoles. Installing a console with HomeLink into a car that didn't have it from the factory will not enable the feature, as the necessary wiring and modules will be missing.
2. Physically Inspect the Unit
- Check for Water Damage: Look for any signs of corrosion on the electrical connectors or water stains on the plastic housing. This is a major red flag.
- Inspect the Lenses: Ensure the plastic lenses for the dome and map lights are not cracked, hazy, or yellowed.
- Test the Buttons: Physically press each button. They should have a solid, tactile click and not feel loose, sticky, or broken.
- Verify Part Numbers: If possible, match the part number on the replacement unit to your original. Part numbers like 4G0959719, 4G0947135, and their variants are common. However, visual matching of features is often more reliable for a buyer.
Cost of Replacement
Replacing the overhead console is a prime example of where choosing a used OEM part provides significant savings over a new part from the dealer.
| Part Type | Estimated Cost |
|---|---|
| New OEM | $270 - $675+ |
| New Aftermarket | Not Commonly Available |
| Used OEM | $50 - $150 |
| Shop Labor | $75 - $125 |
Overhead Console Replacement Guide (DIY)
Replacing the overhead console is a very simple task that most owners can complete in under 15 minutes with basic tools.
- Difficulty: 1/5 (Very Easy)
- Estimated Time: 0.25 hours
- Tools Needed: Plastic trim removal tool, Torx T25 driver.
Step-by-Step Instructions
- Open the Sunglasses Holder: If your console has a sunglasses holder, open it. If not, you will first pry off the outer trim ring surrounding the console.
- Remove the Screw: Look inside the top of the sunglasses compartment (or under the trim piece you removed). You will see a single Torx T25 screw. Remove it.
- Pry the Console Down: Using a plastic trim tool to avoid scratching the headliner, gently pry downwards on the front edge of the console (the side closest to the windshield). It is held in by two metal spring clips.
- Lower and Disconnect: Once the front clips release, the console will hinge down. Lower it carefully and disconnect the one or two electrical connectors on the back.
- Installation: Installation is the reverse of removal. Connect the electrical plugs, slide the rear tabs of the new console into the headliner, and then push the front upwards firmly until the metal clips snap into place. Reinstall the T25 screw.
Pro Tip: After installation, you may need to reset or 'relearn' the sunroof. To do this, press and hold the sunroof switch in the 'tilt up' or 'pull down' position until the sunroof and sunshade cycle through their full range of motion and stop.
Frequently Asked Questions (FAQ)
Why did my sunroof switch stop working but the lights are fine?
The console contains multiple circuits on its internal board. It's common for one specific part, like the circuit for the sunroof switch, to fail while others continue to function normally.
Can I add HomeLink or other features by installing a different console?
No. Features like HomeLink, the SOS system, or ambient lighting require specific wiring harnesses and control modules throughout the car. Simply swapping the console will not add these features and may cause other electrical problems. You must buy a replacement that exactly matches your car's original options.
Do I need to disconnect the car battery to replace the overhead console?
While the replacement is low-risk, it is always best practice to disconnect the negative battery terminal before working on any vehicle electronics to prevent accidental short circuits.
If my sunroof is stuck open, can I close it manually?
Yes. After you remove the overhead console, you will see the sunroof motor. There is typically a spot for an Allen key to manually turn the motor and close the glass.
Technical Specifications
OEM Part Numbers: 4G0959719 4G0947135G 4G09597196PS 4G0947135G6PS 4G0959613 4G0959719ET1 4G0947135GET1 4G0947135GBF1
Configurations vary based on options: Sunroof (standard/panoramic), HomeLink (garage door opener), SOS emergency call button, ambient lighting controls, and color (black, gray, beige).
We Have This Part in Stock



The information in this article is provided for general reference and educational purposes only. Vehicle specifications, procedures, and part compatibility can vary by production date, trim level, and region. Always consult your vehicle's factory service manual and verify part numbers before purchasing or performing repairs. Safety-critical components such as airbags, seat belts, and braking systems should be installed by a qualified professional.
- Audi A6:
- Audi S6:
- Audi RS7:
- Audi S7:
- Audi A7:
- 🛍️ Shop This Part
- Symptoms of a Failing Overhead Console
- Known Issues, Recalls, and Technical Service Bulletins (TSBs)
- Buying a Used 2013-2018 Audi Overhead Console: What to Check
- 1. Match the Features and Buttons EXACTLY
- 2. Physically Inspect the Unit
- Cost of Replacement
- Overhead Console Replacement Guide (DIY)
- Step-by-Step Instructions
- Frequently Asked Questions (FAQ)
- 🎟️ Get 5% Off