

U1549 on 2015-2019 GMC Yukon Denali: Network Communication Loss Causes and Fixes
On a 2015-2019 GMC Yukon Denali, code U1549 almost always indicates a pinched wiring harness under the driver's side dashboard. This is a well-documented factory issue causing widespread electrical problems. The fix is to repair the damaged wires, which costs about $10-$50 in parts but involves several hours of labor.
- U1549 on a 2015-2019 Yukon Denali is almost certainly caused by a pinched wiring harness under the driver's side dash, not a failed module. This is a known factory flaw.
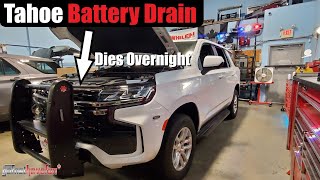
- Symptoms are widespread and seemingly random, including a dead battery, non-functional rear windows/wipers, and radio issues.
- Diagnosis should start with a physical inspection of the harness near the driver's side dash bracket, as detailed in GM TSB #PIT5288H.
- The repair involves freeing and repairing the wires, not expensive module replacement. Using high-quality anti-abrasion tape like Tesa 51608 is recommended for the final wrap.
What's Unique About the 2015-2019 Gmc YUKON DENALI
The 2015-2019 GMC Yukon and its sister platforms (Tahoe, Suburban, Silverado, Sierra, Escalade) have a well-known design flaw where the main dash wiring harness is often pinched by a metal instrument panel bracket on the driver's side. This specific, repeatable failure point is the cause for code U1549 in the vast majority of cases, as documented in multiple revisions of GM Technical Service Bulletin #PIT5288 (currently version H). This makes diagnosis more direct than typical network issues, which can often be difficult to trace.
Diagnostic Flowchart
Tap your situation to follow the diagnostic path that matches what you're seeing on this vehicle.
Symptoms You May Notice
- Dead battery or parasitic battery drain
- Rear power windows inoperative
- Rear wiper inoperative
- Radio, touch screen, or audio system inoperative
- Radio and/or DIC display blank
- Steering wheel controls not working
- "Service Side Blind Zone Alert" message
- "Service Stabilitrak" message
- "Service Tire Pressure System" message
- "No Fob Detect" message on DIC
- Remote Keyless Entry (RKE) or Passive Entry system inoperative
- Radio clock resets or other random electronic glitches
- Replacing the Body Control Module (BCM)
- Replacing the Radio or Human Machine Interface (HMI) module
- Replacing individual window switches or wiper motors
- Replacing the battery without diagnosing the parasitic draw
Most Likely Causes
- Pinched Instrument Panel Wiring Harness 🔴 High Probability A known design/assembly flaw causes the main dash harness to be crushed by a sharp metal mounting bracket to the left of the steering column. This fault is documented in TSB #PIT5288H and affects the entire K2XX platform.
How to confirm: Remove the driver's side lower dash panels and dash-end cover. Visually inspect the large wiring harness where it passes the metal dash support bracket, above and to the left of the parking brake assembly. The TSB notes the damage can be on the upper or lower portion of the bracket and may be difficult to see. A key test is to gently pull on the harness; if it is stuck and does not move freely, it is almost certainly pinched.
Typical fix: Disconnect the battery. Loosen the bracket's mounting bolts to free the harness. Cut open the protective tape/loom, inspect individual wires for damage (chafed insulation, broken copper strands), and repair any broken or chafed wires with solder and heat shrink or quality butt connectors. GM specifies using bulletin 10-00-89-005 for wire repair procedures. Re-wrap the harness with anti-abrasion PET fleece tape (e.g., Tesa 51608) and reroute it away from the bracket, securing with zip ties to prevent future pinching.
Est. part cost: $10-$50 - Poor Ground Connection ⚪ Low Probability Ground points, particularly those on the engine block or frame, can become loose or corroded, causing intermittent network-wide communication failures that mimic a wiring short. This is especially true in regions with high humidity or road salt usage.
How to confirm: Check major ground points like G110 (driver's side of the engine block, behind the power steering pump) for tightness and corrosion. A voltage drop test from the battery negative terminal to the ground point can confirm a poor connection. The connection may look fine externally but be corroded under the bolt head.
Typical fix: Remove the ground nut or bolt, clean the terminal, the wire eyelet, and the mounting surface to bare metal, then re-secure it tightly. Apply a dielectric grease to prevent future corrosion.
Est. part cost: $1-$5
Rare But Worth Checking
- Corroded Side Blind Zone Module Connector: While the primary issue is the dash harness, the Side Blind Zone Alert modules are located in the rear bumper corners, behind the wheels, and are exposed to water, salt, and road grime. Severe corrosion on the module or its connector can short the low-speed CAN bus, causing communication codes. A visual inspection may reveal a completely deteriorated module.
Diagnosis Steps
- Scan the vehicle for all DTCs. A long list of communication codes (U-codes) across multiple modules is a strong indicator of a network wiring problem rather than a single failed module.
- Perform a preliminary check of the battery and charging system to ensure low voltage is not the cause.
- Following the guidance of TSB #PIT5288H, remove the driver's side knee bolster and dash-end trim panel to access the area near the parking brake pedal.
- Locate the main instrument panel wiring harness where it passes by the large, stamped metal dash support bracket.
- Critically inspect the harness for signs of being pinched, crushed, or chafed. TSB PIT5288H shows photos of the harness being pinched at both the upper and lower portions of this bracket.
- Gently pull on the harness. If it is stuck and does not move freely away from the bracket-to-body interface, it is almost certainly pinched. The TSB states the damage may not be immediately obvious.
- If the harness is pinched, loosen the bracket's mounting bolts to create slack and free the harness.
- Carefully cut away the protective fabric tape or loom to expose the individual wires in the damaged area. Pay close attention to twisted pairs of wires, as these are CAN bus communication lines.
- Inspect each wire for broken strands, exposed copper, or crushed insulation.
- Repair any damaged wires using solder and heat shrink tubing or high-quality butt connectors, following GM bulletin 10-00-89-005 for best practices.
- After repairs, re-wrap the harness with high-quality fabric electrical tape (e.g., Tesa 51608) and secure it with zip ties away from the sharp edges of the bracket to prevent the issue from recurring.
- Clear all DTCs and perform a test drive to ensure all symptoms are resolved.
Parts You'll Likely Need
- Wiring Repair Supplies — The most common cause is damaged wiring, not a failed component. The fix requires supplies to repair the existing harness.
Trusted brands: 3M, Tesa (for anti-abrasion tape, specifically 51608 PET fleece tape)
Aftermarket price range: $10-$50 - Instrument Panel Wiring Harness
(OEM #23307532)— In rare cases of extreme damage where multiple wires are severed, replacing the entire instrument panel harness may be more efficient than performing dozens of individual repairs. This part number is for reference and should be verified with a dealer using the vehicle's VIN.
Trusted brands: ACDelco, GM Genuine Parts
OEM price range: $500-$700
Related Codes That Often Appear With This One
- U1548, U154A — These are related LIN bus communication codes for different devices on the same network, often set together by the same pinched harness issue.
- U0028, U0029, U0077 — These codes indicate general communication bus problems, which are a direct result of the shorted or open wires in the dash harness.
- U0126, U0151, U0415 — These codes indicate lost communication with the Steering Angle Sensor, Restraints Control Module, and ABS module, respectively, which can all be affected by the damaged harness.
- B3101, B144C, C0710, C0544 — These are Body and Chassis codes related to keyless entry and stability control systems that lose communication due to the same wiring fault, as listed in TSB PIT5288H.
Technical Service Bulletins (TSBs) & Recalls
- Bulletin #PIT5288H: Addresses a wide range of electrical concerns (dead battery, inoperative windows/wipers, etc.) and numerous communication codes, including U1549, caused by a pinched left instrument panel wire harness. It provides photos of the pinch point.
- Bulletin #10-00-89-005: Referenced by PIT5288H, this is a general GM bulletin that outlines the standard, approved procedures for performing wire and connector repairs under warranty, ensuring a durable fix.
Platform-Specific Known Issues
- Pinched Dash Harness (TSB PIT5288H): A factory assembly issue documented in TSB #PIT5288H is the primary cause of this code. The instrument panel wiring harness is frequently pinched between a metal body bracket and the body itself on the driver's side, causing wires to short out or break. The TSB has been updated multiple times (e.g., versions C, D, E, G, H), indicating a long-standing, known problem.
Mechanic-Grade Diagnostic Values
- LIN Bus Voltage (Key On, with multimeter on Peak Min/Max) — expected: Toggling between a max of ~12V (or 1V less than battery voltage) and a min of ~1V.. Failure: A steady voltage (stuck high or low) indicates a short to power or ground, or an open circuit. A reading between 7-9V without using Peak Min/Max can be misleading.
- LIN Bus Voltage at Rest (inactive bus) — expected: A steady voltage of approximately 11-12V.. Failure: No voltage may indicate an open circuit or a module that has shut down due to a short.
Scan Tool Commands That Help
- GDS2 (Global Diagnostic System 2): Data Bus Diagnostic Tool — This function acts as an external node on the bus to determine which modules are communicating and which are not. It helps pinpoint the location of a communication breakdown before physically inspecting wiring, defining a starting point for repair.
- GDS2 (Global Diagnostic System 2): Clear All DTCs — After a battery disconnect or jump-start, modules can fail to re-establish communication ('bad-handshake'). Clearing all codes, even if none appear active, can force the BCM and other modules to reset and re-initiate communication.
Wiring & Ground Locations
- Pinched Harness Location — Behind the driver's side of the dash, where the main dash harness passes the left instrument panel mounting bracket. It is best viewed from underneath, looking up near the parking brake pedal assembly.. This is the primary, well-documented failure point described in TSB PIT5288H that causes U1549 by chafing or severing communication wires.
- LIN Bus 1 Wire — Within the main instrument panel harness that is prone to being pinched.. This is one of the specific single-wire data circuits that, when damaged, triggers codes like U1549. According to wiring diagrams, this is often a Green/Violet wire.
- High Speed GMLAN Wires — Within the main instrument panel harness, typically as a twisted pair.. Damage to these wires (often Blue and White) will cause numerous U-codes alongside U1549 as they are the primary communication lines between major modules like the BCM, ECM, and ABS.
- G218 — Inside the cab, on the driver's side A-pillar, behind the dash trim near the speaker.. This is a critical ground point for the instrument panel and BCM. A poor connection here can cause identical symptoms to the pinched harness. In some cases, factory sound-deadening foam gets trapped under the ground nut, preventing a solid connection.
- G110 — On the driver's side of the engine block, behind the power steering pump.. This is a common ground point for the Engine Control Module (ECM) and Transmission Control Module (TCM). While less likely to cause U1549 specifically, a poor connection here can cause other U-codes (like U0100/U0101) and general network failure symptoms.
Real Owner Repair Stories
- YouTube channel 'Broken Cars with Johnnie Mic' (2015 GMC Yukon) — Loss of power steering assist, no tachometer, no communication with ECM or TCM on scan tool, setting codes U0100 and U0101.
❌ Tried (didn't work) Initial diagnosis pointed to a general network failure without a specific location.
✅ What actually fixed it The issue was an intermittent connection at ground point G110, located on the driver's side of the engine block behind the power steering pump. The ground bolt was removed, the connection point was cleaned to bare metal, and it was re-secured.
Helpful Videos

We Have This Part in Stock

The information in this article is provided for general reference and educational purposes only. Vehicle specifications, procedures, and part compatibility can vary by production date, trim level, and region. Always consult your vehicle's factory service manual and verify part numbers before purchasing or performing repairs. Safety-critical components such as airbags, seat belts, and braking systems should be installed by a qualified professional.
- Gmc YUKON DENALI:
- 🎬 Helpful Videos
- 🛍️ Shop This Part
- What's Unique About the 2015-2019 Gmc YUKON DENALI
- Diagnostic Flowchart
- Symptoms You May Notice
- Most Likely Causes
- Rare But Worth Checking
- Diagnosis Steps
- Parts You'll Likely Need
- Related Codes That Often Appear With This One
- Technical Service Bulletins (TSBs) & Recalls
- Platform-Specific Known Issues
- Mechanic-Grade Diagnostic Values
- Scan Tool Commands That Help
- Wiring & Ground Locations
- Real Owner Repair Stories
- 🎟️ Get 5% Off