

OBD-II Code P2124: Throttle/Pedal Position Sensor/Switch 'E' Circuit High Input
The Ultimate Guide to Diagnosing and Fixing P2124: Causes, Pro-Level Diagnostics, and Real-World Costs
- P2124 triggers when the accelerator pedal's 'E' circuit voltage exceeds 4.8 volts, instantly forcing the vehicle into a 30-40 mph limp mode.
- Replacing the accelerator pedal assembly fixes this code 80% of the time and costs between $150 and $450 at an independent repair shop.
- Never replace the pedal if code P0641 is also present; this indicates a missing 5-volt reference signal caused by a wiring short or PCM fault.
- Perform a live-data 'wiggle test' on the pedal wiring harness to definitively identify intermittent shorts before spending money on parts.
What Does P2124 Mean?
P2124 means the Powertrain Control Module (PCM) detects a voltage signal from the gas pedal's secondary sensor ('E' circuit) exceeding the maximum 4.8-volt threshold. Modern gas pedals use two redundant sensors for safety. When one signal sticks high, the PCM distrusts the driver's input, illuminates the Check Engine Light, and instantly activates limp mode.
Technical definition: Throttle/Pedal Position Sensor/Switch 'E' Circuit High Input. The PCM detects voltage from the Accelerator Pedal Position (APP) sensor 'E' circuit above the 4.8-volt maximum threshold for a predetermined fraction of a second.
Can I Drive With P2124?
yes_but_not_recommended. You can drive, but the vehicle enters a reduced power 'limp mode,' limiting speeds to 30-40 mph and RPMs to 2,500. This mode gets you to a safe stopping point, not for highway commuting. Prolonged driving forces an improper air-fuel mixture, destroying the catalytic converter and adding a $1,500+ repair bill.
Common Causes
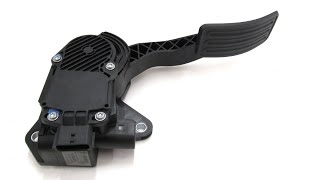
- Faulty Accelerator Pedal Position (APP) Sensor (Very Common) — Internal contacts inside the pedal assembly wear out, sending a continuous 5-volt signal to the PCM regardless of actual pedal position.
- Damaged Wiring or Connector (Common) — Chafed wires, melted insulation, or water intrusion causes the signal wire to short directly to a 5-volt or 12-volt power source inside the harness.
- Poor Ground Connection (Less Common) — A corroded or loose ground wire causes the sensor's baseline voltage to float above normal limits, triggering the high input code.
- Loss of 5-Volt Reference Signal (Less Common) — An open or shorted 5-volt reference circuit from the PCM disables the sensor, usually triggering companion code P0641 alongside P2124.
- Floor Mat Obstruction (Rare) — A bunched-up aftermarket floor mat physically wedges the pedal, preventing it from returning to its 0.5-volt resting position.
- PCM Failure (Very Rare) — The PCM's internal input driver fails and misreads a perfectly functioning sensor signal. This is the absolute last diagnosis.
Symptoms
- Limp Mode (Max 30-40 mph) — The PCM slashes engine power and limits RPMs to 2,500 to prevent unintended acceleration.
- Check Engine Light On — The Malfunction Indicator Lamp (MIL) illuminates instantly when the fault occurs.
- Dead Throttle Response — Pressing the gas pedal produces zero engine response or severe hesitation.
- Cruise Control Disabled — The PCM locks out cruise control when pedal sensor data is unreliable.
Diagnostic Flowchart
Tap your situation to follow the diagnostic path that matches what you're seeing on this code.
Common Fixes & Costs
- Replace Accelerator Pedal Assembly
— Parts: $50-$250, Labor: $100-$200, ~0.7 hr book time
(DIY)
Ford F-150 (2011-2014): OEM W0133-2116563 (Alt: Standard Motor Products APS420)
Chevrolet Silverado (2007-2014): OEM 25832864 (Alt: Standard Motor Products APS265)
Nissan Altima (2007-2012): OEM 18002-9HA0B 🎬 See this walkthrough for replacing a Nissan accelerator pedal (Alt: Standard Motor Products APS310) 🎬 Watch: Step-by-step gas pedal assembly replacement guide - Repair Damaged Wiring or Connector — Parts: $10-$50, Labor: $150-$450, ~2.5 hr book time (Intermediate)
- Clean Ground Connection — Parts: $0-$5, Labor: $50-$150, ~0.5 hr book time (DIY)
- Remove Floor Mat Obstruction — Parts: $0, Labor: $0, ~0.1 hr book time (DIY)
- Replace Powertrain Control Module (PCM) — Parts: $500-$1500, Labor: $150-$300, ~1.5 hr book time (Professional)
Used vs. New Parts: Buying Guide
When a used part is worth it: Never. Electronic sensors degrade over time. Buying a used pedal assembly carries a high risk of premature failure.
Donor-vehicle mileage cap: roughly under 50000 miles for the part to have meaningful remaining life.
Donor quality checklist:
- Verify the part number matches exactly.
- Inspect the connector for bent pins or green corrosion.
Decision logic:
- If A new aftermarket part is available for under $150 → Buy new. The savings from a used part are not worth the risk.
- If The part is a known high-failure item (e.g., Nissan models) → Always buy new.
Warranty tradeoff: Used parts carry a 30-day warranty. New aftermarket parts carry a 1-year to lifetime warranty.
Worst-case if a used part fails: 250
What Happens If You Wait — Timeline
- 0-1 week: Code P2124 sets, MIL illuminates, and vehicle enters limp mode. Speed is limited to 30-40 mph. (MPG impact: 10%% · Added cost: $0)
- 1-4 weeks: Rich air-fuel mixture begins to foul spark plugs and oxygen sensors. (MPG impact: 20%% · Added cost: $50)
- 1-3 months: Unburned fuel overheats and melts the catalytic converter's internal honeycomb structure. (MPG impact: 25%% · Added cost: $1500)
- 3+ months: Clogged catalytic converter causes extreme exhaust backpressure, leading to severe engine overheating. (MPG impact: 50%% · Added cost: $3000)
Cost of Not Fixing It
- Immediate: Limp mode limits speed to 30-40 mph, making highway driving impossible. (Added cost: 0)
- 1-4 weeks: Rich running condition wastes fuel and fouls spark plugs. (Added cost: 50)
- 1-3 months: Unburned fuel melts the catalytic converter, requiring complete replacement. (Added cost: 1500)
Diagnosis Steps
- Scan Codes and Check TSBs
Read all stored codes. P2138 confirms a pedal issue; P0641 points to a 5-volt reference short. Check manufacturer Technical Service Bulletins (TSBs) for known wiring rub points specific to your vehicle.
Tools: OBD-II Scanner, Internet Access (Beginner) - Visual Inspection
Check for floor mat obstructions. Inspect the pedal wiring harness for chafing against the steering column and ensure the electrical connector is fully seated and free of green corrosion.
Tools: Flashlight (Beginner) - Monitor Live Data
Graph APP1 and APP2 voltages while pressing the pedal. The 'E' circuit will show a flatline high voltage (near 5.0V) instead of a smooth 0.5V to 4.5V sweep, confirming the hard fault.
Tools: Advanced OBD-II Scanner (Intermediate) - Wiggle Test
While watching live data, aggressively wiggle the harness at the pedal and PCM. Voltage spikes or dropouts confirm a wiring short or loose pin in that specific area.
Tools: Advanced OBD-II Scanner (Intermediate) - Test 5-Volt Reference and Ground
Unplug the pedal. With the key ON, probe the harness connector. You must see exactly 5.0V on the reference pin and less than 0.1V on the ground pin. High ground voltage proves a bad ground connection.
Tools: Digital Multimeter (Advanced) - Test Signal Circuit for Short
With the pedal unplugged and key ON, probe the 'E' signal wire. A reading above 0V confirms the wire is shorted to power inside the harness, ruling out the pedal itself.
Tools: Digital Multimeter (Advanced)
When This Code Triggers (Freeze-Frame Conditions)
- Engine Coolant Temp: 170-220°F (Fully warmed up, in closed-loop operation.)
- RPM: 1,500-2,500 (Cruising speeds.)
- Engine Load: 15-40% (Light to moderate acceleration.)
- Vehicle Speed: 30-60 mph (Steady highway or city driving.)
Related Codes
- P2138 — Voltage Correlation Error. Confirms the 'E' circuit reading doesn't match the 'D' circuit, proving a fault in the pedal assembly or its direct wiring.
- P0641 — 5-Volt Reference Circuit Open. Proves the issue is a shared power supply short affecting multiple sensors, not the pedal itself.
- P2127 — Circuit 'E' Low Input. The exact opposite of P2124, caused by an open wire or a short to ground rather than a short to power.
Climate & Environmental Factors
- Water Intrusion: Moisture penetrates firewall connectors, corroding pins and shorting the 5-volt signal directly to the sensor output.
- Winter Road Salt: Salt spray accelerates corrosion on chassis ground points, causing the sensor's baseline voltage to float high.
How to Talk to a Mechanic About This Code
Say this: "My car is in limp mode with a P2124 code. Please verify the 5-volt reference and ground at the pedal connector, and check the signal wire for a short to voltage before replacing the assembly."
Prevents the shop from blindly replacing the pedal without confirming the root cause, saving you from paying for a repair that doesn't fix a wiring issue.
Avoid saying:
- Just replace the gas pedal sensor.
- My car is acting weird, fix whatever is wrong.
Questions to ask before authorizing the repair:
- Did you find a stable 5-volt reference and a good ground (under 0.1 volts) at the connector?
- Was there any voltage present on the signal wire when the connector was unplugged?
- What is the warranty on both the part and the labor?
Where to Take It: Dealer vs Independent vs Chain
- Dealer:
A safe but expensive choice. Required for warranty work or software updates.
Best for: Vehicles under warranty., Known TSBs requiring a PCM software re-flash.
Downsides: Highest labor rates., More likely to replace entire assemblies rather than repair a single wire. (Typical cost: +50% vs. baseline) - Independent Shop:
Best overall fit. A good independent shop diagnoses the circuit correctly at a lower cost than a dealer.
Best for: Out-of-warranty vehicles., Wiring diagnostics and pedal replacement.
Downsides: Diagnostic skill varies; look for ASE certifications. (Typical cost: +0% vs. baseline) - Chain Shop:
Avoid for initial diagnosis. Acceptable only if you have already diagnosed the pedal and just need it installed.
Best for: Routine maintenance like oil changes and tires.
Downsides: Lacks experienced electrical diagnosticians., High pressure to upsell parts. (Typical cost: -10% vs. baseline)
When to Walk Away From the Repair
If the estimated repair cost exceeds 40-50% of your car's private-party market value, seriously consider whether to repair it.
- Car worth $4000, fix is $400: Fix it. A typical pedal replacement is well below the threshold.
- Car worth $2500, fix is $1200: Walk away. A complex wiring repair on an older car is not financially viable.
What Scan Tool You Need for This Code
Minimum: An OBD-II scanner with Live Data streaming is essential to view the voltage readings from both accelerator pedal sensors in real-time.
A basic $20 code reader cannot show live sensor voltages, making it impossible to see if the sensor signal is stuck high or intermittent.
Budget: BlueDriver Pro Scan Tool (~$100) — Connects to your smartphone via Bluetooth and graphs live data from both APP sensors.
Mid-range: Foxwell NT510 Elite (~$180) — Provides faster live data refresh rates and manufacturer-specific codes.
Professional: Autel MaxiCOM MK808 (~$450) — Offers full bidirectional control and detailed data graphing to spot intermittent wiring issues.
Rent vs buy: Auto parts stores offer free loaner scanners, but they often lack the live data graphing required for this specific diagnosis. Buying a budget live-data scanner is recommended.
How to Clear the Code After You Fix It
- Use an OBD-II scan tool to clear all Diagnostic Trouble Codes (DTCs).
- Ensure the fuel tank is between 15% and 85% full.
- Perform a complete OBD-II drive cycle to allow readiness monitors to run.
Drive cycle (~30 minutes): Cold start, idle for 3 minutes, drive 15 minutes at a steady 55 mph, and allow the vehicle to coast down without braking.
Readiness monitors affected: Catalyst Monitor, Evaporative System (EVAP) Monitor, Oxygen (O2) Sensor Monitor
Before emissions retest: drive at least 100 miles to fully set monitors.
Watch out for:
- Disconnecting the battery clears the code but resets all readiness monitors to 'Not Ready', guaranteeing an emissions test failure.
- The code returns immediately if the root electrical fault is not repaired.
Will This Fail Emissions / State Inspection?
Yes — this code typically fails an OBD-II emissions inspection.
- California: An active Check Engine Light is an automatic failure. All readiness monitors must be 'Ready' to pass.
- New York: Automatically fails inspection if the Check Engine Light is on.
- Texas: In the 17 counties requiring emissions testing, an illuminated MIL is an automatic test failure.
Most Commonly Affected Vehicles
- Ford F-150, Fusion, Focus, Escape (2011-2018) — Prone to wiring harness chafing against the steering column.
- Chevrolet / GMC Silverado, Sierra, Tahoe (2007-2014) — Frequently breaks the main PCM ground wire on the passenger side of the engine block.
- Nissan Altima, Titan, Sentra (2004-2015) — Suffers from high rates of internal APP sensor failure requiring complete pedal replacement.
- Dodge / Ram Ram 1500, Charger (2006-2012) — APP sensor is a common failure item leading to immediate limp mode.
- Honda CR-V, Accord (2005-2011) — Known for failures of the APP sensor assembly, which is not sold separately from the pedal.
- Subaru Outback, Forester (2005-2014) — APP sensor failures disable cruise control and vehicle dynamics control systems.
- Toyota Corolla, Camry (2009-2016) — Commonly sets correlation code P2138 alongside P2124 when the pedal fails.
Manufacturer-Specific Notes
- General Motors (GM): On 2007-2014 trucks, a small ground wire attached to the passenger side of the intake manifold frequently breaks, triggering P2124. Always check this wire before replacing the pedal.
- Nissan: Nissan models from 2004-2013 suffer from internal APP sensor contacts deteriorating. On a Nissan with P2124, the pedal assembly itself is the culprit 90% of the time.
- Ford: F-Series trucks route the pedal harness too close to the steering shaft and metal brackets, causing chafing and shorts to power.
Real Owner Stories
2008 Chevy Silverado at 150K miles
Truck entered 'Reduced Engine Power' mode with codes P2124 and P2138.
What they tried:
- Replaced the accelerator pedal assembly, but the code returned immediately.
Outcome: Found a broken ground wire on the passenger side of the engine block. Repaired it with a new ring terminal for $5, permanently fixing the limp mode.
Lesson: On GM trucks, always check the main PCM ground wire on the engine block before replacing the pedal.
2006 Pontiac GXP at 150K miles
Car flashed 'Traction Control Off' and 'Reduced Engine Power' with code P2138.
What they tried:
- Cleaned connectors and checked for wiring damage.
Outcome: Replaced the accelerator pedal assembly, permanently resolving the issue.
Lesson: Limp mode combined with traction control warnings is a standard safety protocol for a failing pedal sensor.
Intermittent P2124 after car wash
P2124 code and limp mode only appeared after heavy rain or a car wash.
What they tried:
- Suspected a faulty pedal sensor.
Outcome: Traced to water intrusion in the main engine wiring harness connector at the firewall. Dried and sealed with dielectric grease.
Lesson: If the fault correlates with moisture, locate and seal the water intrusion point before replacing parts.
How to Prevent This Code From Triggering
- Apply Dielectric Grease to Connectors (Every 5 years) — Creates a barrier that prevents moisture from corroding pins and causing intermittent signals.
- Secure Wiring Harnesses (Once) — Zip-tying the pedal harness away from the steering shaft prevents chafing and shorts to power.
- Clean Chassis Ground Points (Every 3 years) — Removes road salt corrosion, ensuring a reliable ground path and preventing floating voltage issues.
Frequently Asked Questions
What is the difference between an APP sensor and a TPS?
The Accelerator Pedal Position (APP) sensor is on your gas pedal and tells the computer your request for power. The Throttle Position Sensor (TPS) is on the engine's throttle body and reports how far the throttle blade is actually open. They work together to operate a drive-by-wire system.
I replaced the pedal but P2124 came back. What's next?
The fault is in the wiring harness or a bad ground connection. You must test the circuit for a short to voltage and verify the 5-volt reference is stable. Perform a wiggle test on the harness while watching live data to find the intermittent short.
Does a new accelerator pedal need a relearn procedure?
Most vehicles do not require a specific relearn procedure for the accelerator pedal itself. However, you must clear all codes with an OBD-II scanner to exit limp mode. Performing a throttle body relearn is also recommended to ensure a smooth idle.
Can I just clear the P2124 code to fix it?
No. P2124 indicates a hard electrical fault in the sensor circuit. The PCM detects the high voltage instantly on startup and immediately restores the Check Engine Light and limp mode.
How much does it cost to fix code P2124?
Replacing the accelerator pedal assembly costs between $150 and $450 at a repair shop. If the issue is a damaged wiring harness, diagnostic time and repair labor typically cost $150 to $500.
Key Takeaways
- P2124 triggers when the accelerator pedal's 'E' circuit voltage exceeds 4.8 volts, instantly forcing the vehicle into a 30-40 mph limp mode.
- Replacing the accelerator pedal assembly fixes this code 80% of the time and costs between $150 and $450 at an independent repair shop.
- Never replace the pedal if code P0641 is also present; this indicates a missing 5-volt reference signal caused by a wiring short or PCM fault.
- Perform a live-data 'wiggle test' on the pedal wiring harness to definitively identify intermittent shorts before spending money on parts.
Helpful Videos

The information in this article is provided for general reference and educational purposes only. Vehicle specifications, procedures, and part compatibility can vary by production date, trim level, and region. Always consult your vehicle's factory service manual and verify part numbers before purchasing or performing repairs. Safety-critical components such as airbags, seat belts, and braking systems should be installed by a qualified professional.
- 🎬 Helpful Videos
- What Does P2124 Mean?
- Can I Drive With P2124?
- Common Causes
- Symptoms
- Diagnostic Flowchart
- Common Fixes & Costs
- Used vs. New Parts: Buying Guide
- What Happens If You Wait — Timeline
- Cost of Not Fixing It
- Diagnosis Steps
- When This Code Triggers (Freeze-Frame Conditions)
- Related Codes
- Climate & Environmental Factors
- How to Talk to a Mechanic About This Code
- Where to Take It: Dealer vs Independent vs Chain
- When to Walk Away From the Repair
- What Scan Tool You Need for This Code
- How to Clear the Code After You Fix It
- Will This Fail Emissions / State Inspection?
- Most Commonly Affected Vehicles
- Manufacturer-Specific Notes
- Real Owner Stories
- 2008 Chevy Silverado at 150K miles
- 2006 Pontiac GXP at 150K miles
- Intermittent P2124 after car wash
- How to Prevent This Code From Triggering
- Frequently Asked Questions
- What is the difference between an APP sensor and a TPS?
- I replaced the pedal but P2124 came back. What's next?
- Does a new accelerator pedal need a relearn procedure?
- Can I just clear the P2124 code to fix it?
- How much does it cost to fix code P2124?
- Key Takeaways
- 🎟️ Get 5% Off