

OBD-II Code P1055: Variable Valve Timing Control Circuit Malfunction
What P1055 means, why it triggers, and how to fix it
- P1055 is a manufacturer-specific code that flags an electrical or hydraulic failure in the variable valve timing (VVT) system, with definitions varying wildly between BMW, Toyota, and Subaru.
- Check your oil first; over 50% of VVT codes trigger because low, dirty, or incorrect-viscosity engine oil cannot generate the hydraulic pressure needed to adjust valve timing.
- Test the VVT solenoid's resistance with a multimeter; a healthy solenoid reads between 8 and 12 Ohms, while anything under 2 Ohms indicates a dead short requiring replacement.
- Limit driving to under 100 miles with an active P1055 code to prevent unburnt fuel from overheating and destroying your catalytic converter, a secondary failure costing upwards of $1,500.
- Repair costs range from a $60 DIY oil change to over $1,200 for complex manufacturer-specific fixes like a Toyota VALVEMATIC controller or BMW eccentric shaft sensor.
What Does P1055 Mean?

P1055 is a manufacturer-specific code, meaning its definition changes depending on your car. Most commonly, the engine control unit (ECU) detects a power supply or electrical circuit problem in the variable valve timing (VVT) system. This system adjusts engine valve timing on the fly to improve performance and fuel economy. For some manufacturers, it indicates a high voltage condition in the VVT motor circuit; for others, it points to a discrepancy between desired and actual valve lift.
Technical definition: As a P1xxx code, there is no universal SAE/ISO definition. For BMW and MINI, it is 'Valvetronic (VVT) Supply Voltage Control Motor High Input (Bank 1)', triggered when the ECU detects supply voltage over 17 volts (often after a jump-start). For Toyota, it flags a 'VALVEMATIC Angle Difference', where actual valve duration differs from requested duration by 14.5 degrees or more. For Hyundai, it means 'VVT supply voltage control motor high input bank 1'.
Can I Drive With P1055?

Yes, But With Caution. You can drive, but expect poor engine performance, reduced fuel economy, and a rough idle. Continued driving for over 100 miles causes unburnt fuel to overheat and damage the catalytic converter, a repair costing between $1,000 and $2,500. Get it diagnosed immediately to prevent expensive secondary failures.
Common Causes

- Low or Dirty Engine Oil (Very Common) — The VVT system is hydraulic and uses oil pressure to adjust timing. If the oil level is low, or the oil is old, sludgy, or the wrong viscosity, it cannot operate the VVT components correctly, triggering a fault.
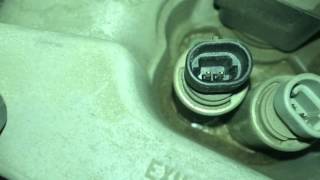
- Faulty VVT Solenoid (Oil Control Valve) (Very Common) — This electronically controlled valve directs oil flow to the camshaft phasers. It is a common failure point that clogs with sludge or fails electrically. 🎬 Watch: How to test a VVT solenoid for electrical failure.
- Clogged VVT Oil Filter Screens (Common) — Many engines have small, fine-mesh filter screens in the oil passages leading to the VVT solenoids. These screens clog with debris, starving the system of oil pressure even if the oil level is correct and the solenoid is functional.
- Damaged Wiring or Poor Connection (Common) — The wiring harness or connector for the VVT solenoid, Valvetronic motor, or related sensor frays, corrodes, or loosens, interrupting the electrical signal. Wires rubbing against other components cause a short.
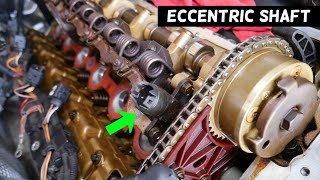
- Failed BMW Eccentric Shaft Sensor (Common) — Specific to BMWs with Valvetronic, this sensor monitors the position of the eccentric shaft. It notoriously fails when engine oil leaks from its own seal or the valve cover gasket into its electrical connector. 🎬 See where the eccentric shaft sensor is located and replaced.
- Stretched Timing Chain or Failing Cam Phaser (Less Common) — Over time, a timing chain stretches or a cam phaser mechanically fails, causing a mismatch between crankshaft and camshaft positions. The ECU interprets this timing deviation as a VVT control fault.
- Worn Camshaft Bearing Ledges (Rare) — On high-mileage engines, the bearing surfaces on which the camshaft rides wear down. This wear causes a loss of oil pressure specifically in the cylinder head, starving the VVT system and triggering codes.
- Faulty Engine Control Module (ECM) (Rare) — The ECM itself fails and sends incorrect signals or falsely reports a problem with the VVT circuit. Consider this only after exhausting all other possibilities, including wiring and software updates.
Symptoms

- Check Engine Light is On — The ECU illuminates the Malfunction Indicator Lamp (MIL) on your dashboard immediately after detecting the fault.
- Rough Idle or Stalling — Incorrect valve timing makes the engine run erratically or shut off when stopped.
- Poor Acceleration and Power Loss — The engine cannot adjust its timing for optimal power, making the car feel sluggish and unresponsive.
- Decreased Fuel Economy — With the engine running inefficiently, fuel consumption increases noticeably.
- Rattling or Ticking Engine Noise — Indicates a mechanical VVT problem, like a failing cam phaser, a stretched timing chain, or low oil pressure.
Diagnostic Flowchart
Tap your situation to follow the diagnostic path that matches what you're seeing on this code.
Common Fixes & Costs
- Engine Oil and Filter Change — Parts: $30-$80, Labor: $50-$120, ~0.7 hr book time (DIY)
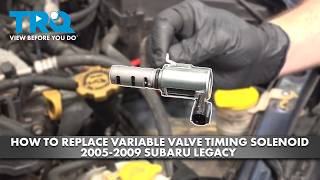
- Replace VVT Solenoid (Oil Control Valve)
— Parts: $40-$250, Labor: $100-$400, ~1 hr book time
(DIY)
: OEM 24355-2G500 (Intake), 24375-2G500 (Exhaust) (Alt: Standard Motor Products VVT429, Dorman 918-021)
: OEM 10921AA080 (for AVLS) (Alt: Dorman 917-247, Walker Products 922-105)
: OEM 12655420 (Intake), 12655421 (Exhaust) (Alt: Bosch 0232200008, Delphi VVT47) - Clean or Replace VVT/VTEC Filter Screens — Parts: $10-$50, Labor: $75-$150, ~1.2 hr book time (DIY)
- Replace BMW Eccentric Shaft Sensor
— Parts: $300-$550, Labor: $800-$1600, ~4.5 hr book time
(Professional)
: OEM 11377524879 (for N52 engine) (Alt: VDO S119565001Z) - Replace Toyota VALVEMATIC Controller Assembly
— Parts: $950-$1100, Labor: $1100-$1300, ~8 hr book time
(Professional)
: OEM 222A0-37025 (Varies by model) (Alt: OEM Denso highly recommended) - Replace Cam Phaser(s) and Timing Chain — Parts: $400-$1200, Labor: $1000-$2800, ~8 hr book time (Professional)
DIY vs Professional
- Engine Oil and Filter Change — Beginner:
Tools: Wrench/socket for drain plug, oil filter wrench, drain pan, funnel. - Replace VVT Solenoid / Clean Filter Screens — Beginner:
Tools: Basic socket set, torque wrench, rags, brake cleaner. - Replace BMW Eccentric Shaft Sensor — Beginner:
Tools: Extensive socket set (including E-Torx), torque wrench, trim removal tools, picks, sealant. - Replace Toyota VALVEMATIC Controller — Beginner:
Tools: Extensive socket set, torque wrench, specialized tools for actuator pin, bidirectional scan tool. - Replace Timing Chain and/or Phasers — Beginner:
Tools: Engine-specific timing tools, extensive socket set, torque wrenches, pullers.
Used vs. New Parts: Buying Guide
When a used part is worth it: For externally mounted, easily accessible parts like a VVT solenoid, a used OEM part from a low-mileage vehicle is a cost-effective alternative to a new aftermarket part.
Donor-vehicle mileage cap: roughly under 80000 miles for the part to have meaningful remaining life.
Donor quality checklist:
- Verify the part number exactly, as multiple versions exist.
- Ask for the VIN of the donor car to check its history and mileage.
- Avoid parts from vehicles scrapped due to engine failure or oil sludge issues.
Decision logic:
- If Part is labor-intensive to install (e.g., BMW Eccentric Shaft Sensor, Toyota VALVEMATIC controller) → Buy new OEM or OE manufacturer part. The risk of a used part failing and requiring repeat labor is too high.
- If Part is a simple VVT solenoid on a high-mileage vehicle (>150k miles) → A tested, used part from a reputable seller is an acceptable budget repair.
- If Vehicle is newer (<80k miles) and the part is under $150 → Buy new for the longer warranty and peace of mind; the cost savings on a used part are minimal.
Warranty tradeoff: Used parts typically offer a 30-90 day warranty. New aftermarket parts come with a 1-year to limited lifetime warranty. New OEM parts carry a 1-2 year warranty.
Worst-case if a used part fails: 400-1500. This represents the cost of paying for the same labor twice and buying a second part if the used component fails prematurely.
What Happens If You Wait — Timeline
- 0-1 month: Check Engine Light is on. You notice a slightly rough idle or a minor hesitation when accelerating. The issue is often intermittent. (MPG impact: 3-5%% · Added cost: $0-40 in wasted fuel)
- 1-3 months: Symptoms become consistent. Engine power is noticeably reduced, acceleration is sluggish, and the rough idle is present every time you stop. Fuel economy drops significantly. (MPG impact: 5-15%% · Added cost: $50-150 in wasted fuel)
- 3-6 months: The engine runs poorly. Inefficient combustion from incorrect valve timing causes unburnt fuel to enter the exhaust, overheating and damaging the catalytic converter. You smell fuel from the exhaust. (MPG impact: 10-20%% · Added cost: $1,000-$2,500 (Catalytic converter replacement required))
- 6+ months: Catastrophic secondary damage occurs. Continued operation with incorrect oil pressure accelerates wear on the timing chain, guides, and camshafts. A stretched or broken timing chain leads to total engine failure. (MPG impact: 20-30%+% · Added cost: $3,000-$8,000+ (Full timing job or engine replacement needed))
Cost of Not Fixing It
- 0-1 month: Noticeable drop in fuel economy (5-15%), rough idle, and poor acceleration. Increased fuel costs are the primary financial impact. (Added cost: 25-75)
- 1-6 months: Continued misfires and improper combustion cause unburnt fuel to enter the exhaust, overheating and destroying the catalytic converter. (Added cost: 1200-2800)
- 6+ months: Severe neglect leads to accelerated wear on timing chains, guides, and camshafts due to incorrect oil pressure. This leads to catastrophic engine failure. (Added cost: 3000-8000)
Diagnosis Steps
- Check Engine Oil Level and Condition
The VVT system depends entirely on clean oil at the correct level. Pull the dipstick, check the level, and examine the oil's color and consistency. If it is low, top it off. If it is dark, gritty, or milky, change the oil immediately.
Tools: Rag or paper towel (Beginner) - Scan for Additional Codes
Use an OBD-II scanner to check for other codes. Codes for misfires (P030x), camshaft position (P0011, P0014), or other VVT system codes (P2646) pinpoint the root cause. Generic scanners often misinterpret manufacturer-specific codes.
Tools: OBD-II Scanner (Beginner) - Inspect VVT Solenoid, Sensors, and Wiring
Locate the VVT solenoid and related sensors. Unplug their electrical connectors and inspect both sides for corrosion, bent pins, or oil contamination. Follow the wiring harness, looking for damage, fraying, or melting.
Tools: Flashlight (Beginner) - Check for Power at the Connector
With the ignition on and engine off, use a multimeter to check for voltage at the VVT solenoid's electrical connector. You should see a reading close to battery voltage. No voltage points to a wiring issue, a blown fuse, or a bad ECM.
Tools: Multimeter (Intermediate) - Test VVT Solenoid Resistance
Using a multimeter set to Ohms (Ω), measure the resistance between the two electrical pins on the VVT solenoid. A healthy solenoid reads between 8 and 12 Ohms. A reading of 'OL' indicates an open circuit, while under 2 Ohms suggests a short. Replace the solenoid if it fails this test.
Tools: Multimeter (Intermediate) - Test VVT Solenoid Actuation
Apply a 12V power source and a ground to the two pins of the VVT solenoid. You should hear a distinct 'click' as the internal plunger moves. No click means the solenoid is mechanically stuck and requires replacement.
Tools: 12V power source (e.g., car battery), fused jumper wires (Intermediate) - Clean or Replace VVT Oil Filter Screens
Locate the VVT oil filter screens for your specific engine. Remove and clean them with brake cleaner. If they are damaged or heavily clogged with sludge, replace them.
Tools: Socket set, brake cleaner, picks (Intermediate) - Pro Tip: Check BMW Valvetronic Fuses
On BMWs, a blown fuse frequently causes Valvetronic faults. Before condemning the expensive motor, check the dedicated 40A Valvetronic fuse located in the engine computer (DME) box under the hood, not in the main glove box panel.
Tools: Socket set, trim removal tools (Advanced) - Inspect BMW Eccentric Shaft Sensor (If Applicable)
On BMW models, unplug the large round connector for the eccentric shaft sensor on the valve cover. If you find engine oil inside the connector, the sensor has failed internally. Replace the sensor and the valve cover gasket.
Tools: Flashlight, basic hand tools to remove engine cover (Advanced) - Pro Tip: Perform Toyota VALVEMATIC Active Test
For Toyota models, use a professional scan tool like Techstream to perform an 'Active Test'. Compare the 'VALVEMATIC Target Angle' with the 'VALVEMATIC Current Angle'. If the current angle does not follow the target angle, it confirms a system fault.
Tools: Toyota Techstream or equivalent bidirectional scan tool (Advanced) - Advanced: Test BMW Valvetronic Motor
Remove the Valvetronic motor. Apply 12V power to the two pins on the motor's connector. The worm gear should spin smoothly and quickly. Reverse the polarity; the motor should spin in the opposite direction. If it is slow or noisy, replace it.
Tools: Socket set, 12V power source, fused jumper wires (Advanced)
When This Code Triggers (Freeze-Frame Conditions)
- Engine Coolant Temp: 180-200°F (VVT system diagnostics run when the engine is fully warmed up to ensure stable oil viscosity.)
- RPM: 1500-2500 (The fault is detected during steady-state cruising or light acceleration, not at idle or full throttle.)
- Engine Load: 30-60% (This moderate load condition occurs during highway driving when the VVT system actively adjusts timing for efficiency.)
- Vehicle Speed: 35-55 mph (Corresponds to the RPM and load conditions for steady highway driving where the fault registers.)
Related Codes
- P0011 / P0014 — These codes indicate the result of a timing problem (camshaft timing is over-advanced or over-retarded). P1055 points to the cause—a fault in the electrical control circuit for the VVT system.
- P2646 — The primary Honda/Acura code for Rocker Arm Actuator System Performance. It is functionally identical to Toyota's P1055, pointing to an issue in the variable valve lift system caused by low oil or clogged screens.
- P0300-P0308 — Cylinder misfire codes. If the VVT system malfunctions due to the P1055 fault, it leads to incomplete combustion and triggers misfire codes for one or more cylinders.
- P0155 / P0135 — O2 Sensor Heater Circuit Malfunction codes are generally unrelated but appear with P1055 due to widespread electrical issues like a failing alternator, bad battery, or blown fuse.
Climate & Environmental Factors
- Cold Weather: Low ambient temperatures increase engine oil viscosity. This slows the hydraulic response of the VVT system on startup, triggering timing deviation codes. Using the manufacturer-specified oil weight is critical.
- Low Battery Voltage: On electronically-intensive systems, low system voltage during cold weather cranking causes control modules to lose learned limit positions or register false voltage faults, triggering P1055.
How to Talk to a Mechanic About This Code
Say this: "I have a P1055 code on my [Make, Model]. I'd like to schedule a diagnostic. Please start by checking the simple things like oil condition, VVT solenoid operation, and wiring before moving to complex diagnostics."
This signals you've done research and want a logical, cost-effective diagnostic path. It steers the mechanic away from immediately quoting an expensive repair and focuses them on the most common failure points first.
Avoid saying:
- 'Just fix my check engine light.'
- 'The internet said it's the Valvetronic motor, can you replace it?'
- 'Do whatever you think is best.'
Questions to ask before authorizing the repair:
- What was the result of the initial electrical tests on the solenoid/motor?
- Did you check for TSBs related to P1055 for this model?
- If you recommend a VALVEMATIC/Valvetronic replacement, what specific tests confirmed the failure?
- What is the warranty on the parts and labor for this repair?
Where to Take It: Dealer vs Independent vs Chain
- Dealer:
Recommended for BMW and Toyota with this code, as specialized tools and knowledge are required.
Best for: Vehicles under warranty., Complex manufacturer-specific issues like BMW Valvetronic or Toyota VALVEMATIC that require proprietary software for diagnosis and calibration.
Downsides: Highest labor rates and part costs., Less willing to perform targeted repairs (e.g., cleaning screens) versus replacing a whole assembly. (Typical cost: +40% vs. baseline) - Independent Shop:
Best fit for most makes like Hyundai, Kia, and Subaru. For BMW/Toyota, choose a well-vetted, marque-specific independent specialist who confirms they have the necessary diagnostic software.
Best for: Out-of-warranty vehicles where the cause is a common failure (e.g., VVT solenoid on a Hyundai or Subaru)., Building a long-term relationship with a mechanic who knows your car.
Downsides: Quality and expertise vary greatly; a European car specialist is mandatory for a BMW., May lack the expensive, latest manufacturer-specific diagnostic tools. (Typical cost: +0% vs. baseline) - Chain Shop:
AVOID for diagnosing P1055. They can perform an oil change or replace an accessible solenoid if you diagnosed the problem yourself, but do not rely on them for the diagnostic process.
Best for: Simple, clear-cut repairs like an oil change or battery replacement.
Downsides: Technician skill varies dramatically., Lack the deep diagnostic tools and experience for complex, manufacturer-specific codes like P1055., High pressure to upsell unnecessary services. (Typical cost: -10% vs. baseline)
When to Walk Away From the Repair
If the estimated repair cost exceeds 40-50% of the car's private-party value, seriously consider selling or trading it in instead of repairing it.
- Car worth $5000, fix is $400: Fix it. This is a minor repair well below the threshold.
- Car worth $6000, fix is $2500: Borderline. The repair is ~42% of the car's value. Get a second opinion and assess the car's overall health before proceeding.
- Car worth $3000, fix is $2200: Walk away. The repair cost is over 70% of the vehicle's value and is not financially sensible.
What Scan Tool You Need for This Code
Minimum: A scanner that reads manufacturer-specific codes and views live data streams (e.g., camshaft position requested vs. actual). A basic code reader is not enough.
A $20 reader only shows the generic P1055 code, not the manufacturer-specific definition or the live data needed to see if solenoids respond correctly. This leads to guessing and replacing the wrong parts.
Budget: BlueDriver Pro (~$99) — Reads manufacturer-specific codes for BMW/Toyota, graphs live data to compare requested vs. actual VVT angles, and provides freeze-frame data.
Mid-range: Foxwell NT510 Elite / NT530 (~$180) — Provides OE-level diagnostics for a single chosen brand. It has bidirectional controls to perform active tests, adaptations, and service functions like the Toyota 'Learn Value Reset'.
Professional: Autel MaxiCOM MK808S / MK906BT (~$450-1200) — Full bidirectional control for all major brands. Performs active tests on solenoids, runs BMW Valvetronic limit tests, and executes Toyota VALVEMATIC calibrations.
Rent vs buy: For a one-time diagnosis, AutoZone's Loan-A-Tool program allows you to borrow a basic OBD-II scanner for free. However, these scanners are too basic for P1055. If your code requires bidirectional control, you must buy a capable scanner.
How to Clear the Code After You Fix It
- Use an OBD-II scan tool to clear the fault code after the repair is complete.
- Perform a complete drive cycle to allow the vehicle's readiness monitors to run.
- Check for any pending or recurring codes after the drive cycle.
Drive cycle (~30 minutes): A generic drive cycle includes a cold start, 2-3 minutes of idling, 15 minutes of mixed city driving with smooth acceleration, followed by 10 minutes of steady highway speed (55-60 mph).
Readiness monitors affected: Catalyst Monitor, O2 Sensor Monitor, EVAP Monitor
Before emissions retest: drive at least 100 miles to fully set monitors.
Watch out for:
- Clearing the code with a scanner does not fix the underlying problem; the code returns if the fault persists.
- Taking the vehicle for an emissions test immediately after clearing the code results in a 'Not Ready' failure. The car must be driven 50-100 miles for self-tests to complete.
Will This Fail Emissions / State Inspection?
Yes — this code typically fails an OBD-II emissions inspection.
- California: An illuminated Check Engine Light is an automatic failure of the Smog Check. After repairs, the vehicle must complete a drive cycle to set all readiness monitors before it passes.
- New York: Vehicles with an illuminated Check Engine Light automatically fail the OBD-II portion of the annual state inspection. A re-test is required after repairs.
- Texas: In counties requiring emissions testing, an active P1055 code causes an automatic failure of the OBD inspection. The vehicle cannot be registered until repaired.
Most Commonly Affected Vehicles
- BMW 3-Series (E90, F30), 5-Series (E60, F10), X1, X3, X5 (2006-2017) — Very common due to failure of the eccentric shaft sensor leaking oil, or issues with the Valvetronic motor itself on N52, N55, and N20 engines.
- Toyota Corolla, C-HR, Avalon (with VALVEMATIC) (2009-2022) — Often relates to the VALVEMATIC controller assembly. TSB T-SB-0098-19 addresses 2018-2020 models requiring recalibration or replacement of the controller.
- Hyundai / Kia Elantra, Sonata, Sorento, Sportage (2006-2025) — Often caused by failing VVT solenoids. A recall exists for some 2020-2022 models with 8-speed dual-clutch transmissions for an electric oil pump fault.
- Subaru Forester, Impreza, Legacy, Outback (with EJ253 engine) (2006-2012) — On non-turbo models, the Active Valve Lift System (AVLS) causes similar symptoms. The issue is often a failed AVLS oil control solenoid or clogged filter screen.
- Chevrolet Malibu, Equinox, Cobalt (with Ecotec engines) (2008-2017) — Related VVT issues are common, caused by stretched timing chains or faulty solenoids on the 2.4L Ecotec engine. Generic scanners misinterpret this as P1055.
- Nissan Altima, Maxima, Murano (2005-2015) — Issues with VVT solenoids and stretched timing chains on VQ-series V6 engines lead to timing codes cross-referenced to P1055.
- Volkswagen / Audi GTI, Jetta, A3, A4 (with 2.0T TSI EA888 engine) (2008-2015) — These engines are known for timing chain tensioner failure and stretched chains, causing camshaft correlation faults that share the same root cause.
- Mazda Various with SKYACTIV-D 2.2 engine (2012-2018) — The definition is completely different for these diesel engines, pointing to a fuel injector or related sensor issue rather than a VVT problem.
Manufacturer-Specific Notes
- BMW: The code points to the Valvetronic system. It flags a high voltage detection (over 17V) from a jump-start attempt, or a failing eccentric shaft sensor leaking oil. Always check the 40A fuse in the DME box before replacing the motor.
- Toyota: This code is for the VALVEMATIC system. Per TSB T-SB-0098-19, the issue is often a loss of calibration, not a failed part. A technician uses a Techstream scan tool to perform a 'Learn Value Reset' to fix it.
- Mazda: On SKYACTIV-D diesel engines, P1055 indicates the ECU detected reduced torque from cylinder #3, pointing towards a fuel injector problem, not a valve timing issue.
- Subaru: On non-turbo EJ253 engines, this code points to a fault in the Active Valve Lift System (AVLS). The cause is typically a faulty oil control solenoid or a clogged filter screen on the cylinder head.
Real Owner Stories
2011 BMW 328i (E90) at 93K miles - The Cascading Failure
Owner experienced violent shaking on startup during cold weather, accompanied by Engine Malfunction, AWD/DSC errors, and transmission warnings. Codes P1017 and P1056 were present.
What they tried:
- Restarting the car temporarily cleared the codes.
- As weather got colder, the problem became persistent and misfire codes appeared.
Outcome: The issue was traced to a faulty Valvetronic Eccentric Shaft Sensor. Replacing this sensor resolved the numerous codes and restored normal engine operation.
Lesson: On BMWs, a single Valvetronic system failure cascades into numerous, seemingly unrelated error codes. Address the primary Valvetronic codes first before chasing misfire or transmission warnings.
2020 Toyota Corolla at 50K miles - The Misdiagnosis Story
Immediately after a routine oil change, the Check Engine Light came on with codes P1055, P10A0, P2646, and P265B. The car hesitated badly on acceleration.
What they tried:
- The owner blamed the oil change shop, suspecting incorrect oil.
- The shop verified the oil level and viscosity were correct.
Outcome: The issue was a known problem covered by Toyota TSB T-SB-0098-19. The VALVEMATIC system lost its calibration. A technician performed a 'Learn Value Reset' which recalibrated the system and fixed the issue without replacing parts.
Lesson: A simple voltage fluctuation during routine service triggers a software calibration issue. Always check for TSBs related to your specific code and model before replacing parts.
2008 Subaru Impreza 2.5i at 110K miles - The Hidden Filter
Car had a persistent VVT-related code, rough idle, and poor performance. The owner was a diligent DIYer.
What they tried:
- Performed regular oil changes with high-quality synthetic oil.
- Replaced the AVLS oil control solenoid.
- Cleaned the oil control solenoid's primary filter screen.
Outcome: The code returned. The owner discovered a second, lesser-known oil filter screen located inside a banjo bolt for the oil supply line. This screen was completely clogged with sludge. Cleaning this hidden filter permanently solved the problem.
Lesson: VVT systems have multiple, sometimes hidden, oil filter screens. If replacing the main solenoid doesn't work, research detailed diagrams for your specific engine to find all potential oil passage restrictions.
How to Prevent This Code From Triggering
- Perform regular oil changes with high-quality full synthetic oil (Every 5,000-7,500 miles) — The VVT system is hydraulic and extremely sensitive to oil quality. Clean oil prevents sludge from clogging the tiny passages in solenoids, phasers, and filter screens, which is the #1 cause of VVT failures.
- Use the manufacturer-specified oil viscosity (Every oil change) — VVT systems are calibrated for a specific oil viscosity to ensure correct hydraulic pressure. Using oil that is too thick or too thin delays phaser response, triggering codes in cold weather.
- Replace the VVT oil filter screens (Every 60,000-80,000 miles, or when replacing a solenoid) — These small mesh filters protect the VVT solenoids from debris. Over time, they clog and restrict oil flow. Proactively replacing them prevents a future P1055 code.
- Address engine oil leaks promptly (As soon as they are detected) — On BMWs, a leaking valve cover gasket drips oil directly onto the eccentric shaft sensor connector, causing it to short out. Significant leaks lead to a low oil level, starving the VVT system.
- Maintain a healthy battery and charging system (Check annually) — Electronically controlled systems are sensitive to voltage. A weak battery or failing alternator causes low voltage during cranking, corrupting learned values or triggering false electrical fault codes.
Frequently Asked Questions
I replaced the VVT solenoid and the P1055 code came back. What did I miss?
If a new solenoid doesn't fix it, check for clogged oil passages or hidden filter screens. Next, inspect the wiring harness and connector for damage or corrosion. If the code persists, suspect a stretched timing chain or failing cam phaser.
What is the difference between Honda VTEC and Toyota VALVEMATIC?
Both are variable valve lift systems, but they work differently. Traditional Honda VTEC uses oil pressure to switch between two different cam lobe profiles, creating a noticeable 'kick'. Toyota's VALVEMATIC continuously varies valve lift from 0.9mm to over 10mm, eliminating the traditional throttle body for smoother power delivery.
Can a bad battery or alternator cause a P1055 code?
Yes, especially on BMWs where P1055 triggers from 'high input voltage'. A faulty alternator with a bad voltage regulator causes voltage spikes. A failed battery causes system voltage to become unstable during cranking, triggering this and other electrical codes.
Can I fix a P1055 code myself?
If the cause is low oil, a dirty VVT filter screen, or an accessible VVT solenoid, it is a very DIY-friendly repair. If the cause requires removing the valve cover (BMW eccentric shaft sensor) or timing cover (cam phaser), leave it to a professional.
Will an oil change definitely fix a P1055 code?
If the code triggered due to low or dirty oil, an oil change with the correct grade of full synthetic oil fixes the problem. If the code returns after the oil change, a failing part like the VVT solenoid or a clogged oil passage is to blame.
Is P1055 an expensive repair?
A simple VVT solenoid replacement costs $200-$400. However, if the problem is a Toyota VALVEMATIC controller or a BMW eccentric shaft sensor, the repair costs between $1,200 and $2,000+ due to high parts and labor.
My scanner shows P1055, but what does Bank 1 mean?
'Bank 1' refers to the side of the engine containing cylinder #1. On an inline 4 or 6-cylinder engine, there is only one bank. On a V6 or V8 engine, you have two banks and must identify which side is Bank 1 to find the correct component.
What is the 'Learn Value Reset' for Toyota's P1055?
For certain Toyota vehicles, the VALVEMATIC system loses its calibration after a battery disconnect or voltage drop. The 'Learn Value Reset' is a scan tool procedure that forces the system to re-learn the mechanical limits of the valve lift components. This software-based reset often fixes the problem without replacing any parts.
Key Takeaways
- P1055 is a manufacturer-specific code that flags an electrical or hydraulic failure in the variable valve timing (VVT) system, with definitions varying wildly between BMW, Toyota, and Subaru.
- Check your oil first; over 50% of VVT codes trigger because low, dirty, or incorrect-viscosity engine oil cannot generate the hydraulic pressure needed to adjust valve timing.
- Test the VVT solenoid's resistance with a multimeter; a healthy solenoid reads between 8 and 12 Ohms, while anything under 2 Ohms indicates a dead short requiring replacement.
- Limit driving to under 100 miles with an active P1055 code to prevent unburnt fuel from overheating and destroying your catalytic converter, a secondary failure costing upwards of $1,500.
- Repair costs range from a $60 DIY oil change to over $1,200 for complex manufacturer-specific fixes like a Toyota VALVEMATIC controller or BMW eccentric shaft sensor.
Helpful Videos


The information in this article is provided for general reference and educational purposes only. Vehicle specifications, procedures, and part compatibility can vary by production date, trim level, and region. Always consult your vehicle's factory service manual and verify part numbers before purchasing or performing repairs. Safety-critical components such as airbags, seat belts, and braking systems should be installed by a qualified professional.
- 🎬 Helpful Videos
- What Does P1055 Mean?
- Can I Drive With P1055?
- Common Causes
- Symptoms
- Diagnostic Flowchart
- Common Fixes & Costs
- DIY vs Professional
- Used vs. New Parts: Buying Guide
- What Happens If You Wait — Timeline
- Cost of Not Fixing It
- Diagnosis Steps
- When This Code Triggers (Freeze-Frame Conditions)
- Related Codes
- Climate & Environmental Factors
- How to Talk to a Mechanic About This Code
- Where to Take It: Dealer vs Independent vs Chain
- When to Walk Away From the Repair
- What Scan Tool You Need for This Code
- How to Clear the Code After You Fix It
- Will This Fail Emissions / State Inspection?
- Most Commonly Affected Vehicles
- Manufacturer-Specific Notes
- Real Owner Stories
- 2011 BMW 328i (E90) at 93K miles - The Cascading Failure
- 2020 Toyota Corolla at 50K miles - The Misdiagnosis Story
- 2008 Subaru Impreza 2.5i at 110K miles - The Hidden Filter
- How to Prevent This Code From Triggering
- Frequently Asked Questions
- I replaced the VVT solenoid and the P1055 code came back. What did I miss?
- What is the difference between Honda VTEC and Toyota VALVEMATIC?
- Can a bad battery or alternator cause a P1055 code?
- Can I fix a P1055 code myself?
- Will an oil change definitely fix a P1055 code?
- Is P1055 an expensive repair?
- My scanner shows P1055, but what does Bank 1 mean?
- What is the 'Learn Value Reset' for Toyota's P1055?
- Key Takeaways
- 🎟️ Get 5% Off