

OBD-II Code P0109: Manifold Absolute Pressure (MAP) Sensor Circuit Intermittent
The Ultimate 2026 Guide to Diagnosing and Fixing P0109
- P0109 stems from three primary culprits: a frayed wiring harness, a cracked vacuum hose, or a failed MAP sensor.
- Expect an immediate 5-15% drop in fuel economy, accompanied by rough idling and unexpected stalling in traffic.
- Never replace the MAP sensor without first performing a live-data 'wiggle test' on the wiring harness to rule out electrical shorts.
- Driving with an active P0109 for more than 3 months forces a rich fuel mixture that destroys your catalytic converter, turning a $150 repair into a $2,500 nightmare.
What Does P0109 Mean?

P0109 means your car's Powertrain Control Module (PCM) is receiving an unstable, flickering, or erratic signal from the Manifold Absolute Pressure (MAP) sensor. The MAP sensor measures engine load by reading intake manifold pressure. When this signal cuts in and out, the PCM cannot accurately calculate required fuel and ignition timing, triggering immediate engine performance problems.
Technical definition: The SAE/OBD-II definition is 'Manifold Absolute Pressure/Barometric Pressure Circuit Intermittent'. The PCM detects the voltage signal from the MAP sensor circuit is unstable. Instead of a smooth, predictable voltage change corresponding to engine load, the PCM sees signals that randomly spike, drop out, or freeze. This differs from P0108 (consistently high) or P0107 (consistently low).
Can I Drive With P0109?
yes_but_not_advised. Yes, but it is strongly discouraged. The engine hesitates, stalls unexpectedly, or enters a low-power 'limp mode', creating a serious safety hazard in traffic. Continuing to drive with the resulting rich fuel condition overheats and destroys the catalytic converter, a secondary repair costing $800 to $2,500. Address the issue immediately to ensure vehicle reliability.
Common Causes

- Wiring or Connector Issues (Very Common) — The number one cause. The wiring harness to the MAP sensor is exposed to engine heat and vibration, causing wires to fray, chafe, or break internally. Connector pins become loose, spread, or corroded, leading to a poor connection that drops the signal intermittently.
- Vacuum Leaks (Common) — A cracked, disconnected, or deteriorated vacuum hose connected to the intake manifold or the MAP sensor's port causes fluctuating, incorrect pressure readings. The PCM interprets these rapid, uncommanded fluctuations as an intermittent circuit fault.
- Faulty MAP Sensor (Common) — The sensor itself fails internally. Age, heat cycles, and moisture cause the internal electronics to degrade, resulting in erratic or nonsensical signals being sent to the PCM.
- Contaminated or Blocked MAP Sensor Port (Less Common) — The small port on the sensor that reads manifold pressure becomes clogged with carbon, oil, or dirt. This blockage acts like a filter, slowing or preventing the sensor from seeing true pressure changes, which is interpreted as an intermittent signal.
- Poor Electrical Grounds (Less Common) — A corroded or loose engine or chassis ground connection for the sensor circuit or the PCM introduces electrical 'noise' and causes the sensor's signal to become unstable or drop out.
- Software or Calibration Glitch (Rare) — The logic within the PCM is sometimes too sensitive. Manufacturers release software updates (calibrations) that adjust the parameters for monitoring the MAP sensor, making the system less likely to set a false P0109 code.
- Restricted Exhaust System (Rare) — A clogged catalytic converter or muffler creates excessive backpressure in the engine. This raises the baseline pressure in the intake manifold, causing the MAP sensor readings to fall outside their expected range at certain RPMs.
- Electromagnetic Interference (EMI) (Rare) — If the MAP sensor wiring is routed too close to high-voltage components like ignition coils, spark plug wires, or the alternator, it picks up EMI. This interference corrupts the low-voltage MAP signal, making it appear erratic.
- Faulty Powertrain Control Module (PCM) (Very Rare) — An internal failure, such as a cracked solder joint on the circuit board or a faulty analog-to-digital converter, prevents the PCM from correctly processing a perfectly good signal from the sensor.
Symptoms

- Engine Hesitation or Stumbling — When accelerating, the vehicle stumbles, hesitates, or loses power momentarily due to the PCM's inability to provide the correct fuel mixture for the changing engine load.
- Rough or Unstable Idle — The engine's idle speed fluctuates, bouncing up and down. The engine stalls entirely when coming to a stop or when the A/C is turned on.
- Poor Fuel Economy — Fuel mileage noticeably decreases. When the PCM loses the MAP signal, it defaults to a rich fuel mixture as a precaution, wasting fuel.
- Black Smoke from Exhaust — Occasional puffs of black smoke from the tailpipe, especially during acceleration, indicate a rich fuel condition where unburned fuel is expelled.
- Reduced Power or 'Limp Mode' — The vehicle suddenly loses significant power and exhibits poor throttle response. This 'limp mode' is a self-preservation strategy by the PCM to prevent engine damage.
- Difficulty Starting — The engine takes longer than usual to start, or cranks but fails to fire up, especially in cold weather, because the PCM receives an incorrect initial pressure reading.
- Other Warning Lights Activated — Because engine load data is shared, a MAP sensor fault disables systems like traction control, stability control, or hill start assist, illuminating their respective warning lights.
- Check Engine Light is On (also visible on scanner) — The most common indicator. The light remains steady or flashes intermittently when the fault is actively occurring, signaling a severe misfire event.
Diagnostic Flowchart
Tap your situation to follow the diagnostic path that matches what you're seeing on this code.
Common Fixes & Costs
- Repair Wiring or Connector — Parts: $10-$50, Labor: $150-$400, ~2 hr book time (Intermediate)
- Repair Vacuum Leak (Hose/Gasket) — Parts: $5-$60, Labor: $100-$300, ~1.5 hr book time (Intermediate)
- Replace MAP Sensor
— Parts: $50-$150, Labor: $50-$150, ~0.7 hr book time
(DIY)
Ford F-150 (3.5L EcoBoost): OEM Motorcraft CX-2420 (replaces BL3Z-9F479-C) (Alt: Bosch 0261230333, Standard Motor Products AS463, Denso 229-1002)
Jeep Wrangler (3.6L): OEM Mopar 68371847AB (replaces 5149174AB) (Alt: NTK MA0191, Standard Motor Products AS339, Bosch 0261230227)
Chevrolet/GMC (5.3L/6.2L): OEM ACDelco 213-4681 (replaces 12644228) (Alt: Delphi PS10178, Standard Motor Products AS394, Walker 215-1123) - Clean MAP Sensor and Port — Parts: $10, Labor: $30-$80, ~0.5 hr book time (DIY)
- Perform PCM Software Update — Parts: $0, Labor: $100-$180, ~1.2 hr book time (Professional)
- Replace Powertrain Control Module (PCM) — Parts: $600-$1200+, Labor: $150-$300, ~1.5 hr book time (Professional)
DIY vs Professional
- Replace MAP Sensor — Beginner: Yes
Tools: Basic socket set or Torx driver, pliers for vacuum hose clamp. - Clean MAP Sensor and Port — Beginner: Yes
Tools: MAP/MAF sensor cleaner (do not use brake or carb cleaner), soft brush or cotton swabs, basic hand tools to remove the sensor. - Repair Vacuum Leak (Hose) — Beginner: Yes, for accessible hoses.
Tools: Pliers, hose cutters, replacement vacuum hose. - Repair Wiring or Connector — Beginner: No
Tools: Multimeter, soldering iron, heat shrink tubing, wire strippers, replacement pigtail connector. - Perform PCM Software Update — Beginner: No
Tools: Dealership-level scan tool (like Ford's IDS, GM's GDS2) with a subscription to the manufacturer's service network.
Used vs. New Parts: Buying Guide
When a used part is worth it: For a critical, relatively inexpensive electronic part like a MAP sensor, buying used rarely makes sense. Consider a used sensor only as a last resort for obsolete vehicles or extreme budget constraints, and only from a verified low-mileage donor vehicle.
Donor-vehicle mileage cap: roughly under 50000 miles for the part to have meaningful remaining life.
Donor quality checklist:
- Verify the exact OEM part number matches; superseded or 'similar' parts fail to communicate properly.
- Avoid parts from vehicles in regions with extreme heat or from flood-damaged cars.
- Inspect the connector pins for any signs of corrosion or damage before purchasing.
Decision logic:
- If The vehicle is a daily driver and reliability is important → Buy a new OEM or high-quality aftermarket sensor. The cost savings of a used part are not worth the risk of repeat failure.
- If A new aftermarket sensor costs less than $100 → Buy new. The minimal savings from a used part are outweighed by the lack of warranty and unknown lifespan.
- If The part is for a project car or for temporary diagnosis → A used part from a reputable auto recycler is acceptable, but assume it has a limited remaining life.
Warranty tradeoff: Used parts typically offer a 30-90 day warranty at best. New aftermarket parts usually come with a 1-year to limited lifetime warranty. New OEM parts carry a manufacturer's warranty (typically 12 months).
Worst-case if a used part fails: $150-$300 if a used sensor fails shortly after installation, accounting for repeat diagnostic time, labor to replace it again, and the cost of another part.
What Happens If You Wait — Timeline
- 0-1 month: Check Engine Light appears, often intermittently. You notice a slight hesitation when accelerating or a brief rough idle, but it often clears up. The code may go away on its own for a few days. (MPG impact: 0-5%% · Added cost: $0-$40 in wasted fuel)
- 1-3 months: Symptoms become more frequent and pronounced. Stalling at stoplights becomes a possibility. The engine defaults to a rich fuel mixture more often, leading to a noticeable drop in fuel economy and the smell of gas. (MPG impact: 5-15%% · Added cost: $50-$200 in wasted fuel and potential for fouled spark plugs.)
- 3-6 months: The consistently rich fuel mixture begins to damage the catalytic converter. Unburned fuel enters the exhaust and superheats the converter's internal substrate, causing it to melt or crack. You get a P0420 (Catalyst Efficiency) code alongside P0109. (MPG impact: 10-20%% · Added cost: $800-$2500 for catalytic converter replacement, plus the original P0109 repair cost.)
- 6+ months: Catastrophic failure is likely. The catalytic converter becomes completely clogged, creating extreme exhaust backpressure that severely reduces engine power and causes stalling that makes the vehicle undrivable. This backpressure leads to further engine damage. (MPG impact: 20-40%+% · Added cost: $1500-$3500+ for a new catalytic converter, potentially new O2 sensors, and diagnosis for performance issues caused by the blockage.)
Cost of Not Fixing It
- 0-1 Month: Noticeable drop in fuel economy (5-15%), poor acceleration, and unexpected stalling, creating a safety risk. (Added cost: $50-$150 in wasted fuel.)
- 1-6 Months: The default rich fuel mixture overheats the catalytic converter, reducing its efficiency and causing irreversible damage to the internal substrate. (Added cost: Up to $2800 if the catalytic converter requires replacement.)
- 6+ Months: Complete failure of the catalytic converter. Prolonged misfires and poor combustion lead to fouled spark plugs, damaged oxygen sensors, and internal engine wear. (Added cost: $1200-$3500+ for catalytic converter and secondary repairs.)
Diagnosis Steps

- Scan for Codes & Review Freeze Frame Data
Using an OBD-II scanner, confirm P0109 is present and note any other stored codes. Analyze the freeze frame data to see engine parameters (RPM, load, temp) at the exact moment the fault occurred, providing crucial clues about trigger conditions.
Tools: OBD-II Scanner (Beginner) - Check for Technical Service Bulletins (TSBs)
Before replacing parts, check for TSBs related to P0109 for your specific year, make, and model. Manufacturers frequently release bulletins for known issues, which dictate a required PCM software update or a redesigned part.
Tools: Internet Access or Repair Database Subscription (Beginner) - Thorough Visual Inspection
Inspect the MAP sensor, its electrical connector, and the surrounding wiring harness. Look for melted plastic, chafed wires, or corrosion. Check all vacuum hoses connected to the intake manifold for cracks, brittleness, or loose connections.
Tools: Flashlight, Inspection Mirror (Beginner) - Perform a 'Wiggle Test'
With the engine idling, use a scan tool to view live MAP sensor data (voltage or pressure). Carefully wiggle the wiring harness at the sensor connector and along its path to the PCM. If the engine stumbles or the live data spikes, drops out, or goes erratic, you have an intermittent wiring fault.
Tools: OBD-II Scanner with Live Data (Beginner) - Check for Vacuum Leaks with a Smoke Test
A smoke test is the most effective way to find hidden vacuum leaks. A machine fills the intake system with pressurized smoke. Leaks from cracked hoses, bad gaskets, or a faulty intake manifold are revealed by streams of smoke.
Tools: Smoke Machine (Intermediate) - Test Sensor Circuit Voltages with a Multimeter
Identify the sensor's three wires: 5-volt reference, ground, and signal. With the key on, engine off (KOEO), back-probe the connector. You must see a steady ~5V on the reference wire and less than 0.1V on the ground wire. The signal wire reads ~4.5-5.0V at sea level. At idle, the signal voltage drops to 1.0-2.0V and changes smoothly as you open the throttle.
Tools: Multimeter, Wiring Diagram, Back-probe Kit (Intermediate) - Test Sensor Response with a Vacuum Pump
Disconnect the sensor from the intake but leave it connected electrically. Connect a hand-held vacuum pump to the sensor's port. With KOEO, monitor the signal voltage. At 0 inHg, voltage is high (~4.5V). As you apply vacuum, the voltage decreases smoothly and holds steady. If the voltage jumps, drops out, or doesn't change, the sensor is faulty.
Tools: Hand-held Vacuum Pump, Multimeter (Intermediate) - [ADVANCED] Analyze Live Data PIDs
Monitor the 'MAP' and 'BARO' PIDs. At KOEO, MAP and BARO are nearly identical (approx. 101 kPa / 29.9 inHg at sea level). At a stable, warm idle, MAP drops to 27-44 kPa (8-13 inHg). Sudden dropouts to 0 kPa or spikes to the BARO value during steady driving indicate an intermittent fault.
Tools: Advanced OBD-II Scanner with Live Data Graphing (Advanced) - [PRO TIP] Analyze MAP Sensor Waveform with an Oscilloscope
For truly intermittent faults, a multimeter is too slow. Connect an oscilloscope to the signal wire and ground. A good sensor shows a clean, smooth line that changes with throttle. An intermittent fault appears as a sharp, vertical drop-out to 0V, a sudden spike to 5V, or a 'hairy' line indicating electrical noise.
Tools: Digital Storage Oscilloscope (DSO) or Graphing Multimeter (Professional) - [ADVANCED] Sensor Resistance Test
While most modern 3-wire sensors are tested via voltage, some older types are bench-tested for resistance using manufacturer-specific values. A reading of 'OL' (over-limit) or 0 ohms indicates a failure. This test is less reliable for intermittent faults than live voltage analysis.
Tools: Multimeter, Vehicle-Specific Repair Manual (Advanced)
When This Code Triggers (Freeze-Frame Conditions)
- Engine Coolant Temp: 180-200°F (The fault often sets when the engine is fully warmed up and operating in closed-loop fuel control.)
- RPM: 1500-2500 (The intermittent drop-out is frequently captured during steady-state cruise or light throttle application, where a stable signal is expected.)
- Engine Load: 30-60% (Occurs under moderate, steady load conditions, not typically during heavy acceleration or deceleration when rapid voltage changes are normal.)
- Vehicle Speed: 35-55 mph (Often triggered during city or highway driving at a constant speed, which makes intermittent wiring or connector faults more apparent.)
Related Codes
- P0106 — Indicates a MAP sensor 'Range/Performance' issue. P0106 sets when the sensor's reading is illogical compared to throttle position and RPM. P0109 sets when the electrical signal itself cuts out or spikes, regardless of engine operation. An oscilloscope clearly distinguishes between a performance issue (P0106) and an electrical dropout (P0109).
- P0107 — Means the MAP sensor circuit voltage is stuck low (near 0V). If the intermittent fault causing P0109 is a short to ground or a complete open circuit that lasts for more than a few seconds, it sets a P0107 as a 'hard' fault. P0109 is the intermittent version of this fault.
- P0108 — Means the MAP sensor circuit voltage is stuck high (near 5V). If an intermittent short to the 5V reference wire occurs, it triggers both P0109 and P0108. P0108 is a 'hard' fault where the signal is consistently high, while P0109 is the intermittent spike.
- P0171 / P0174 — These are 'System Too Lean' codes for Bank 1 and Bank 2. A vacuum leak is a very common cause for both P0109 and these lean codes. If fixing a vacuum leak resolves all codes, the cause was shared. If the lean codes remain after fixing a P0109 related to wiring, there is a separate issue.
Climate & Environmental Factors
- Cold Weather: Extreme cold causes moisture within vacuum lines or the sensor itself to freeze, leading to blockages or delayed readings that trigger P0109, particularly on cold starts. Manufacturers like Toyota and Ford have issued TSBs for software updates to make the PCM less sensitive to these cold-start fluctuations.
- High Humidity: In humid climates, moisture accelerates corrosion on electrical connector pins and grounds. This corrosion introduces resistance, causing the intermittent signal drops that define a P0109 fault.
- High Altitude: While high altitude itself doesn't directly cause an intermittent electrical fault, it exposes underlying sensor performance issues. The PCM relies on the BARO reading to compensate for altitude, and if the MAP signal intermittently drops out during this compensation, it is more likely to be flagged as a fault.
How to Talk to a Mechanic About This Code
Say this: "I have a P0109 code and the engine is hesitating intermittently. I'd like to authorize one hour of diagnostic time to check for the most common causes, specifically the wiring harness, connector, and for any vacuum leaks before replacing the MAP sensor itself."
This shows you know that P0109 is often not the sensor itself. It directs the technician to perform methodical diagnostics (like a wiggle test or smoke test) rather than just swapping the most obvious part, which saves you money on a misdiagnosis.
Avoid saying:
- 'Just replace the MAP sensor.'
- 'My check engine light is on, can you just fix it?'
- 'I'm not sure what's wrong, just do whatever you think is best.'
Questions to ask before authorizing the repair:
- Did you perform a 'wiggle test' on the wiring harness while watching live data, and did the signal drop out?
- If you suspect a vacuum leak, can you confirm it with a smoke test?
- If you are recommending a new sensor, have you confirmed the sensor has a good 5-volt reference and ground at the connector?
- What is the warranty on the parts and labor for this specific repair?
Where to Take It: Dealer vs Independent vs Chain
- Dealer:
Recommended only if you suspect a software update is needed or the vehicle is under warranty. Otherwise, an independent shop is more cost-effective.
Best for: Vehicles still under a powertrain or emissions warranty., Diagnosing known manufacturer-specific TSBs that require a software update.
Downsides: Significantly higher labor rates (1.5-2x) compared to independent shops., More inclined to replace an entire assembly rather than repair a specific wire. (Typical cost: +50% vs. baseline) - Independent Shop:
Best fit. An experienced independent technician with good diagnostic tools handles the wiring, vacuum, and sensor tests required for a P0109 without the high cost of a dealership.
Best for: Out-of-warranty vehicles where cost is a factor., Diagnosing complex intermittent electrical and vacuum issues.
Downsides: Shop quality and diagnostic skill vary widely; vet shops based on reviews and ASE certifications. (Typical cost: +0% vs. baseline) - Chain Shop:
Avoid for P0109 diagnosis. While they replace a MAP sensor cheaply, they are likely to misdiagnose the common underlying wiring or vacuum leak issues, leading to repeat repairs.
Best for: Simple, straightforward parts replacement like batteries or brakes.
Downsides: Technician skill varies dramatically; lacks experience with in-depth electrical diagnostics., Incentivized to replace parts rather than perform detailed diagnosis, which is the most common mistake for P0109. (Typical cost: -10% vs. baseline)
When to Walk Away From the Repair
If the total estimated repair cost exceeds 40-50% of your car's private-party value (check Kelley Blue Book), sell or trade it in.
- Car worth $3000, fix is $1800: Walk away. The repair cost is 60% of the car's value. It is not a sound financial decision.
- Car worth $10000, fix is $450: Fix it. The repair is less than 5% of the vehicle's value and restores proper function and safety.
- Car worth $5000, fix is $2200: Borderline. At 44% of the car's value, get a second opinion and consider the car's overall health before proceeding.
What Scan Tool You Need for This Code

Minimum: A scanner that displays live data, preferably with graphing capabilities.
A basic $20 code reader only shows the P0109 code. It cannot display the live sensor voltage needed to see the intermittent dropouts or spikes that define this fault. To diagnose P0109, you must watch the sensor's behavior in real-time.
Budget: BlueDriver Pro Scan Tool (~$100) — Connects to your smartphone via Bluetooth and provides excellent live data graphing for the MAP sensor voltage. This is the key feature needed to visually confirm the signal is dropping out intermittently.
Mid-range: Innova 5610 (~$330) — A powerful handheld unit that offers advanced live data recording and graphing. It features bi-directional controls to test circuits, which is helpful for advanced diagnosis of wiring issues without needing a professional-grade tool.
Professional: Autel MaxiCOM MK808-Series (~$450-600) — A tablet-based professional scanner with full bidirectional control, extensive live data graphing, and OE-level diagnostics. It allows a technician to command circuits and view data like a factory tool, making it definitive for tracking down complex electrical faults.
Rent vs buy: For a one-time diagnosis, auto parts stores like AutoZone offer a loaner tool program. You 'rent' a capable scanner for free with a refundable deposit. If you plan to do your own car repairs more than once a year, buying a tool like the BlueDriver is a worthwhile investment.
How to Clear the Code After You Fix It
- Use an OBD-II scan tool to erase the P0109 and any related fault codes.
- Perform a complete OBD-II drive cycle to allow the readiness monitors to run and complete.
- Reconnect the battery if it was disconnected for the repair, but be aware this resets all monitors to 'Not Ready'.
Drive cycle (~30 minutes): A generic drive cycle includes: a cold start (engine off for 8+ hours), 2-3 minutes of idling, 10-15 minutes of steady highway driving (55-60 mph), a period of coasting deceleration, and 10 minutes of stop-and-go city driving.
Readiness monitors affected: Catalyst (CAT) monitor, Oxygen (O2) Sensor monitor, Comprehensive Component Monitor (CCM)
Before emissions retest: drive at least 100 miles to fully set monitors.
Watch out for:
- Clearing the code with a scanner or disconnecting the battery resets the emissions readiness monitors to 'Not Ready', causing an automatic smog test failure until a full drive cycle is completed.
- The code returns immediately or within a few drive cycles if the root cause of the intermittent fault was not correctly identified and repaired.
Will This Fail Emissions / State Inspection?
Yes — this code typically fails an OBD-II emissions inspection.
- California: An active P0109 code results in an automatic smog check failure. After repair, a complete drive cycle must be performed to set all readiness monitors before a retest is possible.
- New York: Any illuminated Check Engine Light is an automatic failure of the emissions portion of the NYS inspection. The vehicle cannot pass until the fault is repaired and the code is cleared.
- Texas: In the 17 counties requiring emissions testing, a vehicle with an active P0109 code fails the OBD-II scan. Simply clearing the code is not enough, as the 'Not Ready' status of the monitors also results in a failure.
Most Commonly Affected Vehicles
- Ford F-150, Explorer, Flex, Taurus (2015-2020) — Extremely common on models with the 3.5L EcoBoost engine. The cause is almost always a faulty Manifold Absolute Pressure and Temperature (MAPT) sensor. Ford issued TSB 19-2212 for this. On 5.0L F-150s, check for ground continuity issues at the firewall posts near the PCM.
- Jeep Wrangler (JK/JL) (2012-2020) — The engine wiring harness on 3.6L models chafes against the firewall or engine components, causing intermittent shorts that trigger P0109 along with camshaft sensor codes. This is exacerbated by off-road vibrations.
- Chevrolet / GMC Silverado, Sierra, Tahoe (2014-2021) — Vacuum hoses, particularly the PCV hose, become brittle and crack or become dislodged, especially under the stress of towing. This is a frequent cause of intermittent idle and P0109.
- BMW 3-Series, 5-Series, X3, X5 (2006-2019) — Highly susceptible to vacuum leaks from cracked plastic intake boots, valve cover gaskets, or failed Crankcase Ventilation (CCV) systems. A smoke test is mandatory for diagnosis on these vehicles, which often present P0109 with lean codes (P0171/P0174).
- Honda Accord, Civic, CR-V (2013-2018) — The MAP sensor port on the intake manifold becomes restricted with carbon or oil buildup from the PCV system, leading to delayed or erratic readings that trigger P0109 and cause stalling.
- Toyota Tacoma, Tundra (2016-2021) — A P0109 code, especially when it appears during cold weather starts, is often resolved with an ECM software update from a Toyota dealership. Check this before replacing any hardware.
- Hyundai / Kia Sonata, Optima, Elantra, Sorento (2011-2018) — Failures are commonly linked to either the MAP sensor itself failing internally or issues with the wiring harness connector developing a poor connection over time, causing intermittent stalling.
- Subaru Forester, Outback, WRX (Turbo models) (2014-2019) — On turbocharged models, the complex network of vacuum and boost reference hoses in the intake system provides multiple failure points for leaks. The sensor itself is also subject to failure from high heat and pressure cycles.
Manufacturer-Specific Notes
- Ford: On 3.5L EcoBoost engines (2018-2019), TSB 19-2212 points directly to a faulty MAPT sensor as the cause for P0109, often accompanied by a sudden loss of power. This TSB is often covered under the vehicle's 5-year/60,000-mile powertrain warranty. On older models like the Freestyle (2005-2007), TSB 08-9-7 addresses moisture freezing in the MAP sensor vacuum line, requiring a PCM reprogram and hose rerouting.
- BMW: Diagnosis on modern BMWs with P0109 must always begin with a smoke test. The plastic components of the intake and crankcase ventilation (CCV) systems are notorious for cracking and causing elusive vacuum leaks that mimic sensor faults.
- Jeep: On 3.6L Pentastar engines found in Wranglers, the main engine harness is routed too tightly and chafes against the back of the cylinder head or firewall, causing intermittent shorts in the MAP and camshaft sensor circuits. There is no specific recall, but this is a widely known issue.
- Toyota: For many late-model Toyotas, especially trucks like the Tacoma, the first diagnostic step after reading codes is to check for an available ECM software update. A calibration update from the dealer resolves intermittent 'ghost' codes like P0109 that appear in specific conditions (e.g., cold starts).
Real Owner Stories
2017 Ford F-150 5.0L with 85K miles
Truck went into limp mode on the first start of the day, throwing P0109 and P0108. After restarting, it ran fine. The problem was worst in the morning.
What they tried:
- Replaced MAP sensor - no change.
- Replaced throttle body - no change.
- Checked for wiring continuity between MAP sensor and PCM - all good.
Outcome: The problem was a poor ground connection. The owner found they had no continuity from the MAP sensor ground wire to the battery negative. Cleaning the main ground posts on the firewall near the PCM and ensuring a solid connection resolved the codes.
Lesson: Don't forget to check grounds! An intermittent ground causes sensor readings to fluctuate wildly, perfectly matching the definition of P0109. This must be part of the standard electrical diagnosis.
2016 Volvo S60 D4
Check Engine Light came on with a P0109 code. The owner cleared it, but it returned after a few days.
What they tried:
- Mistakenly replaced the Mass Airflow (MAF) sensor for £120. The code returned after two weeks.
Outcome: A forum member pointed out that P0109 refers to the MAP (Manifold Absolute Pressure) sensor, not the MAF sensor. The likely cause was either the actual MAP sensor, a wiring problem, or a boost/vacuum leak. The owner was advised to check all turbo and intercooler hoses for splits or cracks before replacing more parts.
Lesson: Confirm which sensor the code is for before buying parts. P0109 is for the MAP sensor. A common and costly mistake is to confuse it with the MAF (Mass Airflow) sensor.
2019 Jeep Wrangler in Colorado
Vehicle experienced sporadic power loss on trails and threw a P0109 code after off-roading.
What they tried:
- Initial inspection revealed no obvious damage.
Outcome: The cause was a loose connector in the MAP sensor wiring harness that was shaken loose by the vibrations from off-road driving. Securing the connector resolved the issue.
Lesson: For intermittent faults, context matters. If the problem appears after driving on rough roads, off-roading, or hitting a pothole, the first place to look is for loose connectors and chafed wiring harnesses.
BMW 3-Series
Shop was chasing an intermittent P0109 code for several days.
What they tried:
- Initial checks of the sensor and wiring did not reveal the fault.
Outcome: The root cause was a tiny, hard-to-see crack in the plastic intake manifold, discovered only after performing a smoke test. The crack opened and closed with temperature and vibration, causing an intermittent vacuum leak that the PCM interpreted as a sensor circuit fault.
Lesson: For P0109 on vehicles known for plastic intake components, a smoke test is essential. A vacuum leak perfectly mimics the symptoms of an electrical fault, leading to expensive misdiagnosis.
How to Prevent This Code From Triggering
- Inspect and Clean Electrical Connectors (Every 30,000 miles or during other under-hood work) — Corrosion and moisture are primary causes of intermittent signals. Disconnecting the MAP sensor, spraying the pins with electrical contact cleaner, and applying a small amount of dielectric grease prevents moisture intrusion and ensures a solid connection.
- Periodically Inspect Vacuum Hoses (Every oil change) — Engine heat makes rubber and plastic hoses brittle over time, leading to cracks and leaks. A quick visual and physical check of the hoses connected to the intake manifold for softness, brittleness, or visible cracks catches a potential vacuum leak before it triggers a code.
- Secure Wiring Harnesses Away from Heat and Vibration (Once, or after any engine repair) — Chafing is a leading cause of intermittent shorts and opens. Ensure the MAP sensor harness is not rubbing against sharp metal edges or resting on hot components like the exhaust manifold. Use zip ties or factory clips to secure it properly.
- Use an Intake System Cleaner (for GDI engines) (Every 20,000-30,000 miles) — On Gasoline Direct Injection (GDI) engines, carbon and oil from the PCV system build up and clog the MAP sensor port. Using an aerosol cleaner sprayed into the intake helps dissolve these deposits and prevent blockages.
- Install an Oil Catch Can (especially on turbocharged GDI engines) (Once) — An oil catch can intercepts oil vapor from the PCV system before it enters the intake manifold, significantly reducing the amount of oil and carbon that contaminates the MAP sensor and its port.
Frequently Asked Questions
Can I fix a P0109 code myself?
Yes, many P0109 fixes are DIY-friendly. Simple tasks like replacing a cracked vacuum hose, cleaning a dirty connector, or replacing the MAP sensor itself are within the reach of a beginner. Diagnosing intermittent wiring faults or a bad PCM requires advanced tools like a multimeter or oscilloscope and is best left to experienced technicians.
How much does it cost to fix P0109?
A professional diagnosis typically costs $100-$180. A simple fix like a vacuum hose or replacing the MAP sensor usually ranges from $150 to $300 total. Complex wiring repairs cost $250-$500+, while a PCM replacement exceeds $1,200.
What is the most common mistake when diagnosing P0109?
The most common mistake is immediately replacing the MAP sensor without performing proper diagnostics. Technicians often find the true cause to be a simple vacuum leak, a corroded connector, or a chafed wire. Always perform a thorough visual inspection and a 'wiggle test' before spending money on parts.
Will cleaning the MAP sensor fix the code?
It might. If the sensor's port is clogged with oil or carbon, cleaning it carefully with a dedicated MAP sensor cleaner restores proper function. However, if the sensor has an internal electrical fault, cleaning has no effect and it must be replaced.
Can a dirty air filter cause a P0109 code?
It is highly unlikely. A severely clogged air filter affects engine performance and sets airflow codes, but it does not directly cause the intermittent electrical fault indicated by P0109.
Can a bad EGR valve cause P0109?
Yes. An EGR valve that is stuck open or opening at the wrong time causes erratic pressure fluctuations within the intake manifold, which the PCM misinterprets as an intermittent fault with the MAP sensor itself.
What is the difference between a MAP sensor and a MAF sensor?
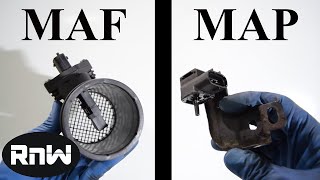
A MAP (Manifold Absolute Pressure) sensor measures air pressure (vacuum) inside the intake manifold to calculate engine load. A MAF (Mass Air Flow) sensor measures the mass and volume of the air entering the engine. Both ensure the correct air-fuel ratio, but measure different variables.
Can P0109 cause my transmission to act weird?
Yes, indirectly. The severe hesitation and sudden power loss from P0109 feels like a transmission slipping or jerking. The PCM uses MAP data to control shift points, so an erratic signal causes harsh or delayed shifts.
Key Takeaways
- P0109 stems from three primary culprits: a frayed wiring harness, a cracked vacuum hose, or a failed MAP sensor.
- Expect an immediate 5-15% drop in fuel economy, accompanied by rough idling and unexpected stalling in traffic.
- Never replace the MAP sensor without first performing a live-data 'wiggle test' on the wiring harness to rule out electrical shorts.
- Driving with an active P0109 for more than 3 months forces a rich fuel mixture that destroys your catalytic converter, turning a $150 repair into a $2,500 nightmare.
Helpful Videos

The information in this article is provided for general reference and educational purposes only. Vehicle specifications, procedures, and part compatibility can vary by production date, trim level, and region. Always consult your vehicle's factory service manual and verify part numbers before purchasing or performing repairs. Safety-critical components such as airbags, seat belts, and braking systems should be installed by a qualified professional.
- 🎬 Helpful Videos
- What Does P0109 Mean?
- Can I Drive With P0109?
- Common Causes
- Symptoms
- Diagnostic Flowchart
- Common Fixes & Costs
- DIY vs Professional
- Used vs. New Parts: Buying Guide
- What Happens If You Wait — Timeline
- Cost of Not Fixing It
- Diagnosis Steps
- When This Code Triggers (Freeze-Frame Conditions)
- Related Codes
- Climate & Environmental Factors
- How to Talk to a Mechanic About This Code
- Where to Take It: Dealer vs Independent vs Chain
- When to Walk Away From the Repair
- What Scan Tool You Need for This Code
- How to Clear the Code After You Fix It
- Will This Fail Emissions / State Inspection?
- Most Commonly Affected Vehicles
- Manufacturer-Specific Notes
- Real Owner Stories
- 2017 Ford F-150 5.0L with 85K miles
- 2016 Volvo S60 D4
- 2019 Jeep Wrangler in Colorado
- BMW 3-Series
- How to Prevent This Code From Triggering
- Frequently Asked Questions
- Can I fix a P0109 code myself?
- How much does it cost to fix P0109?
- What is the most common mistake when diagnosing P0109?
- Will cleaning the MAP sensor fix the code?
- Can a dirty air filter cause a P0109 code?
- Can a bad EGR valve cause P0109?
- What is the difference between a MAP sensor and a MAF sensor?
- Can P0109 cause my transmission to act weird?
- Key Takeaways
- 🎟️ Get 5% Off