

P0031 on 2012-2017 Toyota Camry 2.5L: Heater Circuit Causes and Fixes
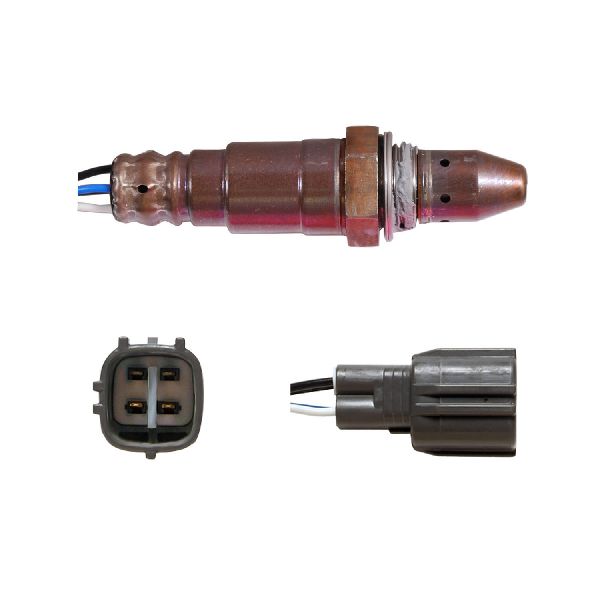
On a 2012-2017 Camry with the 2.5L engine, P0031 almost always means the upstream Air/Fuel Ratio sensor (Bank 1, Sensor 1) has failed. First, check the 20A 'A/F HTR' fuse in the engine bay fuse box. If the fuse is good, the sensor needs replacement. The OEM part is 89467-06080, and the direct-fit Denso equivalent is 234-9128. Expect to pay around $160-$190 for the Denso part.
- P0031 on a 2012-2017 Camry 2.5L almost always points to a bad upstream Air/Fuel Ratio sensor (Bank 1, Sensor 1).
- Always check the 20A 'A/F HTR' fuse in the engine bay fuse box first; it's a simple check that could save you money and diagnostic time.
- The job is very DIY-friendly; the sensor is located on the front of the engine and is easy to access with a 22mm O2 sensor socket.
- Use a high-quality replacement sensor. The OEM part is 89467-06080; the direct-fit Denso equivalent is 234-9128. Cheap universal sensors often do not work correctly and will cause the code to return.
What's Unique About the 2012-2017 Toyota Camry
For the 2.5L 2AR-FE engine in this Camry generation (XV50), the P0031 code is a very common and straightforward issue. The upstream A/F sensor is extremely easy to access on the front of the exhaust manifold, making diagnosis and replacement a simple DIY job that can be done in under 30 minutes. Unlike some other vehicles where wiring or ECU issues are common, the cause is overwhelmingly a failed sensor. Owners should be aware that Toyota calls this an Air/Fuel Ratio sensor, which is a more advanced (and expensive) type of oxygen sensor. Using cheap, universal parts is a common mistake and will cause the code to return.
Symptoms You May Notice
- Check Engine Light is on
- Reduced fuel economy
- Rough idle on a cold start
- Failing an emissions test
- Slight hesitation on acceleration when the engine is cold
- Replacing the wrong oxygen sensor. P0031 is for Bank 1, Sensor 1, which is the upstream sensor before the catalytic converter. Do not replace the downstream sensor (Sensor 2).
- Using a cheap or universal oxygen sensor. These often have incorrect heater resistance values or connector types and will not fix the code on a Toyota. Stick with OEM or a direct-fit Denso part.
Most Likely Causes
- Failed Air/Fuel Ratio Sensor (Bank 1, Sensor 1) 🔴 High Probability The internal heater element is a common failure point due to thermal cycling (heating and cooling) over many thousands of cycles. It's a wear-and-tear item.
How to confirm: Disconnect the sensor and measure the resistance between the two heater pins (the two black wires on the OEM sensor). For the OEM Denso sensor, the resistance at room temperature should be between 1.8 and 3.4 ohms. A reading of 'OL' (infinite resistance or 'OL' on a multimeter), indicates the heater has failed and the sensor must be replaced. 🎬 See how to test and replace the A/F sensor
Typical fix: Replace the upstream Air/Fuel Ratio sensor located on the exhaust manifold. Use a 22mm (or 7/8") oxygen sensor socket to remove and install. Torque the new sensor to 32 ft-lbs.
Est. part cost: $160-$220 - Blown 'A/F HTR' Fuse 🟡 Medium Probability A short circuit in the sensor's heater element can cause the protective fuse to blow. This is less common than the sensor failing open-circuit, but it happens.
How to confirm: Locate the fuse box in the engine bay. Find the 20A fuse labeled 'A/F HTR'. Visually inspect if the fuse is blown or test for continuity with a multimeter. This should always be the first check. 🎬 Watch: Common causes and fixes for the P0031 code
Typical fix: Replace the blown 20A fuse. If it blows again immediately, there is a hard short circuit in the wiring or the A/F sensor that must be diagnosed before proceeding.
Est. part cost: $1-$5 - Damaged Wiring or Connector ⚪ Low Probability The wiring harness is close to the hot exhaust and can become brittle or damaged over time, especially if the plastic retaining clips have broken.
How to confirm: Visually inspect the wiring harness and connector leading to the A/F sensor for any signs of melting, fraying, corrosion, or loose pins. Check for battery voltage (12V) at the harness-side connector pin for the heater circuit with the ignition on.
Typical fix: Repair the damaged section of the wiring harness or replace the connector pigtail.
Est. part cost: $10-$30
Rare But Worth Checking
- Faulty Engine Control Module (ECM): This is extremely rare. The ECM contains the driver circuit for the heater. It should only be considered after all other possibilities, including the sensor, fuse, and wiring, have been thoroughly tested and ruled out.
- Failed EFI Main Relay: The A/F heater circuit is powered by the EFI MAIN relay. A failure of this relay is uncommon and would typically cause other engine running issues and codes, not just P0031 in isolation.
Diagnosis Steps
- Read the code with an OBD-II scanner to confirm P0031 is the only code present.
- Open the hood and locate the main fuse box near the battery.
- Find and inspect the 20A 'A/F HTR' fuse. If it's blown, replace it, clear the codes, and see if the code returns. If it blows again, suspect a short circuit in the sensor or wiring.
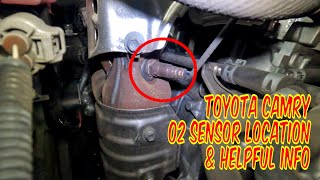
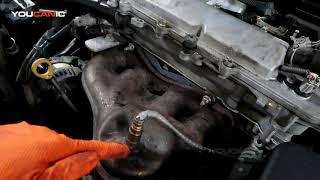
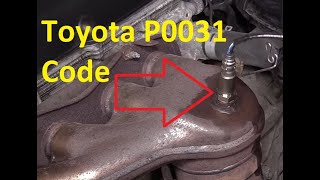
- If the fuse is good, locate the Bank 1, Sensor 1 Air/Fuel Ratio sensor. On the 2AR-FE engine, it is easily accessible on the front of the exhaust manifold, just below the heat shield. 🎬 Watch: Locate the Bank 1 Sensor 1 A/F sensor
- Inspect the sensor's wiring harness and connector for any visible damage, melting, or corrosion.
- Disconnect the sensor's electrical connector. Be careful not to break the locking tab.
- Using a multimeter set to Ohms (Ω), measure the resistance across the two heater pins on the SENSOR side of the connector (these are the two black wires on the original sensor).
- A good sensor should read between 1.8 and 3.4 ohms at 68°F. A reading of 'OL' (Open Loop/infinite resistance) or a value significantly outside this range indicates a failed heater element, and the sensor must be replaced.
- If the sensor resistance is good, check for power at the HARNESS side of the connector. With the ignition key in the 'ON' position, you should have battery voltage (~12V) at one of the heater circuit pins.
- If power and sensor resistance are good, the issue may be in the ground control side of the circuit from the ECM, but this is highly unlikely. At this point, the sensor is still the most probable cause despite testing within spec.
- To replace, use a 22mm or 7/8" oxygen sensor socket. Apply anti-seize compound to the threads of the new sensor (usually included) and torque to 32 ft-lbs.
Parts You'll Likely Need
- Air/Fuel Ratio Sensor (Bank 1, Sensor 1)
(OEM #89467-06080)— This is the most common cause of P0031, as the internal heater element fails over time.
Trusted brands: Denso (OEM Supplier) - Part No. 234-9128, NTK
OEM price range: $180-$240
Aftermarket price range: $160-$190
Technical Service Bulletins (TSBs) & Recalls
- T-SB-0086-12 - Addresses torque converter shudder on 2012 models.
- T-SB-0041-13 - Describes the VVT cam gear rattle on cold start for 2AR engines.
Mechanic-Grade Diagnostic Values
- A/F Sensor Heater Current Draw — expected: Above 0.8 Amps. Failure: Less than 0.8 Amps will trigger DTC P0031.
- A/F Sensor Heater Resistance (alternate spec) — expected: 0.8 - 1.4 ohms at 20°C (68°F). Failure: A reading of OL (infinite resistance) or near zero ohms.
- ECM Pin Voltage (HA1A) — expected: Pulse-width modulated signal (duty-cycle controlled ground). Failure: No signal or constant ground/open when heater should be active.
- ECM Pin Voltage (+B at sensor connector) — expected: ~12V (Battery Voltage) with key on, engine off.. Failure: No voltage indicates an issue with the A/F HTR fuse or EFI Main Relay.
Scan Tool Commands That Help
- Toyota Techstream: Active Test: 'Control Injection Volume for A/F Sensor' — While not a direct test of the P0031 heater circuit, this allows a technician to command the fuel mixture rich or lean (e.g., -12.5% to +25%) and observe the A/F sensor's voltage/lambda response in live data. A healthy sensor should respond almost instantly. A non-responsive sensor during this test would further condemn the sensor assembly as a whole, confirming the need for replacement.
Wiring & Ground Locations
- A/F Sensor Connector (A8 / B7) — The 4-pin connector that attaches the Bank 1 Sensor 1 A/F sensor to the main engine harness, located near the top of the exhaust manifold on the 2AR-FE.. This is the primary point for testing voltage, ground, and sensor resistance. The heater circuit pins are +B (power) and HA1A (ECM-controlled ground).
- Engine Harness Ground — A primary ground point for the engine harness is located on the cylinder head near the intake manifold. Another key ground is a strap from the valve cover to the chassis near the passenger-side strut tower.. While a rare cause for an isolated P0031, a poor engine ground can cause incorrect voltage references for multiple sensors, leading to spurious codes. This should be checked if the sensor and its direct wiring test good.
Real Owner Repair Stories
- YouTube user 'Fix it Angel' (Toyota Camry with 2AR-FE engine, 249,758 miles) — Check Engine Light with code P2238 (which is related to the A/F sensor circuit).
✅ What actually fixed it The owner diagnosed an open circuit in the original A/F sensor. Replacement of the Bank 1, Sensor 1 Air/Fuel Ratio sensor with a new Denso unit resolved the issue and cleared the code. The high mileage (250k) was noted as a likely reason for the original sensor's failure. - NHTSA ODI #10573840 — An owner of a Toyota reported that after owning a certified pre-owned vehicle for one month, the "Check Engine" light appeared specifically for the Bank 1 Air/Fuel sensor on the exhaust manifold, confirming the P0031 code was present on only one sensor.
- NHTSA ODI #10531943 — A report describes a recurring check engine light where a technician found P0031 for the AF Sensor B1S1, leading to a replacement of the sensor.
- NHTSA ODI #10901973 — An owner reported persistent issues where the engine light would not go out despite an error reading of P0031, noting that the sensor had been replaced multiple times but the light remained on even after resetting.
OEM Part Supersession History
89467-33080→89467-06030— Standard part number consolidation and updates by Toyota.
Heads up: While 89467-06030 supersedes the older part, the specified part for the 2012-2017 Camry 2.5L is 89467-06080. Using the wrong suffix can lead to incorrect heater resistance or signal calibration. Always verify the part number for the specific vehicle and engine.
Diagnostic Flowchart
Other Known Issues on This Vehicle
Issues unrelated to this code that are worth knowing about as an owner of this generation:
- Torque Converter Shudder 🟠 Medium — Common on 2012-2014 models with the U760E transmission, typically felt on light acceleration. Toyota issued a Warranty Enhancement Program (ZE5) to address this. (Ref: T-SB-0086-12)
- VVT Cam Gear Rattle on Cold Start 🟡 Low — A brief (~1 second) rattle noise immediately after a cold start. While startling, it is often considered benign unless it persists. (Ref: T-SB-0041-13)
- Melting / Sticky Dashboard 🟡 Low — Affects 2007-2011 models primarily, but some early XV50 generation owners have reported it. Caused by heat and humidity. Toyota had a Warranty Enhancement Program (ZE6) for this. (Ref: Warranty Enhancement Program ZE6)
- Water Pump Failure 🟠 Medium — While not extremely common, premature water pump failure (leaks or internal failure) is a known potential issue on the 2AR-FE engine.
Used vs. New Parts: Buying Guide for This Vehicle
When a used part is the smart pick: For this specific repair, using a used part is NOT recommended. The A/F sensor is a wear-and-tear item with a finite lifespan, determined by heat cycles and mileage. A used sensor from a junkyard has unknown remaining life and could fail soon after installation, wasting time and money.
What to inspect on the donor part:
- Not applicable as used part is not recommended.
OEM-only on this vehicle (don't cheap out):
- Air/Fuel Ratio Sensor
Aftermarket brands forum-validated for this vehicle:
- Denso (OEM supplier, Part No. 234-9128)
- NTK
Brands owners have reported issues with on this vehicle:
- Unnamed or generic 'white box' sensors from online marketplaces. These frequently have incorrect heater resistance values, leading to the P0031 code returning immediately or shortly after installation.
Real Owner Stories
Aggregated from forums and TSBs cited above. Mileages and costs reflect what owners reported in those sources.
2006 Toyota Camry V6 3.0L
Symptoms: Owner was performing diagnostics for a P0031 code, specifically measuring voltage and resistance at the sensor connector.
What fixed it: The diagnostic process confirmed the need to check for 9-14V and a resistance of 1.8-3.4 ohms to verify sensor failure.
Source hint: CamryForums - 'Newbie to the forum- '06 V6 3.0 with P0031 code'
2012-2017 Toyota Camry 2AR-FE
Symptoms: A brief (~1 second) rattle noise immediately after a cold start.
What fixed it: This is a known VVT cam gear rattle described in T-SB-0041-13; while startling, it is often considered benign unless it persists.
Source hint: TSB T-SB-0041-13
Related OBD-II Codes
Frequently Asked Questions
Does T-SB-0086-12 mean my P0031 code is related to the transmission shudder?
Can I use a generic sensor from an online marketplace to fix P0031 on my 2AR-FE?
Is the VVT cam gear rattle described in T-SB-0041-13 causing my Check Engine Light?
Where is the fuse for the A/F sensor heater located on a 2012-2017 Camry?
What is the correct resistance for a new Denso A/F sensor on this engine?
Does the 2012-2017 Camry have a warranty extension for the dashboard issue mentioned in the context?
Helpful Videos

We Have This Part in Stock


The information in this article is provided for general reference and educational purposes only. Vehicle specifications, procedures, and part compatibility can vary by production date, trim level, and region. Always consult your vehicle's factory service manual and verify part numbers before purchasing or performing repairs. Safety-critical components such as airbags, seat belts, and braking systems should be installed by a qualified professional.
- Toyota Camry:
- 🎬 Helpful Videos
- 🛍️ Shop This Part
- What's Unique About the 2012-2017 Toyota Camry
- Symptoms You May Notice
- Most Likely Causes
- Rare But Worth Checking
- Diagnosis Steps
- Parts You'll Likely Need
- Technical Service Bulletins (TSBs) & Recalls
- Mechanic-Grade Diagnostic Values
- Scan Tool Commands That Help
- Wiring & Ground Locations
- Real Owner Repair Stories
- OEM Part Supersession History
- Diagnostic Flowchart
- Other Known Issues on This Vehicle
- Used vs. New Parts: Buying Guide for This Vehicle
- Real Owner Stories
- 2006 Toyota Camry V6 3.0L
- 2012-2017 Toyota Camry 2AR-FE
- Related OBD-II Codes
- Frequently Asked Questions
- 🎟️ Get 5% Off