

2014-2026 Mini Cooper Liftgate Seal: Your Guide to Fixing Trunk Water Leaks
This guide covers the common failure symptoms, replacement costs, and what to inspect when buying a used liftgate seal for your F56 3-door Mini Cooper.
- The primary issue is water leaking into the trunk, a known problem addressed by MINI TSB SI M51 05 16 for 2014-2016 F56 models.
- The correct, updated part number is 51767375849, which has a revised design to prevent leaks.
- Before replacing the seal, perform a water test to rule out other common leak sources like taillights, the third brake light, or sunroof drains.
- Replacement is a very easy DIY job; simply pull the old seal off and press the new one on. Sealing the underlying body seams is highly recommended.
Vehicle Compatibility Warning
Important: This guide and the primary part numbers discussed apply specifically to the 2014-2026 Mini Cooper 3-Door Hardtop (F56 chassis). The 5-Door Hardtop (F55), Clubman (F54), and Convertible (F57) models use different seals. The F56 has a single, continuous seal for its single rear liftgate.
Known Issues: The Common F56 Trunk Leak
A significant number of early F56 models (primarily 2014-2016) are known to develop water leaks into the trunk area. The water typically collects in the lower storage compartment under the trunk floor, where the battery and tool kit are located. This is a well-documented problem that led MINI to issue a Technical Service Bulletin (TSB).
Technical Service Bulletin (TSB) SI M51 05 16
For vehicles produced up to June 2016, MINI released TSB SI M51 05 16 to address complaints of water in the trunk. The bulletin identified two root causes:
- Insufficient Body Seam Sealing: The metal seams (pinch welds) that the rubber seal presses onto were sometimes insufficiently sealed at the factory, allowing water to seep past the seal.
- Original Seal Design Flaw: Forum members discovered that the original seal design could cause it to lift up over the plastic bumper trim guide at the bottom of the hatch opening. This created a channel for water to get under the seal and into the trunk.
The official correction involves removing the old seal, applying a bead of polyurethane sealant to the body seams, and installing an updated, redesigned liftgate seal (Part No. 51767375849). This new seal features a small notch in the lower section to prevent it from interfering with the plastic trim and lifting up.
Symptoms of a Failing Liftgate Seal
A bad liftgate seal will make itself known, usually after a car wash or heavy rain.
- Water in the Trunk: The most obvious sign is finding standing water in the lower trunk compartment.
- Musty or Moldy Odors: A damp, musty smell inside the car, particularly from the rear, indicates that water has soaked into the carpets and trim panels.
- Visible Mold: In advanced cases, you may see mold growing on the trunk floor carpet or side panels.
- Increased Wind Noise: A seal that is shrinking, hardened, or damaged may no longer make full contact with the liftgate, allowing more wind noise to enter the cabin at speed.
- Visible Damage: A visual inspection may reveal that the seal is cracked, torn, brittle, or has flat, compressed spots.
How to Diagnose the Leak Source
While the liftgate seal is a common culprit, it's not the only potential source of water in the trunk. Before replacing the seal, it's wise to confirm the leak's origin.
- Dry the trunk area completely.
- Have a helper slowly run water from a garden hose over the rear of the car while you are inside the trunk with a flashlight.
- Focus the water on specific areas one at a time: first around the entire liftgate seal, then the third brake light, then each taillight, and finally the roof antenna base.
- Check for water entry inside. If water appears while soaking the hatch perimeter, the seal is the likely cause. If it appears when soaking a taillight, the taillight gasket is the problem.
Pro Tip: On models with a sunroof, clogged rear sunroof drain tubes can also cause water to leak into the headliner and run down the C-pillars into the trunk area. If you see water stains on the headliner, investigate the sunroof drains first.
Buying a Used Liftgate Seal: What to Check
A used OEM seal in good condition is an excellent, cost-effective alternative to a brand-new part. Because fitment is critical, a used Genuine MINI seal is almost always a better choice than a new, non-OEM aftermarket part. Here’s what to inspect:
- Verify the Part Number: Ensure you are buying part number 51767375849. This is the updated, improved version that is less prone to leaking.
- Check for Pliability: Squeeze the rubber along its entire length. It should be soft and flexible. Avoid any seal that feels hard, stiff, or brittle.
- Inspect for Damage: Carefully examine the entire seal for cracks, tears, or splits, paying close attention to the corners where stress is highest.
- Look for Flat Spots: Run your fingers along the sealing surface. It should be round and full. Avoid seals with significant flat or compressed sections, as these won't seal effectively.
- Examine the Seam: The seal is manufactured as one piece with a bonded seam. Make sure this seam is intact and not separating.
Cost Comparison
| Part Type | Estimated Cost |
|---|---|
| New Genuine MINI | $150 - $200 |
| New Aftermarket | Not commonly available |
| Used Genuine MINI | $50 - $100 |
| Shop Labor | $75 - $150 |
Installation Guide
Replacing the liftgate seal is a simple DIY task. The difficulty is a 1 out of 5 and should take less than 30 minutes.
- Remove the Old Seal: Open the liftgate. Find the end of the seal and simply pull it off the metal pinch weld. It is held on by friction, not adhesive. Work your way around the entire opening until it's completely removed.
- Clean the Surface: Wipe down the metal pinch weld with a clean cloth to remove any dirt or debris.
- (Recommended) Seal the Body Seams: As per TSB SI M51 05 16, apply a thin, continuous bead of automotive polyurethane sealant directly onto the factory body seams along the pinch weld, especially in the lower corners and bottom edge. This provides an extra layer of protection.
- Install the New Seal: The new seal has a seam. Line this seam up with the center of the trunk latch striker on the body. Starting there, press the seal firmly onto the pinch weld. Work your way around the entire opening, using firm pressure or light taps with a rubber mallet to ensure it is fully seated.
- Check for Fitment: Close the liftgate and check for an even gap all around. The door should close smoothly without excessive force.
Technical Specifications & Part Numbers
The part numbers initially provided for this guide were incorrect and belong to the front door seals. The correct part numbers for the F56 3-Door Hardtop liftgate seal are below.
| Part Description | Part Number | Notes |
|---|---|---|
| Liftgate Seal (F56) | 51767375849 | Current, updated part with leak-fix design. |
| Liftgate Seal (F56) | 51767300838 | Superseded, original part number. Avoid if possible. |
| Right Front Door Seal (F56) | 51767408450 | Incorrect part for this location. Fits passenger door. |
| Left Roof Frame Seal (F56) | 51-76-5-A4C-F91 | Incorrect part for this location. Fits upper door frame. |
Frequently Asked Questions (FAQ)
My trunk is leaking. Is it definitely the liftgate seal?
Not necessarily. While the liftgate seal is a very common cause, especially on 2014-2016 models, water can also enter through bad taillight gaskets, a leaking third brake light seal, a poorly sealed roof antenna, or clogged sunroof drains. It's best to perform a water test to pinpoint the source before buying parts.
Can I just repair my old seal with silicone?
This is not recommended as a permanent fix. The leak is often caused by the seal's shape or shrinkage, or by water getting under it at the body seam. A surface repair with silicone is unlikely to solve the underlying problem. Replacing the seal is the correct and lasting repair.
Is this the same seal for the 5-door Mini Cooper?
No. The 5-door F55 model has a different liftgate shape and requires a different part number (51767379602). This guide is only for the 3-door F56 Hardtop.
Do I need any special tools for the installation?
No special tools are required. The seal is removed by hand and pressed back on by hand or with a rubber mallet. If you choose to seal the body seams as recommended, you will need a tube of automotive polyurethane sealant and a caulking gun.
Technical Specifications
OEM Part Numbers: 51767375849 51767300838
Material: EPDM Rubber. Fitment Type: Press-on. Location: Vehicle body opening for rear liftgate.
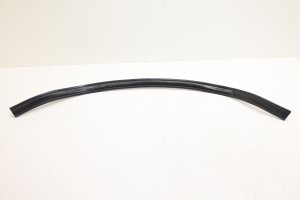
We Have This Part in Stock

The information in this article is provided for general reference and educational purposes only. Vehicle specifications, procedures, and part compatibility can vary by production date, trim level, and region. Always consult your vehicle's factory service manual and verify part numbers before purchasing or performing repairs. Safety-critical components such as airbags, seat belts, and braking systems should be installed by a qualified professional.
- Mini Cooper:
- 🛍️ Shop This Part
- Vehicle Compatibility Warning
- Known Issues: The Common F56 Trunk Leak
- Technical Service Bulletin (TSB) SI M51 05 16
- Symptoms of a Failing Liftgate Seal
- How to Diagnose the Leak Source
- Buying a Used Liftgate Seal: What to Check
- Cost Comparison
- Installation Guide
- Technical Specifications & Part Numbers
- Frequently Asked Questions (FAQ)
- 🎟️ Get 5% Off