

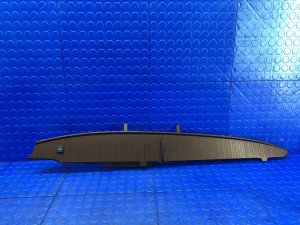
2021-2025 Toyota Sienna Center Instrument Trim: Color Codes & Compatibility Guide
This guide covers the crucial details for replacing the lower instrument panel trim on your 2021-2025 Sienna, focusing on color matching and option compatibility.
- This trim panel is for 2021-2025 Sienna models WITHOUT the optional wireless phone charger.
- The part number suffix determines the color; -B0 is Gun Metal and -E0 is Dark Brown. Verify the full part number before buying.
- When buying used, the condition of the rear mounting tabs is more important than minor surface scuffs.
- Replacement is a simple DIY task using plastic trim pry tools; no screws are involved for this specific part.
Symptoms of a Failing Instrument Panel Trim Panel
Since this is a cosmetic trim piece, failure is almost always related to physical damage or wear rather than mechanical or electrical issues. Symptoms are typically straightforward:
- Visible Damage: Scratches, scuffs, gouges, or cracks are the most common reasons for replacement. This often happens from items being placed in the area, accidental impact, or from the use of harsh cleaning chemicals that damage the finish.
- Broken Mounting Tabs: If the panel feels loose, rattles, or has a noticeable gap between it and adjacent panels, one or more of its hidden mounting clips or tabs has likely broken. This can happen during removal for other repairs if not done carefully.
- Discoloration or Peeling: While less common on modern vehicles, prolonged sun exposure over many years can potentially cause the color to fade. The finish could also be damaged by chemical spills.
Known Issues, TSBs, and Recalls
As of mid-2024, there are no specific recalls, Technical Service Bulletins (TSBs), or widespread owner complaints related to this particular instrument panel trim piece on the 2021-2025 Toyota Sienna. The fourth-generation Sienna has had recalls for other issues, such as third-row seat bolts, but none involve the dashboard trim. Failure of this part is almost exclusively due to cosmetic damage or improper removal during other service.
Important Variants and Compatibility
Getting the correct replacement part is critical and depends on two key factors: your vehicle's options and its interior color scheme. Ordering the wrong part will result in an incorrect fit or a mismatched color.
Warning: The part numbers listed here are specifically for Toyota Sienna models WITHOUT the optional factory wireless phone charger. If your vehicle has the wireless charger, this part will not fit correctly. Always verify your vehicle's configuration before ordering.
Decoding Part Numbers and Colors
Toyota uses a base part number with a color code suffix. When buying a used part, it's essential to match the full part number, not just the base. The color is molded into the plastic, so these panels are not meant to be painted.
| Part Number | Color Name | Commonly Found In |
|---|---|---|
| 55475-08090-B0 | Gun Metal | Often paired with gray or black interior schemes. |
| 55475-08090-E0 | Dark Brown | Often paired with beige, brown, or two-tone interiors. |
| 55475-08090 | Base Part Number | This is the base number without a color code. It is used for reference but is not a complete, orderable part number. |
The best way to confirm your color is to have a Toyota dealer look up your VIN or to carefully compare your original part to photos in a listing, matching the full part number if possible.
Buying a Used Instrument Panel Trim Panel
For a cosmetic part like this, a used OEM panel is an excellent choice. It offers a perfect fit and color match at a significant discount compared to a new part from the dealer. Since aftermarket versions are generally not produced for specific interior trim pieces, used OEM is often the best and only alternative to new.
Inspection Checklist:
- Mounting Tabs: This is the most critical inspection point. Carefully check the back of the panel. All mounting tabs and clip receptacles must be intact. Even one broken tab can cause a poor fit or a persistent rattle.
- Front Surface Condition: Look for deep scratches, scuffs, or any signs of chemical damage that may have altered the texture or finish. Minor scuffs may be acceptable depending on your standards, but deep gouges cannot be repaired.
- No Cracks: Flex the part slightly if possible. Inspect for any hairline cracks, especially around the corners or thin sections.
- Confirm the Part Number: Whenever possible, get the full part number (e.g., 55475-08090-B0) from the seller to guarantee a color match. Do not rely on visual color matching from a photo alone, as lighting can be deceptive.
Replacement Guide
Replacing this trim panel is a straightforward DIY job that requires basic tools and patience. The entire dashboard is assembled with interlocking plastic panels held by clips.
Pro Tip: Invest in a set of plastic trim removal tools (pry tools). Using metal tools like a screwdriver will almost certainly scratch or gouge the soft plastic of the dashboard panels. Work slowly and feel for the clips to release rather than using brute force.
- Engage Parking Brake: Ensure the vehicle is in park with the parking brake engaged.
- Remove Adjacent Panels: The specific panels to remove first may vary slightly, but typically the panels on either side of the target trim piece must be gently pried off first. These are usually held by clips and can be removed by pulling them straight out, starting from one edge.
- Locate and Release Clips: Once you have access to the edges of the instrument panel trim, use your plastic pry tool to gently work your way around it, releasing the clips that hold it to the dashboard structure.
- Remove the Old Panel: Once all clips are disengaged, the panel should come free. There are no screws or bolts holding this specific piece.
- Install the New Panel: Align the new panel carefully. Line up all the clips with their corresponding holes in the dashboard.
- Seat the New Panel: Give the panel a firm push with the palm of your hand at each clip location. You should hear or feel a distinct 'click' as each clip seats.
- Reinstall Other Panels: Snap any other removed trim pieces back into place.
Cost Comparison
| Part Type | Estimated Cost |
|---|---|
| New OEM | $125 - $180 |
| Used OEM | $50 - $90 |
| New Aftermarket | Not Generally Available |
| Shop Labor | $75 - $150 |
Frequently Asked Questions (FAQ)
Can I paint a used trim panel to match my interior?
It is not recommended. This panel is made of molded, textured plastic. Automotive interior paint exists, but achieving a durable, factory-matching finish and texture is extremely difficult and likely to peel or scratch easily. It is far better to find a used part with the correct color code.
How do I know if my Sienna has the wireless charger?
The optional wireless phone charger is located in the vertical slot in the center console, just ahead of the gear selector. If you have a plain storage slot there without the charging symbol (a phone with radio waves), you have the 'without wireless charger' version this part is designed for.
Is it difficult to replace this panel myself?
No, this is considered an easy DIY job for most people. It requires no special mechanical skills, only patience and a set of plastic trim removal tools to avoid damaging the dashboard. The entire process should take less than 30 minutes.
Why are all the mounting tabs so important on a used part?
The mounting tabs and clips are the only things holding the panel securely in place. If they are broken, the panel will not sit flush with the rest of the dash and will vibrate or rattle as you drive, creating an annoying noise in the cabin.
Technical Specifications
OEM Part Numbers: 55475-08090 55475-08090-B0 55475-08090-E0
Molded plastic construction. Attaches with integrated clips. Designed for models without factory wireless phone charger.
We Have This Part in Stock

The information in this article is provided for general reference and educational purposes only. Vehicle specifications, procedures, and part compatibility can vary by production date, trim level, and region. Always consult your vehicle's factory service manual and verify part numbers before purchasing or performing repairs. Safety-critical components such as airbags, seat belts, and braking systems should be installed by a qualified professional.
- Toyota Sienna:
- 🛍️ Shop This Part
- Symptoms of a Failing Instrument Panel Trim Panel
- Known Issues, TSBs, and Recalls
- Important Variants and Compatibility
- Decoding Part Numbers and Colors
- Buying a Used Instrument Panel Trim Panel
- Inspection Checklist:
- Replacement Guide
- Cost Comparison
- Frequently Asked Questions (FAQ)
- 🎟️ Get 5% Off