

2023-2025 Hyundai Palisade Instrument Panel Bracket: A Guide to Dashboard Rattles and Fixes
Learn how to diagnose, replace, and prevent the common dashboard rattles and buzzes associated with the instrument panel trim panel bracket in your Palisade.
- The primary symptom of a failed bracket is a rattling or buzzing noise from the dashboard, which is an annoyance but not a safety risk.
- This part is not subject to any specific recalls or TSBs, but dashboard rattles are a known complaint among some owners.
- A used OEM bracket is a great value, but inspect it carefully for cracks or stress marks around the mounting holes before buying.
- Replacement is a manageable DIY job, but a set of plastic trim removal tools is essential to avoid damaging your dashboard panels.
Symptoms of a Failing Instrument Panel Trim Panel Bracket
Failure of this bracket is not a safety concern, but it can create some very annoying and distracting noises inside the cabin. Because the 2023-2025 Palisade is a newer vehicle, outright failure is uncommon and is more likely to be caused by a previous improper repair than by age. Owners on forums frequently report mysterious dashboard rattles and creaks. While many things can cause these noises, a broken or loose trim bracket is a common culprit.
- Rattling or Buzzing Noises: The most common symptom is a persistent rattling, buzzing, or creaking sound coming from the dashboard area. This noise may be more noticeable when driving on rough roads or during temperature changes, which can cause plastic parts to expand or contract.
- Loose Trim Piece: You may notice that a piece of the dashboard trim is loose, misaligned, or can be easily moved with your hand. This indicates that the bracket holding it in place is no longer secure.
- Vibrations at Certain Speeds: Sometimes, the noise will only appear at specific speeds or engine RPMs when a certain frequency causes the loose parts to vibrate.
Known Issues, TSBs, and Recalls
As of this writing, there are no specific recalls or Technical Service Bulletins (TSBs) issued by Hyundai or the NHTSA that directly address the instrument panel trim panel bracket for the 2023-2025 Palisade. However, owners have reported various rattles and noises from the dashboard area on forums. One owner noted a rattle was traced back to a faulty plastic panel clip, which was replaced under warranty. Another TSB for older models addresses wind noise from the door glass area, which involves adding foam pads and could be mistaken for a dash rattle.
The 2023-2025 Palisade has been subject to several unrelated recalls, including for issues with side curtain airbags, the Idle Stop & Go oil pump, brake boosters, and engine valve springs. A recall also affected some 2022 models where the instrument cluster LCD could go blank. 🎬 See how to remove the instrument cluster These issues are not related to the trim panel bracket itself.
Pro Tip: Before assuming a bracket is broken, use a piece of felt tape or a small foam pad to apply pressure to the rattling trim piece. If the noise stops, it confirms the source is a loose panel, likely due to a faulty bracket or clip.
Buying a Used Instrument Panel Trim Panel Bracket: What to Check
Since this is a simple, non-wear structural part, a used OEM bracket is an excellent, cost-effective alternative to a new part. When buying a recycled bracket, you are getting the same quality and fitment as the original. Here’s what to inspect:
- Check for Cracks: Carefully inspect the entire bracket, paying close attention to the screw holes and clip mounting points. These are the most common areas for stress and breakage. Any visible cracks are a deal-breaker.
- Look for Stress Marks: On the black plastic, look for faint white lines or discoloration. This indicates the plastic has been bent or stressed and is weakened, even if not fully cracked.
- Verify Mounting Points: Ensure all mounting tabs, clip receivers, and screw holes are intact and not broken off. Compare the used part to diagrams or photos of a new one to be sure nothing is missing.
- Confirm Part Numbers: Match the OEM part number exactly. The primary numbers are 84744-S8AA0 and 84744-S8AA0-4X. The '-4X' suffix typically denotes the color (black), but the underlying part should be identical.
Cost Comparison
| Part Type | Estimated Cost |
|---|---|
| New OEM | $110 - $160 |
| New Aftermarket | Not commonly available |
| Used OEM | $40 - $100 |
| Shop Labor | $120 - $250 (1-2 hours) |
Installation Guide & Difficulty
Replacing an instrument panel bracket is generally feasible for a DIYer with patience and the right tools. The main challenge is accessing the bracket, which often requires removing several other trim pieces first.
- Difficulty: 2 out of 5
- Estimated Time: 1-2 hours
Warning: Always use plastic trim removal tools to pry off panels. Using a metal screwdriver will scratch or gouge the soft dashboard plastics.
General Replacement Steps:
- Disconnect the Battery: This is a crucial safety step before working around the dashboard and its electronics.
- Remove Surrounding Trim: 🎬 Watch this step-by-step radio and trim removal guide Following guides or videos, carefully pry off the trim panels surrounding the one attached to the broken bracket. These are usually held by clips and a few screws. Keep track of which screws go where.
- Access the Bracket: Once the trim is removed, you should have access to the bracket. It will be held in place by a few screws (often Phillips head).
- Unscrew and Replace: Remove the screws holding the old bracket, swap in the new one, and secure it.
- Reassemble: Carefully reinstall all trim panels in the reverse order of removal, ensuring all clips snap securely into place.
- Reconnect Battery: Once everything is back together, reconnect the battery and check for any remaining rattles.
Frequently Asked Questions (FAQ)
Can a broken instrument panel bracket cause any real damage?
No, a broken trim bracket is almost always a cosmetic issue that only causes noise. It does not affect the vehicle's mechanical or electrical systems and is safe to drive with, although the rattling can be very distracting.
Why did my trim bracket break on a new car?
On a new vehicle like the 2023-2025 Palisade, breakage is rare. It's most often caused by physical impact or by improper removal/reinstallation during a previous repair, 🎬 Watch a complete dashboard disassembly walkthrough such as a stereo installation or a windshield replacement, which puts stress on the plastic.
Do I need special tools to replace this bracket?
A basic set of screwdrivers (usually Phillips head) is required. However, a set of plastic trim removal (pry) tools is highly recommended to safely remove dashboard panels without scratching or breaking them.
Is the bracket on the driver's side the same as the passenger's side?
No, dashboard components are almost always side-specific. They are often mirror images of each other and will have different part numbers. Ensure you are purchasing the correct bracket for the side you need to repair.
Helpful Videos

Technical Specifications
OEM Part Numbers: 84744-S8AA0 84744-S8AA0-4X
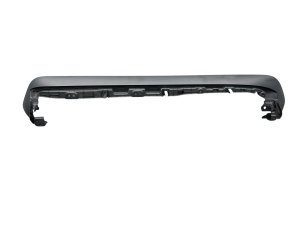
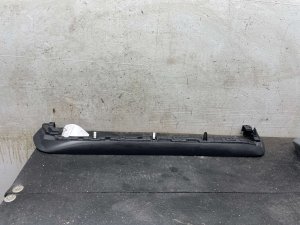
Material: Molded Plastic. Function: Secures instrument panel trim pieces.
We Have This Part in Stock

The information in this article is provided for general reference and educational purposes only. Vehicle specifications, procedures, and part compatibility can vary by production date, trim level, and region. Always consult your vehicle's factory service manual and verify part numbers before purchasing or performing repairs. Safety-critical components such as airbags, seat belts, and braking systems should be installed by a qualified professional.
- Hyundai Palisade:
- 🎬 Helpful Videos
- 🛍️ Shop This Part
- Symptoms of a Failing Instrument Panel Trim Panel Bracket
- Known Issues, TSBs, and Recalls
- Buying a Used Instrument Panel Trim Panel Bracket: What to Check
- Cost Comparison
- Installation Guide & Difficulty
- General Replacement Steps:
- Frequently Asked Questions (FAQ)
- 🎟️ Get 5% Off