

2015-2020 Audi A3 & S3 Instrument Panel Trim: Rattles, Finishes, and Replacement
This guide covers the common issues, various finishes, and replacement process for the dashboard trim panels in your 2015-2020 Audi A3 or S3.
- The most common failures are cosmetic (scratches, peeling) and annoying rattles, not functional problems.
- When buying a used part, the integrity of the mounting clips on the back is more important than minor surface scratches.
- To replace the center trim piece, you MUST use a set of inexpensive 'radio removal keys' to pull the MMI unit out first.
- You can identify your car's specific trim finish by finding the PR code sticker in the trunk's spare tire well or in the service manual.
Symptoms of Failing Instrument Panel Trim
Since this is a cosmetic part, failure doesn't typically affect the vehicle's operation. Instead, symptoms are related to aesthetics and cabin noise.
- Rattling or Buzzing Noises: This is the most common complaint. The plastic or metal trim pieces can vibrate against the main dashboard structure, especially on rough roads or at certain engine RPMs. These noises can be notoriously difficult to pinpoint.
- Visible Cosmetic Damage: Scratches, scuffs, and gouges from daily use are common. On upgraded trims like brushed aluminum, the protective clear coat can start to peel or delaminate over time, creating a hazy or flaky appearance.
- Loose Fitment: If mounting clips are broken, a trim piece may feel loose to the touch or show an uneven gap against the dashboard. This often happens after the trim has been removed and reinstalled improperly.
Known Issues, TSBs, and Recalls
Common Rattles
The Audi A3 and S3 from the 8V generation (2015-2020) are known for developing interior rattles over time. While the dashboard trim is a frequent suspect, these noises can also come from the glove box, door panels, or center console. Owners on forums often use felt tape or foam to dampen vibrations between plastic panels as a DIY fix.
Pro Tip: Before replacing trim to fix a rattle, try pressing firmly on different areas of the dash while driving (with a helper, if possible) to isolate the exact source. Sometimes, a small piece of felt tape placed on a contact point is all that's needed.
Important Recall Notice: Passenger Airbag System
A significant safety recall (NHTSA ID: 21V-198, Audi Campaign 69BY) affects all 2015-2020 Audi A3 and S3 models. The Passenger Occupant Detection System (PODS) can malfunction and disable the passenger airbag, even when someone is seated. This will trigger a warning light and message on the instrument panel. This is NOT a failure of the trim panel itself, but it is a critical safety issue related to the dashboard area. Audi dealers will perform a repair free of charge. You can check if your vehicle is affected by entering your VIN on the NHTSA website.
Identifying Your Trim Variant
Matching the correct finish is critical when buying a used replacement. Audi uses specific Production-Relevant (PR) codes to identify interior trim options. You can find your vehicle's PR codes on a sticker located in the spare tire well in the trunk or inside your original service manual.
Here are the most common dashboard trim finishes for the 2015-2020 A3 and S3:
| Finish Name | PR Code | Description |
|---|---|---|
| Micrometallic Silver | 5MA |
Standard plastic trim with a silver painted finish. Found on base models. |
| Aluminum Mistral | 5TD |
A popular aluminum trim with a fine, horizontal grain. Common on Premium Plus trims. |
| 3D Optik / Glass Optic | 7TM |
A two-layer plastic trim with a dark gray, high-tech pattern that creates a 3D effect. |
| Brushed Aluminum Matt | 5TG |
A matte-finish, heavily brushed aluminum. Standard on most S3 models. |
| Aluminum Race / Carbon Atlas | 5MD |
An aluminum base with a carbon fiber-like textured film applied over it. |
Buying a Used Instrument Panel Trim Panel
Buying a used OEM trim panel is an excellent way to save money, especially if you're upgrading from the basic plastic trim or replacing a damaged piece. However, careful inspection is key.
What to Inspect on a Used Part
- Mounting Tabs and Clips: This is the most critical inspection point. Turn the panel over and check that every single mounting tab and clip location is intact. These are easily broken during removal, and even one broken tab can cause a poor fit or a persistent rattle.
- Surface Finish: Look for deep scratches, gouges, or signs of chemical stains that won't come off. For aluminum or '3D Optik' trims, inspect the surface in bright light for any signs of the clear coat peeling, bubbling, or hazing.
- Check the Part Number: Whenever possible, match the part number from your old trim to the new one. While different finishes have different part number suffixes, the base number should be the same. The main passenger-side piece is typically 8V1853190 and the center piece is 8V1853191.
OEM vs. Aftermarket
For this part, used OEM is often the best choice for fit and quality. The precise fit of OEM trim is essential to prevent gaps and rattles. While many aftermarket options exist, they are typically vinyl overlays or stick-on kits that cover your existing trim. These can be a good option for changing the look (e.g., to a carbon fiber pattern), but they will not fix a broken underlying trim piece. Full carbon fiber replacement pieces are available from tuning shops but are significantly more expensive than used OEM parts.
Replacement Guide
Replacing the dashboard trim is a feasible DIY project for those with patience and the right tools. The difficulty is low to moderate.
Tools Required:
- Plastic Pry Tool Kit
- Radio Removal Keys (for the center section)
- Torx Screwdriver (T20/T25, may be needed for some components)
Warning: The dashboard and trim pieces can be easily scratched. Work carefully and always use plastic pry tools, not metal screwdrivers, to remove panels.
Step-by-Step Replacement Walkthrough
- Driver's Side Trim: This is the easiest piece. Carefully insert a plastic pry tool at the edge and gently pry it away from the dashboard. It is held in by clips and should pop out.
- Passenger Side Trim: Start from the side closest to the door. Use a pry tool to gently release the clips, working your way across the dashboard. It may be necessary to open the glove box to get better leverage on the bottom edge.
- Center Trim (Requires Radio Keys): The center trim surrounds the MMI control unit in the dash. You must first remove this unit.
- Insert two radio removal keys into the narrow horizontal slots on the face of the MMI unit until they click into place.
- Pull on the keys to slide the entire MMI unit out of the dashboard. Disconnect the electrical connectors on the back.
- With the MMI unit removed, you will have access to the clips or screws holding the center trim piece in place. Carefully release them and remove the trim.
- Installation is the reverse of removal. Align all clips carefully and press the new trim pieces firmly into place until they snap in. Do not force them.
Cost Comparison
Prices can vary significantly based on the finish. Aluminum and Carbon Atlas trims are more expensive than the standard plastic versions.
| Part Type | Estimated Cost | Notes |
|---|---|---|
| New OEM | $130 - $280 per piece | Price depends heavily on the finish. A full set can cost over $500 from a dealer. |
| Used OEM | $20 - $150 per set | An excellent value. A basic set can be found for under $50, while a premium S3 brushed aluminum set might be closer to $150. |
| Aftermarket | $50 - $400+ | This ranges from inexpensive vinyl wrap kits to high-end, full carbon fiber replacement sets from specialty tuners. |
| Shop Labor | $75 - $200 | An independent shop may charge 0.5 to 1.5 hours of labor for the swap. |
Frequently Asked Questions (FAQ)
How do I stop my Audi A3 dashboard from rattling?
First, try to identify the exact source of the rattle. If it's a trim piece, removing it and applying thin felt tape to the clips and contact edges can often solve the problem by preventing plastic-on-plastic vibration.
What are Audi radio removal keys and do I need them?
Yes, you almost certainly need them to replace the center trim piece. They are thin, flat metal tools that slide into slots on the MMI head unit to release internal locking tabs, allowing you to pull the unit out. They are inexpensive and widely available online.
Can I just wrap my existing trim panels?
Yes. Using high-quality automotive vinyl wrap (like those from 3M or Avery) is a popular and cost-effective way to change your interior's appearance or cover up minor scratches. However, this requires patience and skill to apply without bubbles or creases, and it will not fix a broken or loose trim piece.
Is a used trim panel a good value?
Absolutely. As long as you inspect it carefully for intact mounting clips and acceptable cosmetic condition, a used OEM panel provides the same fit and quality as a new one for a fraction of the price. This is one of the best parts to buy used.
Technical Specifications
OEM Part Numbers: 8V1853190 8V1853191 8V1853189
Three-piece set: Driver's side, Passenger's side, and Center surround. Finishes include Micrometallic Silver (5MA), Aluminum Mistral (5TD), 3D Optik (7TM), and Brushed Aluminum (5TG).
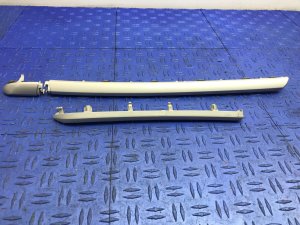
We Have This Part in Stock

The information in this article is provided for general reference and educational purposes only. Vehicle specifications, procedures, and part compatibility can vary by production date, trim level, and region. Always consult your vehicle's factory service manual and verify part numbers before purchasing or performing repairs. Safety-critical components such as airbags, seat belts, and braking systems should be installed by a qualified professional.
- Audi A3:
- Audi S3:
- 🛍️ Shop This Part
- Symptoms of Failing Instrument Panel Trim
- Known Issues, TSBs, and Recalls
- Common Rattles
- Important Recall Notice: Passenger Airbag System
- Identifying Your Trim Variant
- Buying a Used Instrument Panel Trim Panel
- What to Inspect on a Used Part
- OEM vs. Aftermarket
- Replacement Guide
- Step-by-Step Replacement Walkthrough
- Cost Comparison
- Frequently Asked Questions (FAQ)
- 🎟️ Get 5% Off