

2019-2024 Acura RDX Passenger Dash Trim: Solving Rattles & Matching Finishes
Your guide to identifying the correct wood or aluminum trim for your RDX and fixing the common dashboard rattles that plague this model.
- The single most important step is to verify your RDX's specific trim level (Base, Tech, A-Spec, Advance) to ensure you buy the correct matching material (Aluminum, Silver Aluminum, Dark Aluminum, or Wood).
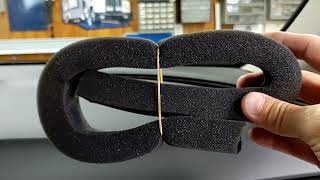
- Widespread complaints of dashboard rattles are common for this RDX generation; this trim panel is a frequent source. DIY fixes with foam or felt tape are often effective.
- When buying a used panel, inspect all mounting clips on the back. Broken clips will cause a poor fit and lead to rattles.
- Replacement is a simple DIY task requiring only plastic trim removal tools and can be completed in under 15 minutes.
Known Issues: Widespread Dashboard Rattles
The most significant known issue with the third-generation Acura RDX is a high number of owner complaints about interior rattles, particularly from the dashboard and A-pillar areas. Many owners report buzzing, creaking, or rattling sounds that are most noticeable at certain temperatures or on rougher road surfaces. The passenger-side dash trim panel is a common culprit. These noises are often caused by the plastic clips that hold the trim in place or by contact between the trim piece and the main dashboard structure.
While dealers have attempted fixes, some owners report the rattles return over time. A popular DIY solution involves strategically placing small pieces of felt tape or soft foam between the trim panel and the dashboard, especially at the corners and edges, to dampen vibrations. One owner demonstrated on video how wedging foam between the dash and A-pillar, and around the trim itself, eliminated the noise.
🎬 Watch this video to see the RDX dash rattle fix.Variant Differences: Matching Your RDX Trim Level
It is critical to purchase the correct trim panel for your specific RDX package. Using the wrong one will result in a mismatched interior. The material of the passenger-side trim panel is one of the key differentiators between the RDX trim levels.
Warning: The part numbers provided (77565-TJB-A01ZA, 77565-TJB-A11ZA, etc.) correspond to specific finishes. Part number 77565-TJB-A01ZA, for example, is described as the aluminum trim for the base model. Always verify the part number corresponds to the trim material you need.
| RDX Package | Passenger Side Trim Material |
|---|---|
| Base | Brushed Aluminum |
| Technology | Silver Brushed Aluminum |
| A-Spec / A-Spec Advance | Y-Pattern Dark Brushed Aluminum |
| Advance | Open-Pore Wood |
How to Verify Your Vehicle's Interior Trim
The easiest and most reliable way to confirm your vehicle's original interior configuration is by checking the vehicle identification sticker located on the driver's side door jamb. This sticker contains manufacturing details, including codes for the exterior paint and interior trim.
- Open the driver's side door.
- Locate the black and silver sticker on the door pillar.
- Look for a code labeled "INTERIOR TRIM" or a similar designation. This code specifies your vehicle's exact interior color and finish.
- When buying a used part, you can provide this code to the seller to help ensure a perfect match.
Buying a Used Instrument Panel Trim Panel
When purchasing a used trim panel, careful inspection is key. Since this is a cosmetic part, its condition is paramount. Used OEM panels are often the only replacement option, as aftermarket manufacturers rarely produce these specific, multi-variant trim pieces.
- Mounting Tab Integrity: This is the most important inspection point. Turn the panel over and check that all plastic mounting clips and tabs are intact and not cracked. Broken clips are a primary cause of rattles and will prevent the panel from seating securely.
- Surface Condition: Closely examine the face of the panel for deep scratches, gouges, or scuffs that won't come out with cleaning. For wood trims, look for any signs of the clear coat peeling or cracking.
- Sun Fading: Compare the color of the used part to photos of your own interior to check for significant fading or discoloration from sun exposure.
- Verify Finish: Double-check that you are buying the correct material (e.g., Open-Pore Wood vs. Dark Brushed Aluminum). A part from an A-Spec will not match the interior of an Advance package.
Replacement Overview
Pro Tip: Use a set of plastic trim removal tools for this job. Using metal tools like a screwdriver will almost certainly scratch or damage the soft-touch dashboard surrounding the trim piece.
Replacing the panel is generally a straightforward process that can be done by most DIYers. It is held in place by clips, not screws.
- Starting from one edge, carefully insert a plastic pry tool between the trim panel and the dashboard.
- Gently pry outwards to release the first clip. You will hear it pop.
- Work your way along the panel, releasing the remaining clips until the panel is free.
- To install the new panel, align the clips with their corresponding holes in the dashboard.
- Press firmly and evenly across the panel until you hear and feel all the clips snap securely into place.
Cost of Replacement
The cost for this part varies based on condition and source. Labor costs are minimal due to the simple installation.
| Item | Estimated Cost |
|---|---|
| New OEM Panel | $125 - $180 |
| Used OEM Panel | $70 - $120 |
| Shop Labor | $50 - $100 |
Frequently Asked Questions (FAQ)
Can I upgrade my Base model's aluminum trim to the Advance package's wood trim?
Yes, the panels are physically interchangeable. As long as you purchase the correct panel for the 2019-2024 RDX, you can swap between trim styles. This is a popular cosmetic upgrade for owners looking for a more premium interior appearance.
My trim panel isn't broken, but it rattles. How can I fix it?
Before buying a new panel, you can try to fix the rattle. Carefully remove the existing panel and apply small pieces of felt tape or thin foam weatherstripping to the back of the panel where it contacts the dashboard, and also wrap the plastic clips. This can create a tighter fit and dampen the vibrations that cause the noise.
Are there aftermarket versions of this trim panel?
There are no direct, one-piece aftermarket replacements. However, some companies offer thin vinyl or film overlays that stick on top of your existing trim panel to change its color or finish (e.g., to a carbon fiber look). These are not full replacement parts.
Is this part the same as the driver's side trim?
No, this is the right-side (passenger) trim panel only. The driver's side has a different shape and incorporates the instrument cluster and vents. The part numbers listed here are exclusively for the passenger side.
Helpful Videos

Technical Specifications
OEM Part Numbers: 77565-TJB-A01ZA 77565-TJB-A11ZA 77565-TJB-A21ZA 77565-TJB-A31ZA
Material and finish vary by part number and vehicle trim package.
We Have This Part in Stock

The information in this article is provided for general reference and educational purposes only. Vehicle specifications, procedures, and part compatibility can vary by production date, trim level, and region. Always consult your vehicle's factory service manual and verify part numbers before purchasing or performing repairs. Safety-critical components such as airbags, seat belts, and braking systems should be installed by a qualified professional.
- Acura RDX:
- 🎬 Helpful Videos
- 🛍️ Shop This Part
- Known Issues: Widespread Dashboard Rattles
- Variant Differences: Matching Your RDX Trim Level
- How to Verify Your Vehicle's Interior Trim
- Buying a Used Instrument Panel Trim Panel
- Replacement Overview
- Cost of Replacement
- Frequently Asked Questions (FAQ)
- 🎟️ Get 5% Off