

2004-2014 Lamborghini Gallardo Instrument Bezel: Fixing Sticky Trim and Replacement Guide
This guide covers the common causes of failure for the Gallardo's instrument panel bezel, focusing on the infamous 'sticky trim' issue, and outlines your options for replacement and repair.
- The most common failure is the soft-touch coating becoming sticky and gummy, a well-known issue for this model.
- You have three main remedies: replace with a costly new OEM part, find a good-condition used part, or have your original part professionally refinished to permanently solve the sticky issue.
- Replacement is a moderately difficult DIY job that requires patience and plastic trim tools to avoid damaging the dashboard.
- There are no safety recalls for the bezel itself, but be aware of unrelated recalls for the power steering system (2004-2006) and ECU software (2011-2014).
Symptoms of a Failing Instrument Panel Bezel
Failure of the Gallardo's instrument panel bezel is almost always cosmetic, not functional. You will not see check engine lights or receive fault codes for this part. Instead, look for physical and visible signs of degradation.
- Sticky or Gummy Surface: This is the most common and well-known issue. The soft-touch coating applied at the factory breaks down over time due to heat, UV exposure, and humidity. The surface becomes tacky, attracts fingerprints and dust, and can even feel like it's melting. This affects many high-end Italian cars from this era.
- Cracking: The plastic can become brittle with age and develop stress cracks, especially around the mounting points or corners. This is often caused by repeated heat cycles or improper removal/installation techniques.
- Peeling or Flaking: The top layer of the finish, whether it's paint or a soft-touch coating, can begin to peel or flake away, revealing the base plastic underneath. This is particularly noticeable on high-wear areas or edges.
- Scratches and Gouges: Deep scratches from previous installation attempts, jewelry, or other objects can permanently mar the surface.
Known Issues, Recalls, and Technical Service Bulletins (TSBs)
While there are no official recalls or TSBs specifically for the instrument panel bezel, owners should be aware of the widespread "sticky interior" problem that affects many plastic trim pieces in the Gallardo. This is a material degradation issue, not a safety defect, so it has not been subject to a recall.
Additionally, several unrelated recalls were issued for the 2004-2014 Gallardo that owners should be aware of:
- NHTSA Recall 12V430000: Affects 2004-2006 Gallardo models. A potential leak from a high-pressure power steering pipe could lead to a fire risk.
- NHTSA Recall 18V833: Affects 2011-2014 Gallardo models. An Engine Control Unit (ECU) software issue could cause diagnostic trouble codes to be erased after turning the ignition off, preventing the warning light from illuminating on the next drive.
Pro Tip: Before purchasing a used Gallardo, you can check if these recalls have been completed by entering the vehicle's VIN on the NHTSA website.
Buying a Used Gallardo Instrument Panel Bezel: What to Check
Given the high cost of new OEM parts, a used bezel is a popular choice. However, careful inspection is critical to avoid buying a part that has the same problems as your old one.
Physical Inspection Checklist:
- Check the Surface Finish: This is the most important check. Run your fingers over the entire surface. It should feel smooth and dry, not tacky, sticky, or gummy. Be extra thorough on bezels from cars in hot, humid climates.
- Inspect Mounting Tabs: Carefully examine the back of the bezel. All mounting tabs and clip points should be intact. Broken tabs are a major red flag, as the bezel will not sit flush and may rattle.
- Look for Cracks: Pay close attention to the screw holes and thin sections of the bezel. These areas are prone to stress cracks that can worsen during installation.
- Check for Pry Marks: Look for gouges or damage along the outer edges. This indicates the part was removed carelessly with improper tools, which could mean there is hidden damage.
Used OEM vs. Aftermarket
For this part, you have three main options: a used OEM bezel, an aftermarket carbon fiber bezel, or having your original part refinished.
- Used OEM: This is the best option for maintaining a factory-original look, provided you can find one in excellent condition. The fit will be perfect, but you run the risk of the sticky coating issue developing later if it hasn't already.
- Aftermarket Carbon Fiber: Many companies offer carbon fiber replacements or overlays. Quality can vary. High-end replacements offer great looks and OEM-like fitment, but cheaper versions might be simple covers that stick on top of your existing bezel and may not match the factory carbon weave pattern.
- Refinishing Service: Companies like 'Sticky No More' specialize in stripping the failed original coating and applying a new, more durable finish. This is often the best long-term solution as it permanently fixes the sticky issue while retaining the original OEM part and its perfect fitment.
Cost Comparison
| Part Type | Estimated Cost | Notes |
|---|---|---|
| New OEM | $1,500 - $2,500+ | Very expensive and may still use the original coating prone to failure. Price varies by specific part number and finish. |
| Used OEM | $300 - $700 | Price depends heavily on condition. A pristine, non-sticky part will be at the higher end of the range. |
| Aftermarket Carbon Fiber | $450 - $1,200 | Varies widely based on quality (overlay vs. full replacement) and manufacturer. |
| Refinishing Service | $250 - $500 | A cost-effective way to get a permanent fix while keeping your original part. Price based on estimates for similar interior trim pieces. |
| Shop Labor | $250 - $500 | Labor at a dealership or exotic car specialist. The job typically takes 2-3 hours. |
Replacement Overview & Difficulty
Replacing the instrument panel bezel on a Lamborghini Gallardo is a moderately difficult task that requires patience and the right tools to avoid damaging the expensive dashboard components.
- Difficulty Rating: 3 out of 5
- Estimated Time: 2-3 hours
- DIY Feasible: Yes, for an experienced DIYer comfortable with interior trim removal.
General Steps:
While specific steps vary slightly between pre-LP (2004-2008) and LP (2009-2014) models, the general process is similar.
- Disconnect the Battery: Always disconnect the negative battery terminal before working on dashboard components to prevent electrical shorts.
- Remove Surrounding Trim: You will likely need to remove adjacent trim pieces, such as the center console trim or side panels, to gain access. Use plastic trim removal tools to gently pry these parts off without scratching the leather or plastic.
- Remove the Instrument Cluster: The bezel is typically secured by the same fasteners that hold the main instrument cluster. This involves removing several Torx screws, often located under the top of the dash hood and behind other trim.
- Detach the Bezel: Once the cluster is loose, you can carefully pull it forward. The bezel may be clipped or screwed onto the cluster assembly itself. Gently release these clips or remove the screws to separate the old bezel.
- Install the New Bezel: Fit the new or refurbished bezel onto the instrument cluster, ensuring all clips and screw holes align. Re-install the cluster and all surrounding trim in the reverse order of removal.
Warning: The plastic tabs and clips on these cars are often brittle and designed to go in one way. Do not use excessive force. Be extremely patient and gentle when prying or pulling on panels to avoid costly damage.
Part Number and Variant Guide
The primary OEM part numbers for the Gallardo instrument panel bezel are 400820319, 400820319A, 400820319B, and 400820319D. The different letter suffixes likely denote revisions or variations in finish (e.g., standard soft-touch vs. carbon fiber) or updates between model years. It is critical to match the part number from your existing bezel or consult with a dealer using your VIN to ensure compatibility.
Frequently Asked Questions (FAQ)
Can a cracked instrument panel bezel be repaired?
Minor cracks can sometimes be repaired with a strong plastic epoxy from the back, but the repair will likely be visible from the front. For a cosmetically perfect result, replacement is the only option.
What is the best way to clean a sticky bezel?
Attempting to clean the sticky residue often makes it worse. The only permanent solution is to chemically strip the failing soft-touch coating and refinish the part. A professional refinishing service is highly recommended for this process.
Is the carbon fiber bezel a direct swap for the standard one?
Yes, OEM or high-quality aftermarket carbon fiber bezels are designed as direct replacements and will fit in the factory location without modification. However, be aware that some cheaper options are simply thin covers that are applied over the original bezel with adhesive.
Do I need special tools to replace the bezel?
You will need a good set of plastic trim removal tools, a Torx screwdriver set (T25 is common), and an 8mm socket. A magnetic tool to retrieve dropped screws is also very helpful. No other highly specialized tools are typically required.
Technical Specifications
OEM Part Numbers: 400820319 400820319A 400820319B 400820319D
Material: Automotive-grade plastic with soft-touch, painted, or carbon fiber finish.
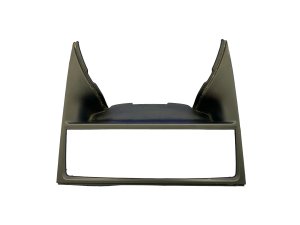
We Have This Part in Stock

The information in this article is provided for general reference and educational purposes only. Vehicle specifications, procedures, and part compatibility can vary by production date, trim level, and region. Always consult your vehicle's factory service manual and verify part numbers before purchasing or performing repairs. Safety-critical components such as airbags, seat belts, and braking systems should be installed by a qualified professional.
- Lamborghini Gallardo:
- 🛍️ Shop This Part
- Symptoms of a Failing Instrument Panel Bezel
- Known Issues, Recalls, and Technical Service Bulletins (TSBs)
- Buying a Used Gallardo Instrument Panel Bezel: What to Check
- Physical Inspection Checklist:
- Used OEM vs. Aftermarket
- Cost Comparison
- Replacement Overview & Difficulty
- General Steps:
- Part Number and Variant Guide
- Frequently Asked Questions (FAQ)
- 🎟️ Get 5% Off