

2017-2019 Genesis G90 Instrument Panel Bezel: A Guide to Finishes, Rattles, and Replacement
This definitive guide covers the common issues, replacement costs, and critical inspection points for the first-generation Genesis G90 instrument panel bezel.
- The most critical factor when buying a used bezel is to inspect all mounting clips on the back; even one broken clip can cause rattles.
- There are no recalls or common defects for this part; failures are almost always due to physical damage or wear.
- You must match the bezel's finish (e.g., wood, metal) to your G90's specific trim package (Premium, Ultimate).
- Replacement is a simple DIY task that requires inexpensive plastic trim tools to avoid scratching the dashboard.
Symptoms of a Failing Instrument Panel Bezel
As a largely cosmetic and static component, the instrument panel bezel doesn't 'fail' in a mechanical sense. Instead, problems are almost always related to physical damage, wear, or improper installation. The symptoms are things you will see or hear.
1. Rattling or Buzzing Noises from the Dashboard
This is the most common complaint related to dashboard trim pieces. A rattling, creaking, or buzzing sound, especially when driving over rough roads or in cold weather, often points to a problem with the bezel. The noise is typically caused by a broken or loose mounting clip on the back of the bezel, allowing it to vibrate against the main dashboard structure. The sound may stop if you press firmly on the bezel while driving.
2. Visible Cracks or Scratches
The plastic can become brittle over time with exposure to sun and temperature cycles. Cracks commonly form near stress points like screw holes or sharp corners. Deep scratches from accidental impact can also detract from the interior's appearance. These are purely cosmetic issues but can be distracting to the driver.
3. Peeling or Discolored Finish
On models with a specific finish (like wood grain or metallic paint), the top layer can sometimes delaminate or peel. This is often caused by age, sun exposure, or the use of harsh interior cleaning chemicals. You might also notice discoloration or fading, which can make the bezel stand out from the rest of the dashboard trim.
Known Issues, TSBs, and Recalls
For the 2017-2019 Genesis G90, there are no specific recalls or Technical Service Bulletins (TSBs) issued by Genesis or the NHTSA for the instrument panel bezel itself. This indicates that it is not a common failure point and that issues are typically isolated cases of wear or physical damage rather than a widespread manufacturing defect.
However, owners should be aware of several important safety recalls for the vehicle in general. These include issues with the starter solenoid, turbocharger oil feed pipes, and windshield bonding, all of which can pose significant safety risks. Owners should always check their vehicle's VIN on the NHTSA website to ensure all applicable recalls have been addressed.
Pro Tip: While the bezel itself isn't under recall, a blank instrument *display* was the subject of a recall for later 2023-2025 G90 models due to a software issue. This does not apply to the 2017-2019 generation but highlights the importance of distinguishing between the cosmetic bezel and the electronic cluster it surrounds.
Buying a Used 2017-2019 G90 Instrument Panel Bezel
A used OEM bezel is often the only cost-effective option, as new aftermarket versions for this specific part are generally not manufactured. When buying a recycled part, careful inspection is critical to ensure you get a quality piece that fits correctly and doesn't rattle.
Key Inspection Points for a Used Bezel:
- Verify All Mounting Tabs Are Intact: This is the most important check. Turn the bezel over and inspect every single plastic clip and tab. Even one broken clip can be the source of a persistent rattle. Many eBay listings for used bezels explicitly mention the condition of the clips.
- Match the Trim Finish: The Genesis G90 was available with different interior trim packages, such as 'Ultimate', which could feature different materials like real wood grain versus a standard metallic or black finish. Compare the finish of the used part to your vehicle's existing trim. The seller should provide the VIN of the donor car, which can help you or a dealer verify the original trim package.
- Inspect for Surface Damage: Look at photos carefully under bright light. Check for deep scratches, peeling clear coat, and any signs of discoloration from chemical cleaners. Minor scuffs may be acceptable, but deep gouges will be noticeable once installed.
- Check for Hidden Cracks: Pay close attention to the areas around screw holes and the thin sections of the bezel. These are common stress points where small cracks can develop.
Replacement Difficulty: 2/5
Replacing the instrument panel bezel is a manageable DIY project for most people with basic tools and patience. The primary challenge is removing trim without causing scratches.
- Estimated Time: 30-60 minutes.
- Tools Required: Plastic trim removal tool set, Phillips head screwdriver, small socket set (if any bolts are present).
- DIY Feasible: Yes.
General Replacement Steps
- Disconnect the Battery: As a safety precaution when working around the dashboard and airbag components, always disconnect the negative battery terminal.
- Remove Surrounding Trim: You may need to gently pry off adjacent trim pieces to access the bezel's clips or screws. A plastic trim removal tool is essential to avoid scratching the dashboard. Often, you'll start with a lower panel and work your way up.
- Locate and Remove Fasteners: The bezel is typically held in by a combination of hidden clips and a few screws. Carefully pry around the edges of the bezel to release the clips.
- Install the New Bezel: Align the new bezel carefully, ensuring all clips line up with their corresponding slots in the dashboard. Press firmly and evenly around the perimeter until you hear and feel the clips snap into place.
- Reinstall Fasteners and Trim: Secure any screws you removed (do not overtighten) and reinstall the surrounding trim pieces.
- Reconnect Battery: Reconnect the negative battery terminal and check that everything is secure.
Cost Comparison
Pricing for a replacement instrument panel bezel can vary significantly between new OEM and used parts.
| Part Source | Estimated Cost |
|---|---|
| New OEM | $250 - $450 (estimate from dealer) |
| New Aftermarket | Not Available |
| Used OEM | $40 - $150 |
| Shop Labor | $100 - $200 |
Frequently Asked Questions (FAQ)
Can I repair a cracked instrument panel bezel?
Generally, repairing a cracked bezel is not recommended. Plastic repair kits and epoxies rarely provide a satisfactory cosmetic finish, and the repair may not be strong enough to prevent future rattles. Replacement is almost always the better option.
Do I need to disconnect the battery to replace a simple trim piece?
Yes. It is always best practice to disconnect the negative battery terminal before doing any work on the dashboard. This prevents any risk of electrical shorts and is a critical safety step due to the proximity of the instrument cluster and passenger airbag wiring.
My dashboard is rattling. How do I know it's the bezel?
While driving on a road that causes the rattle, carefully apply firm pressure with your hand to the bezel. If the noise stops or changes significantly, the bezel is the likely culprit. If the noise continues, it could be coming from the speaker grille, the instrument cluster itself, or something inside the dashboard.
Will a bezel from a 2018 G90 fit my 2017 G90?
Yes, parts are generally interchangeable across the 2017, 2018, and 2019 model years. However, the critical factor is the trim level (e.g., Premium vs. Ultimate), as the color and material finish must match your car's interior. Always verify compatibility using the donor car's VIN or by matching the visual appearance exactly.
Technical Specifications
OEM Part Numbers: Note: Specific part numbers vary by trim and finish. It is best to confirm with a dealer using your VIN. A related structural part is 64300-D2000, but this is not the cosmetic bezel itself.
Material: Automotive-grade plastic with various finishes (e.g., simulated wood, metallic paint, soft-touch black).
We Have This Part in Stock
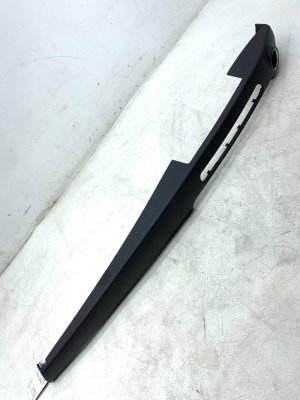

The information in this article is provided for general reference and educational purposes only. Vehicle specifications, procedures, and part compatibility can vary by production date, trim level, and region. Always consult your vehicle's factory service manual and verify part numbers before purchasing or performing repairs. Safety-critical components such as airbags, seat belts, and braking systems should be installed by a qualified professional.
- Genesis G90:
- 🛍️ Shop This Part
- Symptoms of a Failing Instrument Panel Bezel
- 1. Rattling or Buzzing Noises from the Dashboard
- 2. Visible Cracks or Scratches
- 3. Peeling or Discolored Finish
- Known Issues, TSBs, and Recalls
- Buying a Used 2017-2019 G90 Instrument Panel Bezel
- Key Inspection Points for a Used Bezel:
- Replacement Difficulty: 2/5
- General Replacement Steps
- Cost Comparison
- Frequently Asked Questions (FAQ)
- 🎟️ Get 5% Off