

2008-2015 Audi R8 Carbon Fiber Instrument Bezel: Spotting Issues and Replacement
This guide covers the common cosmetic problems with the R8's optional carbon fiber speedometer surround, and what you need to check before buying a used replacement.
- The most common failures are cosmetic, including clear coat delamination and yellowing from sun exposure.
- When buying a used bezel, the most critical inspection point is the condition of the fragile mounting tabs on the back.
- Replacement is a simple DIY job that involves removing the instrument cluster with two screws and one connector.
- Used OEM is often preferred over aftermarket to ensure the carbon fiber weave and finish perfectly match the car's other factory trim.
Symptoms of a Failing Instrument Panel Bezel
Failure of the instrument panel bezel on the first-generation Audi R8 is almost always cosmetic. Because this is a high-end vehicle, these visual flaws can be significant to owners. The carbon fiber version is particularly susceptible to age-related issues.
- Clear Coat Delamination or Peeling: The most common issue is the protective clear coat separating from the carbon fiber weave. This can look like a bubble, a white or hazy patch, or outright peeling at the edges. It is often caused by exposure to heat and UV rays over many years.
- Yellowing or Fading: The epoxy resin used in the carbon fiber can yellow with prolonged sun exposure. This gives the normally deep black weave a faded, brownish, or yellowish tint, which may not match other carbon pieces in the interior.
- Cracks: Stress cracks can form in the resin, especially around tight curves or mounting points. While less common, they can result from impacts or improper installation/removal.
- Rattling Noises: If mounting tabs on the back of the bezel break, the part can become loose. This may cause buzzing or rattling sounds from the dashboard area, especially when driving on rough roads.
Buying a Used 2008-2015 R8 Instrument Panel Bezel
A used OEM bezel is often the best choice for replacement, as it ensures a perfect match with the other factory carbon fiber components. Aftermarket carbon parts can have different weave patterns or resin tints. However, careful inspection is crucial before buying a used part.
Key Inspection Points:
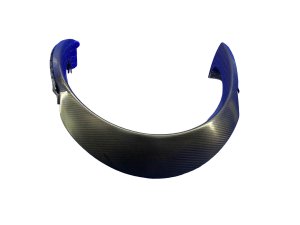
- Inspect All Mounting Tabs: This is the most critical check. The bezel is held in place by several small, fragile plastic tabs on the back. Ask the seller for clear, detailed photos of the back of the part. Even one broken tab can cause a poor fit or rattles.
- Check for Delamination: Look closely at the surface in bright, direct light. Tilt the part in the light to spot any bubbles or hazy areas that indicate the clear coat is beginning to lift. Pay special attention to the edges and corners.
- Verify the Finish: The initial prompt mentioned part number 423858969C, which is a carbon fiber piece. The R8 GT model also offered a matte carbon finish, which is very rare. Ensure the part you are buying has the same gloss or matte finish as the rest of your car's interior trim.
- Look for Fading: Compare the color of the used part (if possible) to your existing trim. Significant yellowing on a used part means it will likely not be a perfect match for well-maintained interior pieces.
Pro Tip: Don't be afraid to ask for a short video of the part. A video can make it much easier to see the depth of the carbon weave and spot surface flaws like hazing or fine scratches that don't show up in photos.
Known Issues, TSBs, and Recalls
There are no specific recalls or Technical Service Bulletins (TSBs) from the National Highway Traffic Safety Administration (NHTSA) for the 2008-2015 Audi R8 instrument panel bezel itself. However, Audi has issued TSBs for delaminating leather dashboards in hot and humid climates on some models, including later R8s (2017-2022), which acknowledges the general issue of interior materials failing under environmental stress. Another TSB notes that damage to exterior black optic trim from caustic cleaning chemicals is not covered by warranty, a principle that could also apply to interior carbon fiber damage.
Replacement Information
Replacing the instrument panel bezel is a straightforward task that most DIY mechanics can handle. The entire instrument cluster must be removed to access the bezel.
Difficulty: 2 out of 5
Estimated Time: 0.5 - 1 hour
Step-by-Step Replacement Guide:
🎬 Watch this video guide on removing the R8 instrument cluster.- Lower the steering column all the way down and pull it all the way out toward the driver's seat.
- Carefully pry off the upper steering column shroud. It is held on by clips.
- You will now see two T-25 Torx screws at the bottom of the instrument cluster. Remove these screws.
- Grip the instrument cluster assembly on both sides and pull it straight back toward you. It should pop out of the dashboard.
- Reach behind the cluster and disconnect the single electrical connector. There is a hinged clip on the connector that you need to release.
- With the cluster removed, you can now access the bezel. It is held onto the cluster housing by several small clips. Carefully release these clips to separate the bezel from the main cluster body.
- Clip the new bezel into place, ensuring all clips are fully seated.
- Installation is the reverse of removal. Reconnect the electrical plug, slide the cluster back into the dashboard until it clicks, and reinstall the two T-25 screws and steering column shroud.
Warning: Use plastic trim removal tools to avoid scratching the dashboard or the bezel itself. The clips holding the bezel to the cluster are fragile, so apply gentle and even pressure when removing the old part.
Cost Comparison
Prices for this part can vary dramatically based on condition and source. The carbon fiber option is significantly more expensive than the standard plastic version.
| Part Type | Estimated Cost |
|---|---|
| New OEM (Carbon Fiber) | $1,500 - $3,500+ |
| New Aftermarket (Carbon Fiber) | $500 - $1,300 |
| Used OEM (Carbon Fiber) | $400 - $1,000 |
| Shop Labor for Installation | $100 - $200 |
Frequently Asked Questions (FAQ)
Can a yellowed or delaminated carbon fiber bezel be repaired?
Repair is possible but difficult. It involves carefully sanding off the old, damaged clear coat without harming the carbon weave, and then re-applying a new, UV-resistant clear coat. This is a job best left to a professional specializing in carbon fiber restoration and can cost several hundred dollars. For minor delamination, some owners have had success using specialized structural adhesives to re-bond the lifting clear coat.
Is the carbon fiber bezel interchangeable with the standard plastic one?
Yes, the carbon fiber and standard plastic bezels are physically interchangeable. You can upgrade a standard interior to the carbon fiber look 🎬 See an aftermarket LCD gauge cluster upgrade in action. by simply swapping this part, provided you have the correct part for the 2008-2015 model years.
How can I protect my new or existing carbon fiber bezel?
The best way to prevent fading and delamination is to limit UV exposure. Use a quality automotive UV protectant on the trim regularly, and use a sunshade when parking the car outside for extended periods. Applying a professional ceramic coating can also offer a durable layer of UV protection.
Will replacing the instrument bezel trigger any warning lights?
No. The bezel itself is a simple trim piece with no electronics. As long as you properly reconnect the main instrument cluster plug after swapping the bezel, no warning lights or errors will occur. The vehicle can be started and run without the cluster plugged in, but it will generate numerous error codes that will need to be cleared, so it's best to keep the battery disconnected or avoid turning the key during the repair.
Helpful Videos


Technical Specifications
OEM Part Numbers: 423858969C 423857115A 42C858969K
Material: Carbon Fiber with epoxy resin and clear coat. Finish: Typically high gloss, with a rare matte option available on GT models.
We Have This Part in Stock

The information in this article is provided for general reference and educational purposes only. Vehicle specifications, procedures, and part compatibility can vary by production date, trim level, and region. Always consult your vehicle's factory service manual and verify part numbers before purchasing or performing repairs. Safety-critical components such as airbags, seat belts, and braking systems should be installed by a qualified professional.
- Audi R8:
- 🎬 Helpful Videos
- 🛍️ Shop This Part
- Symptoms of a Failing Instrument Panel Bezel
- Buying a Used 2008-2015 R8 Instrument Panel Bezel
- Key Inspection Points:
- Known Issues, TSBs, and Recalls
- Replacement Information
- Step-by-Step Replacement Guide:
- Cost Comparison
- Frequently Asked Questions (FAQ)
- 🎟️ Get 5% Off