

2013-2015 Nissan Sentra Instrument Cluster Bezel: Solving Rattles and Navigation Fitment
This guide details how to fix common dashboard rattles and choose the correct bezel for your Sentra's specific radio system.
- The most critical factor is compatibility: bezels for navigation-equipped cars have a larger opening and a different part number (68260-3SG0A) than non-navigation models (68260-4AT0A).
- Failure is always physical (rattles, cracks, cosmetic wear), not electrical. There are no associated fault codes.
- When buying used, inspect all mounting tabs on the back of the panel, as even one broken tab can cause rattles.
- Replacement is a simple DIY job that requires only basic trim tools and a screwdriver, taking less than an hour.
Symptoms of a Failing Instrument Cluster Bezel
Since the instrument cluster bezel is a piece of plastic trim, it does not have electrical functions or generate fault codes. Failure is always related to physical damage or wear. Common symptoms include:
- Rattling or Buzzing Noises: This is the most common complaint. Over time, plastic clips can loosen or break, causing the bezel to vibrate against the main dashboard structure, especially on rough roads.
- Visible Cracks: The plastic can become brittle with age and exposure to sunlight. Cracks often form near stress points like screw holes, air vents, or the corners of the radio opening.
- Peeling or Faded Finish: The silver or charcoal painted finish can chip, peel, or fade, making the interior look worn.
- Poor Fit and Gaps: If mounting tabs are broken, the bezel may not sit flush with the dashboard, creating unsightly gaps or a loose feel.
- Broken Air Vents: The louvers on the integrated air vents can break, preventing you from directing airflow.
Known Issues and Compatibility Warnings for 2013-2015 Nissan Sentra
There are no specific recalls or Technical Service Bulletins (TSBs) from Nissan for the instrument cluster bezel itself. However, several service campaigns related to airbag and console trim repairs note the importance of handling interior trim carefully to avoid damage.
Compatibility Warning: The single most important factor when replacing this bezel is the vehicle's factory radio system. Different bezels were used for models equipped with a factory navigation system versus those without.
- Models with factory navigation have a large, rectangular opening to accommodate the touchscreen. The correct OEM part number for this version is generally 68260-3SG0A.
- Models without factory navigation (with a standard radio) have a smaller, 'double-DIN' sized opening. A common part number for this version is 68260-4AT0A.
You must visually compare your original part to the replacement to ensure the radio opening matches. Installing the wrong bezel will not work.
Buying a Used 2013-2015 Sentra Instrument Cluster Bezel
A used OEM bezel is often the best value, as new OEM plastic trim can be expensive and complete aftermarket replacements are not widely available—most aftermarket options are simple stick-on overlays or dash kits. When buying a used part, perform a careful inspection.
Physical Inspection Checklist:
- Verify Radio Compatibility: First and foremost, confirm the radio opening matches your car (Navigation vs. Non-Navigation). This is the most common purchasing error.
- Check All Mounting Tabs: Carefully inspect the back of the bezel. There are numerous plastic tabs and clips that secure it to the dashboard. Ensure all are present and free of cracks. Even one broken tab can lead to rattles.
- Look for Hidden Cracks: Flex the part gently and inspect it under good light. Look for hairline cracks, especially around the thin sections above the instrument cluster and around the vent openings.
- Inspect the Finish: Check for deep scratches, peeling paint, or discoloration from sun exposure.
- Check Integrated Parts: Make sure the hazard light switch housing is intact and that the air vent assemblies are complete and functional.
Pro Tip: To prevent future rattles, consider applying small strips of felt or foam tape to the contact points on the back of the used bezel before installation. This can dampen vibrations between the bezel and the dashboard structure.
Cost Comparison: New vs. Used
| Part Type | Estimated Cost | Notes |
|---|---|---|
| New OEM | $80 - $150 | Price varies by specific part number (Nav vs. Non-Nav). |
| New Aftermarket | Not Generally Available | Options are typically limited to vinyl or plastic stick-on dash kits, not full replacement bezels. |
| Used OEM | $40 - $90 | Price depends on condition and whether it includes vents and switches. |
| Shop Labor | $75 - $150 | Typically 0.5 to 1.0 hour of labor. |
Installation Guide
- Difficulty Rating: 1/5 (Beginner)
- Estimated Time: 30 minutes
- Tools Needed: Plastic trim removal tool, Phillips head screwdriver.
Step-by-Step Replacement Walkthrough
The following is a general guide based on the design of this vehicle.
- Safety First: While not strictly necessary for this part, it's good practice to disconnect the negative terminal of the car battery before working on dashboard components.
- Remove Side Trim: Using a plastic trim tool, gently pry off the thin vertical trim pieces on either side of the radio/climate control area.
- Remove Lower Panel (if needed): Pry off the panel below the steering column to get better access. It is held in by clips.
- Remove Screws: Locate and remove any Phillips head screws holding the main bezel in place. There is often one behind the side trim pieces you just removed.
- Pry the Bezel: Start at one edge and gently pry the bezel away from the dashboard using your trim tool. It is held in by a series of clips. Work your way around the perimeter, popping the clips loose. Do not use excessive force.
- Disconnect Electronics: Before fully removing the bezel, reach behind it and disconnect the electrical connector for the hazard light switch.
- Install the New Bezel: Connect the hazard switch on the new bezel, align the clips with their slots in the dashboard, and press firmly around the edges to snap it into place. Reinstall any screws and press the side trim pieces back on.
Frequently Asked Questions (FAQ)
What is the difference between the instrument cluster bezel and the instrument cluster itself?
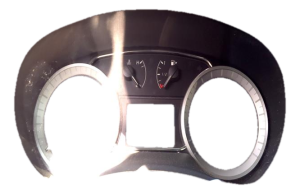
The instrument cluster bezel is the plastic trim piece that you see. The instrument cluster (or combination meter) is the electronic module behind it that contains the actual gauges, warning lights, and LCD screen. A bad bezel causes rattles or cosmetic issues; a bad cluster causes gauge or screen malfunctions.
Can I fix a rattling bezel without replacing it?
Yes. Often, rattles can be fixed by removing the bezel and applying felt tape or foam to the plastic clips and contact points on the back. This dampens the vibration between the bezel and the dashboard. If the rattle is caused by a completely broken mounting tab, replacement is usually the better option.
Will a bezel from a 2016-2019 Sentra fit my 2014 model?
Maybe, but it is not recommended. While the overall dash shape is similar, there can be subtle changes to mounting points, radio designs, and trim finishes between model year updates. It is safest to purchase a bezel specifically listed for the 2013-2015 year range.
Is the hazard light switch included with a used bezel?
It depends on the seller. Some used bezels will come complete with the switch and air vents, while others may be sold as a bare panel. Always check the photos and description of the used part listing to see what is included.
Technical Specifications
OEM Part Numbers: 68260-3SG0A (With Navigation) 68260-4AT0A (Without Navigation)
Material: Molded plastic. Finish: Varies by trim level (e.g., Charcoal, Gray, Silver accent).
We Have This Part in Stock

The information in this article is provided for general reference and educational purposes only. Vehicle specifications, procedures, and part compatibility can vary by production date, trim level, and region. Always consult your vehicle's factory service manual and verify part numbers before purchasing or performing repairs. Safety-critical components such as airbags, seat belts, and braking systems should be installed by a qualified professional.
- Nissan Sentra:
- 🛍️ Shop This Part
- Symptoms of a Failing Instrument Cluster Bezel
- Known Issues and Compatibility Warnings for 2013-2015 Nissan Sentra
- Buying a Used 2013-2015 Sentra Instrument Cluster Bezel
- Physical Inspection Checklist:
- Cost Comparison: New vs. Used
- Installation Guide
- Step-by-Step Replacement Walkthrough
- Frequently Asked Questions (FAQ)
- 🎟️ Get 5% Off