

2016-2023 Nissan Maxima Instrument Cluster Bezel: A Guide to Finishes, Rattles, and Replacement
This is your definitive guide to identifying, replacing, and choosing the right used instrument cluster bezel for your Maxima, ensuring a perfect interior match.
- The most critical step is to verify the bezel's finish (standard silver, woodgrain, liquid chrome) matches your car's interior trim level before buying.
- When buying a used bezel, the number one priority is to ensure all mounting clips on the back are present and unbroken to prevent rattles.
- Direct-fit aftermarket replacement bezels are generally not available; the main options are new OEM, used OEM, or vinyl overlay kits.
- Replacement is a simple DIY task requiring only a Phillips screwdriver and plastic trim tools, usually taking less than 30 minutes.
Symptoms of a Failing Instrument Cluster Bezel
Since the instrument cluster bezel is a cosmetic trim piece, its failure is always visual or audible. There are no electronic symptoms or fault codes associated with this part. Look for the following signs of wear or damage:
- Rattling or Buzzing Noises: The most common symptom is a rattling or buzzing sound coming from the dashboard, especially when driving over rough roads. This is almost always caused by one or more broken mounting clips or tabs on the back of the bezel, which prevents it from sitting securely against the instrument cluster and dash panel.
- Visible Cracks: The plastic can become brittle over time and develop stress cracks, particularly around the screw holes or in corners. Damage can also occur during removal for other dash repairs if proper care is not taken.
- Peeling or Faded Finish: The silver trim accent on the standard bezel can sometimes peel, bubble, or delaminate. The surface may also become scratched, scuffed, or faded from sun exposure, detracting from the interior's appearance.
- Loose Fit: You may notice the bezel is loose to the touch or has visible gaps between it and the surrounding dashboard panels. This indicates broken clips and a part that needs replacement.
Known Issues and Trim Variants for the 2016-2023 Nissan Maxima
The single most important factor when replacing this bezel is matching the interior trim finish of your specific Maxima. Nissan used different decorative finishes depending on the trim level (S, SV, SL, SR, Platinum). Using a bezel from a different trim level will result in a mismatched interior.
Trim Finish Variants:
- Standard Black with Silver Trim: Found on most S, SV, and SL models. The corresponding OEM part number for this finish is 68240-4RA0A.
- Mahogany Woodgrain: Typically found on the luxurious Platinum trim level.
- "Liquid Chrome" or Satin Bronze: A unique finish often found on the sporty SR trim level.
Warning: Before purchasing a replacement bezel, you must visually inspect your vehicle's interior to determine which finish you have. Do not rely on part descriptions alone. Compare photos of the replacement part directly to your existing trim to ensure an exact match.
Buying a Used Instrument Cluster Bezel
For a part like this, a used OEM bezel is often the best choice. Aftermarket manufacturers do not typically produce full replacement bezels, offering only vinyl decal kits that cover the original part. A used OEM part ensures a perfect fit and correct finish, provided you inspect it carefully.
What to Check Before You Buy:
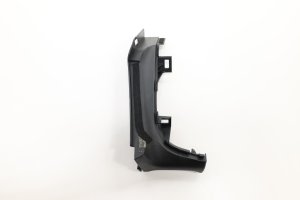
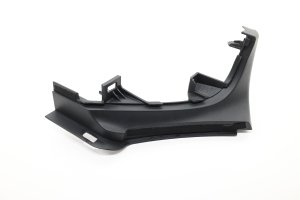
- All Mounting Tabs Intact: This is the most critical inspection point. Turn the bezel over and carefully check every single mounting tab and clip receiver. Look for any that are broken, cracked, or show white stress marks. A single broken tab can be the source of a persistent rattle.
- Condition of the Finish: Closely examine the front surface for deep scratches, scuffs, or peeling on the decorative accents. Minor scuffs may be acceptable, but peeling chrome or deep gouges will be noticeable once installed.
- No Cracks in the Body: Inspect the entire piece, especially around the screw holes and corners, for any cracks in the main plastic structure.
- Verify the Finish: Double-check that the color and texture (e.g., standard silver vs. liquid chrome vs. woodgrain) are an exact match for your car. Ask the seller for clear, well-lit photos if you are unsure.
Pro Tip: Many of these bezels are damaged when people attempt to remove the instrument cluster for other repairs without using proper plastic trim tools. A used bezel with all its tabs intact is a great value compared to a new one from the dealer.
Replacement Difficulty: 2/5 (Easy)
Replacing the instrument cluster bezel is a straightforward job that is very feasible for a DIYer with basic tools. The entire process typically takes less than 30 minutes.
Estimated Time: 0.5 hours
Tools Required:
- Plastic Trim Removal Tool Kit (essential to avoid scratching the dash)
- Phillips Head Screwdriver
Step-by-Step Replacement Guide
- Disconnect the Battery (Optional but Recommended): As a safety precaution when working around the dashboard, it's wise to disconnect the negative battery terminal.
- Remove Retaining Screws: There are typically two Phillips head screws located in the top, curved part of the bezel that need to be removed first.
- Pry the Bezel Loose: Insert a plastic trim removal tool into the seam between the bezel and the main dashboard. Gently pry outwards, working your way around the perimeter. You will hear the clips pop as they release.
- Disconnect Electrical Connectors: The bezel may have the trip computer reset button or other switches attached. Before fully removing it, carefully reach behind and disconnect any electrical connectors by pressing their release tabs.
- Install the New Bezel: Connect the electrical connectors to the new bezel. Align the clips with their corresponding slots in the dashboard and press firmly around the perimeter until all clips snap into place.
- Reinstall Screws: Secure the new bezel by reinstalling the two Phillips head screws at the top.
Cost Comparison
| Part Source | Estimated Cost |
|---|---|
| New OEM | $140 - $225 |
| New Aftermarket | Not Available (Only vinyl overlays) |
| Used OEM | $25 - $80 |
| Shop Labor | $50 - $150 |
Frequently Asked Questions (FAQ)
How do I know which trim finish my Maxima has?
The easiest way is to look at the trim in your car. Platinum models often have a Mahogany woodgrain finish, while SR models may have a 'liquid chrome' or satin bronze look. Most other trims like S, SV, and SL typically have the standard black plastic with a bright silver accent. Always compare to be sure.
Can I install a bezel from a Platinum model in my SV?
Physically, it will fit. However, the woodgrain finish will not match the rest of the standard silver trim in your SV model's interior, creating a mismatched look.
Do I need to remove the whole instrument cluster to replace the bezel?
No. The bezel is the outermost trim piece and can be removed independently of the instrument cluster itself. The cluster is secured behind the bezel.
Why are my used bezel's clips so important?
The clips are what hold the bezel tightly against the dashboard. If even one is broken, the bezel can vibrate against the dash structure, creating a very annoying and persistent rattling sound while you drive.
Technical Specifications
OEM Part Numbers: 68240-4RA0A (Standard Black with Silver Trim)
Material: Molded ABS Plastic Finishes: Black/Silver, Mahogany Wood, Liquid Chrome
We Have This Part in Stock


The information in this article is provided for general reference and educational purposes only. Vehicle specifications, procedures, and part compatibility can vary by production date, trim level, and region. Always consult your vehicle's factory service manual and verify part numbers before purchasing or performing repairs. Safety-critical components such as airbags, seat belts, and braking systems should be installed by a qualified professional.
- Nissan Maxima:
- 🛍️ Shop This Part
- Symptoms of a Failing Instrument Cluster Bezel
- Known Issues and Trim Variants for the 2016-2023 Nissan Maxima
- Trim Finish Variants:
- Buying a Used Instrument Cluster Bezel
- What to Check Before You Buy:
- Replacement Difficulty: 2/5 (Easy)
- Step-by-Step Replacement Guide
- Cost Comparison
- Frequently Asked Questions (FAQ)
- 🎟️ Get 5% Off