

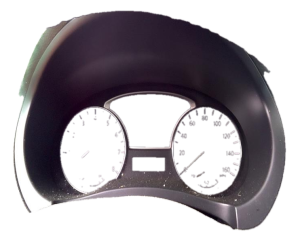
2013-2015 Nissan Altima Instrument Cluster Bezel: Rattles, Finish & Replacement
A guide to fixing common cosmetic issues and replacing the gauge surround on your fifth-generation Altima.
- The most critical factor when buying a used bezel is to inspect the back for intact mounting tabs; broken tabs will cause rattles.
- Replacement is a simple DIY job requiring only a plastic trim tool and about 30 minutes.
- The surface finish can become sticky and shiny in the sun, a common issue for Nissans of this era; inspect any used part for this condition.
- This part fits all 2013-2015 Altima trim levels, but visually matching it to your old part is always recommended.
Symptoms of a Failing Instrument Cluster Bezel
As a static interior trim piece, the instrument cluster bezel doesn't 'fail' in a mechanical sense. Instead, problems are almost always cosmetic or related to its fit and finish. These issues can develop over time due to sun exposure, heat cycles, or accidental damage during other repairs.
1. Cracks and Broken Mounting Tabs
The most common failure is physical damage. The plastic can become brittle over time and develop cracks, especially in thin areas or around stress points. More frequently, the mounting tabs on the back of the bezel break off during removal. These tabs are essential for a secure fit, and if they are broken, the bezel will not sit flush and will likely cause noise.
2. Sticky, Shiny, or Peeling Finish
A widely reported issue for Nissan vehicles from this era is the dashboard material degrading under heat and sun exposure. This can cause the surface to become unpleasantly sticky or shiny, creating a significant glare on the windshield. This happens when plasticizers, chemicals within the vinyl, leach to the surface. While this problem is most famous for the main dash pad, the bezel can also be affected. The surface may also peel or flake off, leaving an unsightly appearance.
3. Rattles and Buzzing Noises
A loose or ill-fitting bezel is a common source of dashboard rattles. If the mounting clips are broken or have lost their tension, the bezel can vibrate against the instrument cluster or the main dashboard, creating a buzzing or rattling sound that is most noticeable when driving on rough roads or at certain engine RPMs.
Known Issues, TSBs, and Recalls
The 2013-2015 Nissan Altima was subject to several safety recalls, most notably for a faulty secondary hood latch and issues with the passenger-side airbag sensor. However, there are no specific recalls or Technical Service Bulletins (TSBs) issued by Nissan for the instrument cluster bezel itself.
While some owners report rattles from the dashboard area, there are no official bulletins linking this specifically to a faulty bezel on this model. Any noise issues are typically due to broken clips or general wear and tear.
Compatibility Check: The primary OEM part number for this bezel is 68240-3TA0A, which was later superseded by 68240-3TA1A. These parts are listed as fitting all trim levels of the 2013-2015 Altima. However, it is always a best practice to visually compare a replacement part to your original to ensure an exact match before purchasing.
Buying a Used Instrument Cluster Bezel
A used OEM bezel is an excellent, cost-effective replacement for a damaged original. Because it's a cosmetic part, you can easily assess its condition. Here’s what to look for:
- Inspect All Mounting Tabs: This is the most critical inspection point. Turn the bezel over and carefully check every single mounting tab and clip. Ensure none are cracked, stressed, or broken off. A bezel with even one broken tab may not install securely and could cause rattles.
- Check the Surface Finish: Look at the front surface under good lighting. Check for the tell-tale signs of a 'melting' dash: a sticky or gummy texture, or an unusually high-gloss shine. Avoid any parts with a compromised finish, as it cannot be easily repaired.
- Look for Scratches and Scuffs: Minor scuffs may be acceptable and can often be cleaned or minimized, but deep scratches or gouges will be permanent.
- Verify Part Integrity: Flex the part gently to check for hairline cracks, which often form near screw holes or sharp corners. Ensure the main body of the bezel is not warped or bent.
Replacement Difficulty: 2/5 (Easy)
Replacing the instrument cluster bezel is a straightforward job that is well within the capabilities of a DIY mechanic. The process primarily involves carefully prying off trim pieces and requires no complex mechanical knowledge. The entire job can typically be completed in under 30 minutes.
Tools Needed:
- Plastic Trim Removal Tool Kit (essential to prevent scratching)
- Phillips Head Screwdriver (may be needed for surrounding panels)
Step-by-Step Replacement Guide
- Lower the Steering Wheel: Adjust the steering column to its lowest and most extended position to create working space.
- Remove Side Dash Panel: Open the driver's door. Use a plastic pry tool to carefully pop off the trim panel on the side of the dashboard. It is held in by clips.
- Pull the Bezel Out: The instrument cluster bezel is held in place by several clips. Grip it firmly and pull it straight back, toward you. Work your way around the edge, applying steady pressure. It should pop out of the dashboard.
- Install the New Bezel: Align the clips on the new bezel with the corresponding slots in the dashboard and press it firmly into place until you hear and feel it click securely.
- Reinstall Trim: Snap the side dash panel back into place and return the steering wheel to its normal position.
Pro Tip: When removing the old bezel, if you feel strong resistance, stop and double-check for a hidden screw. While most guides indicate it is held only by clips, variations can exist. Using plastic pry tools instead of a screwdriver will prevent scratching or marring the surrounding dashboard panels.
Cost Comparison
Prices for a replacement bezel can vary significantly. A used OEM part from a recycler is often the best value, offering original factory fit and quality at a low price.
| Part Type | Estimated Price Range |
|---|---|
| New OEM | $75 - $95 |
| New Aftermarket | $55 - $130 |
| Used OEM | $25 - $45 |
| Shop Labor Cost | $100 - $150 |
Frequently Asked Questions (FAQ)
Do I need to disconnect the battery to replace the instrument cluster bezel?
While it is a general best practice to disconnect the negative battery terminal when working on the dashboard, it is not strictly necessary for this specific part, as the bezel itself has no electrical connections. However, doing so is a simple safety precaution.
My old bezel is rattling. Will a new one fix it?
Most likely, yes. Rattles from this area are almost always caused by broken or loose mounting clips on the bezel. A new or used replacement part with intact clips should fit snugly and eliminate the noise.
Can I repair a sticky or peeling bezel?
Repairing a sticky finish is difficult. Some specialty products claim to clean and seal the surface, but results can vary. Painting is also an option, but it requires significant prep work. For the time and money involved, replacing the bezel with a good-condition used part is often the easier and more effective solution.
Will this bezel fit a 2013-2015 Altima with the navigation screen?
Yes. This bezel only surrounds the instrument gauge cluster (speedometer, etc.). It does not interact with the center stack radio or navigation unit, so it fits vehicles with or without the factory navigation system.
Technical Specifications
OEM Part Numbers: 68240-3TA0A 68240-3TA1A
Material: Plastic. Color: Typically black or dark brown ('Lid Cluster BRN').
We Have This Part in Stock



The information in this article is provided for general reference and educational purposes only. Vehicle specifications, procedures, and part compatibility can vary by production date, trim level, and region. Always consult your vehicle's factory service manual and verify part numbers before purchasing or performing repairs. Safety-critical components such as airbags, seat belts, and braking systems should be installed by a qualified professional.
- Nissan Altima:
- 🛍️ Shop This Part
- Symptoms of a Failing Instrument Cluster Bezel
- 1. Cracks and Broken Mounting Tabs
- 2. Sticky, Shiny, or Peeling Finish
- 3. Rattles and Buzzing Noises
- Known Issues, TSBs, and Recalls
- Buying a Used Instrument Cluster Bezel
- Replacement Difficulty: 2/5 (Easy)
- Tools Needed:
- Step-by-Step Replacement Guide
- Cost Comparison
- Frequently Asked Questions (FAQ)
- 🎟️ Get 5% Off