

2002-2004 Honda CR-V Instrument Bezel: Avoiding the Automatic vs. Manual Trap
This guide details the critical differences, common failure points, and replacement process for the instrument cluster bezel on your 2002-2004 Honda CR-V.
- The most critical factor is matching the bezel to your CR-V's transmission; automatic and manual versions have different shapes and are not interchangeable.
- When buying a used bezel, the most important inspection point is the back side; ensure all mounting clips and tabs are intact to prevent rattles.
- Replacement is a simple DIY task requiring only a screwdriver and a trim tool, typically taking less than 30 minutes.
- This part is purely cosmetic. Issues like gauge backlighting are problems with the instrument cluster itself, not the bezel.
Symptoms of a Failing Instrument Cluster Bezel
Because the instrument cluster bezel is a static piece of plastic trim, its failures are always related to physical damage. There are no electrical components within the bezel itself, so any issues will be visible or audible.
- Cracks and Scratches: Over time, sun exposure can make the plastic brittle, leading to stress cracks. Scratches and gouges are also common from general wear and tear or from previous repair attempts.
- Rattling Noises: The most common symptom is a persistent rattling or buzzing sound coming from the dashboard, especially when driving over rough roads. This is almost always caused by broken mounting clips or tabs on the back of the bezel, which prevent it from sitting securely against the dashboard.
- Poor Fitment: A damaged bezel may not sit flush with the rest of the dashboard. You might notice uneven gaps, or one side might stick out more than the other. This is also a result of broken mounting points.
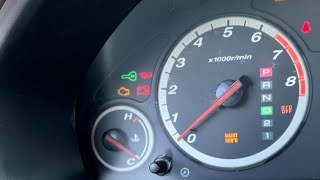
Warning: While the bezel itself has no electronics, its removal is required to access the instrument cluster. If you are experiencing issues like dim backlights or malfunctioning gauges, the problem lies with the cluster, not the bezel. 🎬 See how to remove the gauge cluster for troubleshooting The bezel must be removed to service or replace the cluster.
Buying a Used 2002-2004 CR-V Instrument Cluster Bezel
A used OEM bezel is often the best choice for replacement, as it guarantees a perfect match in color, texture, and fitment, which can be a problem with aftermarket parts. However, there are critical details to check before you buy.
Crucial: Verify Automatic vs. Manual Transmission Shape
The single most important factor when buying a replacement bezel is ensuring it matches your vehicle's transmission type. The lower cutout on the bezel is shaped differently to accommodate the steering column and gear selector.
- Automatic Transmission Bezel: Has a larger, more squared-off opening at the bottom to fit around the automatic gear selector indicator on the steering column.
- Manual Transmission Bezel: Has a smaller, more rounded opening at the bottom, as it only needs to fit around the steering column itself.
Always compare a picture of the part you are buying to the existing part in your vehicle. Installing the wrong type will result in a large, unsightly gap or it may not fit at all.
Physical Inspection Checklist:
- Check All Mounting Tabs: Flip the bezel over and inspect every single mounting clip and tab. These are the most likely failure points. Ensure none are broken off or have stress cracks. A bezel with even one broken tab is likely to rattle once installed.
- Look for Cosmetic Damage: Check for deep scratches, scuffs, or discoloration, especially on the main face of the bezel. Used parts will have some wear, but avoid pieces with significant cosmetic flaws.
- Confirm Color and Trim: For the 2002-2004 CR-V, the instrument bezel was typically a standard dark gray/black color across trim levels (LX, EX). However, it's always wise to compare the color in photos to your own vehicle to ensure a good match.
Installation Guide
Replacing the instrument cluster bezel is a straightforward DIY job that requires basic tools and careful prying.
- Difficulty: 1.5 / 5
- Estimated Time: 20-30 minutes
- Tools Required: Phillips head screwdriver, plastic trim removal tool (recommended).
Step-by-Step Replacement Walkthrough
- Lower the Steering Wheel: Adjust the steering wheel to its lowest position to create more working space.
- Remove Securing Screws: There are typically two Phillips head screws that hold the bottom of the bezel in place. One is often located behind the small coin tray or fuse panel door on the lower left of the dash.
- Pry the Bezel Off: Starting from the bottom, use a plastic trim removal tool to gently pry the bezel away from the dashboard. It is held in by several pressure clips. Work your way around the perimeter, applying steady pressure to release the clips. 🎬 Watch: Dashboard and instrument panel disassembly walkthrough Be patient to avoid breaking the old clips or scratching the dash.
- Disconnect Hazard Switch: Before you can fully remove the bezel, you must disconnect the electrical connector from the back of the hazard light switch. Press the small tab on the connector to release it.
- Install the New Bezel: Connect the hazard switch to the new bezel, line up the clips with their corresponding holes in the dashboard, and press firmly and evenly around the edges until all clips snap into place.
- Replace Screws: Re-install the Phillips head screws at the bottom to secure the new bezel.
Pro Tip: The plastic clips can become brittle with age. If you are removing the original bezel, expect that one or more clips may break, which is likely why you are replacing it in the first place. Using a dedicated plastic pry tool instead of a screwdriver minimizes the risk of damaging the surrounding dashboard.
Known Issues, TSBs, and Recalls
There are no recalls or Technical Service Bulletins (TSBs) issued by Honda or the NHTSA that specifically pertain to the instrument cluster bezel itself. It is a simple cosmetic part with no mechanical or electrical function.
However, several recalls for the 2002-2004 CR-V exist for components in the dashboard area, such as the SRS airbag system and power window master switch, which may lead a technician to remove the bezel during a related repair.
Cost Comparison
| Part Type | Estimated Cost |
|---|---|
| New OEM | $125 - $185 |
| New Aftermarket | Not commonly available |
| Used OEM | $50 - $80 |
| Shop Labor | $50 - $100 |
Frequently Asked Questions (FAQ)
Will an instrument cluster bezel from a 2005-2006 CR-V fit my 2004 model?
No, it will not. The 2005-2006 CR-V received a facelift which included a redesigned dashboard. While the overall shape is similar, the mounting points and contours are different, and it will not fit correctly. You must use a bezel from the 2002-2004 model years.
Can I repair a broken mounting tab on my old bezel?
While it is sometimes possible to use plastic epoxy or a specialized plastic welding kit to repair a broken tab, it is often a temporary fix. The constant vibration of the vehicle usually causes the repaired tab to break again, leading to rattles. Replacement is the most reliable solution.
The lights on my gauges are out. Will replacing the bezel fix this?
No. The bezel is just a plastic trim piece. The illumination for your gauges comes from small, replaceable bulbs located on the back of the instrument cluster itself. To replace these bulbs, you must first remove the bezel to gain access to the screws holding the instrument cluster in place.
🎬 Watch: How to replace your instrument cluster bulbsWhy are there no aftermarket options available?
The demand for a simple trim piece like this is often not high enough for aftermarket companies to justify the cost of creating a mold. For this part, used OEM is the most common and cost-effective replacement option outside of purchasing a new part from a dealer.
Helpful Videos


Technical Specifications
OEM Part Numbers: 78155-S9A-J02
Material: Molded plastic Color: Dark Gray / Black (Varies slightly by specific part number/batch but generally uniform for the model years)
We Have This Part in Stock


The information in this article is provided for general reference and educational purposes only. Vehicle specifications, procedures, and part compatibility can vary by production date, trim level, and region. Always consult your vehicle's factory service manual and verify part numbers before purchasing or performing repairs. Safety-critical components such as airbags, seat belts, and braking systems should be installed by a qualified professional.
- Honda CR-V:
- 🎬 Helpful Videos
- 🛍️ Shop This Part
- Symptoms of a Failing Instrument Cluster Bezel
- Buying a Used 2002-2004 CR-V Instrument Cluster Bezel
- Crucial: Verify Automatic vs. Manual Transmission Shape
- Physical Inspection Checklist:
- Installation Guide
- Step-by-Step Replacement Walkthrough
- Known Issues, TSBs, and Recalls
- Cost Comparison
- Frequently Asked Questions (FAQ)
- 🎟️ Get 5% Off