

2012-2014 Ferrari California Headlight Switch Bezel: Fixing the Inevitable Sticky Finish
This guide covers the most common problem with the 2012-2014 Ferrari California headlight switch bezel: the degrading, sticky soft-touch coating, and how to inspect, replace, or restore it.
- The primary failure is the cosmetic 'sticky button' issue, where the soft-touch coating degrades.
- When buying a used bezel, the most important check is for a sticky or tacky surface; assume any original part will eventually have this issue.
- The only permanent solution is professional refinishing, which removes the faulty coating and applies a new, durable one.
- Replacement is very easy (Difficulty 1/5) and can be done in minutes with a plastic trim tool.
Primary Failure Symptom: The 'Sticky Button' Problem
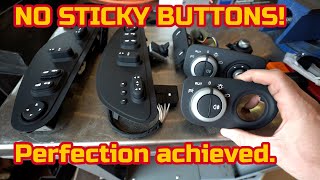
The single most common issue with the headlight switch bezel, and many other interior plastic components on this generation of Ferrari, is the degradation of its soft-touch coating. This is not a mechanical failure but a cosmetic one that worsens over time. The coating, originally intended to provide a premium matte finish and feel, breaks down due to heat, UV exposure, and humidity. This results in a gummy, tacky surface that can easily be scratched and may leave a black residue on your fingers. In advanced stages, the surface can look melted or gooey, significantly detracting from the car's interior appeal.
Known Issues, TSBs, and Recalls
There are no specific recalls or Technical Service Bulletins (TSBs) from Ferrari or the NHTSA for the headlight switch bezel itself. The sticky coating is a widely acknowledged cosmetic issue across many Ferrari models of the era but was never subject to a safety recall.
It is important to note that the 2012 Ferrari California was subject to a safety recall (NHTSA Campaign Number: 12V211000) for a potential crankshaft defect that could lead to engine seizure. This is unrelated to any interior components but is a critical check for any potential owner of a 2012 model.
Warning: The bezel is the trim piece only. If your headlights are malfunctioning (e.g., not turning on, flickering), the problem lies with the electrical switch itself, the wiring, or another part of the lighting system, not the cosmetic bezel.
Buying a Used Headlight Switch Bezel
Given the high cost of new OEM parts, a used bezel is a practical option, but careful inspection is critical. The primary concern is the condition of the soft-touch finish.
- Inspect the Surface: Ask the seller for high-resolution photos taken in bright, direct light. Look for shiny, tacky, or peeling areas. An eBay listing for a similar part explicitly noted "STICKY BUTTONS" in the condition description, which is the kind of transparency you want.
- Ask About the Texture: Directly ask the seller: "Is the surface of the bezel sticky, tacky, or gummy to the touch?" If the seller avoids the question, it's a major red flag.
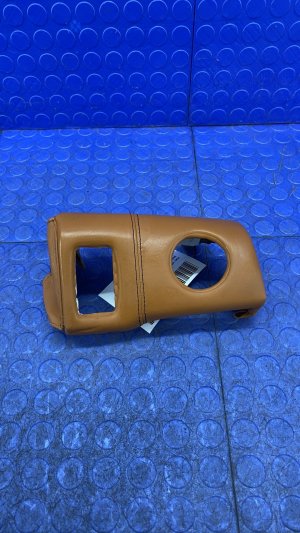
- Check Mounting Tabs: Ensure all plastic mounting tabs on the back of the bezel are intact. These are essential for a secure, rattle-free fit in the dashboard. A bezel with broken tabs will not sit correctly.
- Consider a Refinished Part: The best long-term solution is a bezel that has been professionally restored. Specialists strip the original failed coating, prep the surface, and apply a new, more durable finish that will not become sticky again. A used part that has already been properly refinished is more valuable than a sticky original.
- Verify Part Number: The known OEM part number is 320930. Always confirm compatibility before purchasing.
Cost Breakdown
The cost to address a sticky headlight switch bezel can vary dramatically depending on the approach.
| Item/Service | Estimated Cost | Notes |
|---|---|---|
| New OEM Bezel | $300 - $600+ | Sourced from a Ferrari dealer. Will eventually become sticky again. |
| Used OEM Bezel (Sticky) | $50 - $150 | Requires refinishing or DIY cleaning. Prices vary based on severity. |
| Used OEM Bezel (Good Condition) | $150 - $300 | Rare to find in perfect condition; may still become sticky over time. |
| Professional Refinishing Service | $75 - $200 (for a single part) | The most durable solution. You send your part to a specialist like Sticky RX Refinishing. 🎬 Watch: The best solution to fix Ferrari sticky buttons Cost is much higher if doing all interior parts at once. |
| Shop Labor (Replacement Only) | $75 - $150 | Typically 0.5 hours of labor. |
Replacement & Refinishing Guide
Installation Difficulty: 1/5
Replacing the bezel is a straightforward task suitable for DIYers. The estimated time is less than 30 minutes.
- Protect the Dash: Place painter's tape or a microfiber cloth on the dashboard around the bezel to prevent scratches.
- Pry Out the Old Bezel: Using a plastic trim removal tool, carefully insert the tool into the seam between the bezel and the dashboard. Gently pry outwards, working your way around the bezel until the retaining clips release.
- Install the New Bezel: Align the clips on the new bezel with the slots in the dashboard and press it firmly into place until it clicks and sits flush.
DIY Refinishing a Sticky Bezel
If you have a sticky bezel, you can attempt to remove the degraded coating yourself. This is a labor-intensive process.
Pro Tip: Use automotive-specific cleaners. Some owners report success using products like Goo Gone Automotive spray gel or isopropyl alcohol to dissolve the sticky layer. Apply the cleaner to a microfiber cloth, not directly onto the part, and rub gently in small sections. Be aware that this process will remove the soft-touch coating entirely, leaving a plain plastic finish, and may remove the white graphics on the part if not done carefully.
Warning: Do NOT use harsh solvents like nail polish remover, as this can damage the underlying plastic and will remove the printed icons.
Frequently Asked Questions
Is the headlight switch bezel the same as the headlight switch?
No. The bezel is the cosmetic trim piece that surrounds the switch. The switch is the electronic component with the knob that you turn to operate the lights. If your lights are not working, the switch is the likely culprit, not the bezel.
Can a sticky bezel be permanently fixed?
Yes. The only permanent fix is to have the part professionally refinished. This process removes the faulty factory coating and replaces it with a modern, durable finish that looks and feels like new but will not degrade and become sticky again.
Why are new Ferrari parts so expensive and will they get sticky too?
New OEM parts from Ferrari are produced in low volumes and carry a significant brand premium. A new replacement part from the dealer uses the same soft-touch coating as the original and will likely become sticky again over time, especially in hot climates.
Is it difficult to remove the bezel for replacement or refinishing?
No, removal is typically very easy. It is held in by clips and can be gently pried out using plastic trim tools in a few minutes. This makes it a simple part to send out for professional refinishing.
Helpful Videos
Technical Specifications
OEM Part Numbers: 320930
Material: Plastic with soft-touch coating
We Have This Part in Stock

The information in this article is provided for general reference and educational purposes only. Vehicle specifications, procedures, and part compatibility can vary by production date, trim level, and region. Always consult your vehicle's factory service manual and verify part numbers before purchasing or performing repairs. Safety-critical components such as airbags, seat belts, and braking systems should be installed by a qualified professional.
- Ferrari California:
- 🎬 Helpful Videos
- 🛍️ Shop This Part
- Primary Failure Symptom: The 'Sticky Button' Problem
- Known Issues, TSBs, and Recalls
- Buying a Used Headlight Switch Bezel
- Cost Breakdown
- Replacement & Refinishing Guide
- Installation Difficulty: 1/5
- DIY Refinishing a Sticky Bezel
- Frequently Asked Questions
- 🎟️ Get 5% Off