

2001-2002 Kia Rio Headlight Guide: Fixing Haze, Moisture, and Fitment
This guide covers common problems, replacement, and how to buy a good used headlight assembly for the first-generation Kia Rio.
- Compatibility is crucial: These headlights only fit 2001-2002 Kia Rio models and are NOT interchangeable with the 2003 facelift version.
- When buying used, the most important inspection point is the integrity of the plastic mounting tabs, which are prone to breaking.
- The entire front bumper cover must be removed to replace the headlight assembly, making it more involved than a simple bulb change.
- Headlight aiming is mandatory after replacement to ensure safety and legal compliance.
Key Features and Specifications
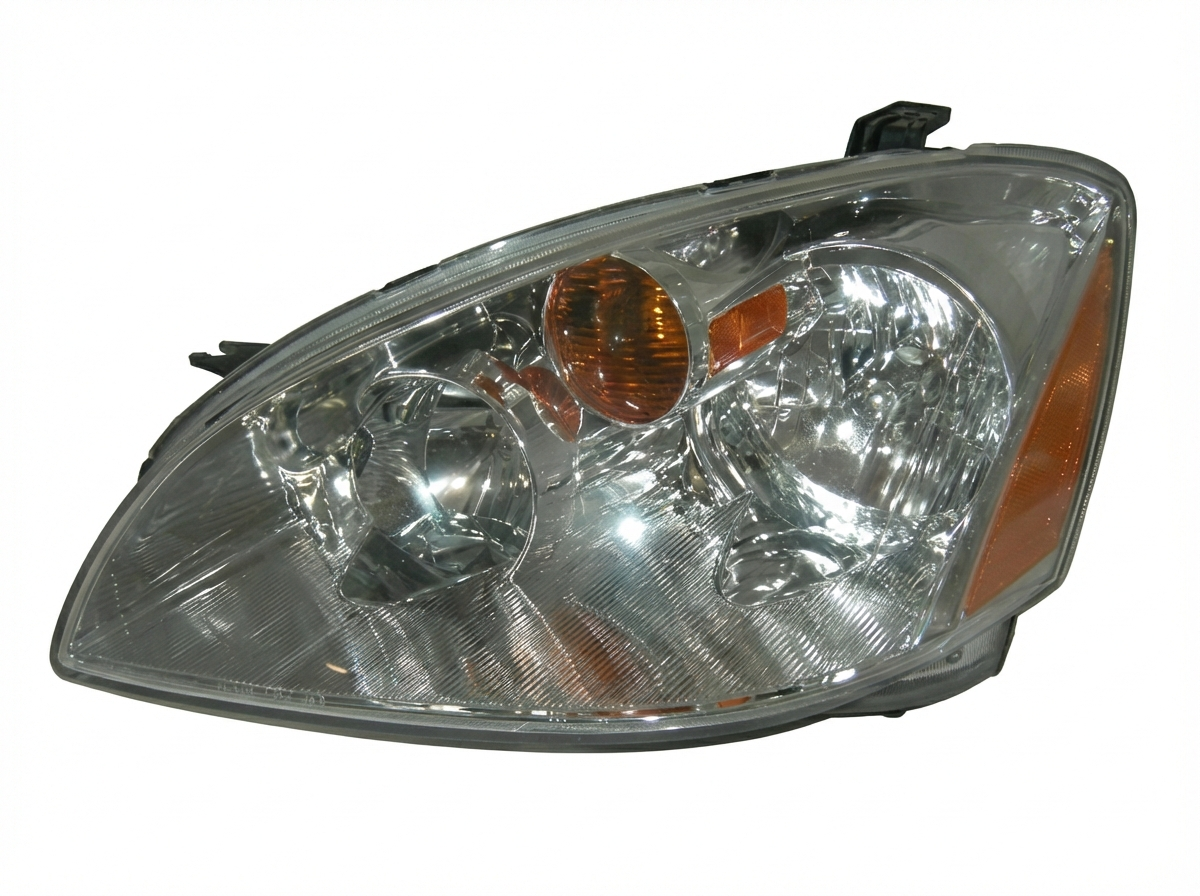
The 2001-2002 Kia Rio uses a basic, single-piece halogen headlight assembly. This was standard for economy cars of this era.
- Headlight Type: Halogen. The assembly uses a single 9003 (also known as H4) bulb for both the low and high beams. This is a dual-filament bulb, meaning one filament lights for low beams and a second, different filament lights for high beams.
- Integrated Lamps: The assembly also includes the sockets and lenses for the front turn signal and the amber parking/side marker lights.
- No Advanced Electronics: These headlights are simple plug-and-play units. They do not require any separate ballasts, igniters, or LED driver modules, which are found on more modern HID or LED systems.
Warning: Compatibility is critical. These headlight assemblies fit 2001 and 2002 Kia Rio models (and some late 2000 models). They will NOT fit the 2003-2005 models. The 2003 model year marked a significant facelift for the Rio, which included larger, differently shaped headlights. The parts are not interchangeable.
Symptoms of a Failing Headlight Assembly
Failure isn't always a burnt-out bulb. The entire housing can degrade over time, leading to safety issues.
- Dim Light Output: Even with new bulbs, the light seems weak. This is often caused by the plastic lens becoming yellowed, hazy, or cloudy from UV sun damage. It can also be caused by the chrome reflector inside the housing peeling or becoming dull.
- Moisture or Condensation Inside: Seeing fog, water droplets, or a pool of water inside the lens means the factory seal between the lens and the housing has failed. This will quickly corrode bulb sockets and degrade the reflector.
- Cracked or Damaged Lens: Physical damage from road debris or minor impacts can crack the lens, allowing moisture in and creating an illegal, scattered beam pattern.
- Flickering or Inoperative Lights: While often a bulb or wiring issue, corrosion inside the bulb sockets within the assembly can cause intermittent power to the bulbs.
Known Issues, TSBs, and Recalls
As of this writing, there are no specific NHTSA recalls for the headlight assemblies on the 2001-2002 Kia Rio. However, Kia has issued general technical service bulletins (TSBs) that apply to many of its vehicles regarding headlight condensation.
TSB BOD055 / 19-BD-003H-1: Headlamp Condensation: These bulletins explain that a small amount of light fogging after a car wash or in humid weather can be normal. The heat from the halogen bulb is usually enough to dry it out. However, if you see large water droplets or water pooling at the bottom of the housing, the seal has failed and the assembly should be repaired or replaced.
Buying a Used Headlight Assembly: What to Look For
For a vehicle of this age, a good-condition used OEM headlight is often a better choice than a cheap aftermarket part. OEM parts use higher-quality plastics that resist yellowing and have a beam pattern that is guaranteed to be safe and legal. Here’s what to inspect:
- Check All Mounting Tabs: This is the most critical inspection point. These assemblies have several plastic tabs that are used to bolt them to the car. These tabs become brittle with age and often break during removal. Carefully inspect every tab for cracks or signs of being repaired with glue or epoxy. A broken top mounting tab is especially common and can cause the headlight to vibrate, leading to a shaky beam on the road.
- Inspect the Lens: Look for deep scratches, rock chips, and cracks. Distinguish between surface haze (which can be polished out) and internal yellowing or micro-cracking (which cannot be fixed). Hold the light at an angle to check for "crazing," a network of fine cracks in the plastic from UV damage.
- Look for Moisture Evidence: Check for a "water line" or mineral deposits on the inside of the lens or on the chrome reflector. This is a clear sign the seal has failed in the past, and it will likely leak again.
- Examine the Reflector: The internal chrome reflector should be bright and shiny. Any peeling, bubbling, or burnt-looking spots will dramatically reduce light output.
- Verify Part Numbers: If possible, match the OEM part number on the housing to the ones listed in this guide to ensure you're getting the correct part for your vehicle.
Pro Tip: When buying used, it's often a good idea to buy a pair of headlights. This ensures they will match in clarity and appearance on the car. A new-looking headlight next to an old, hazy one can look awkward.
Replacement and Aiming Guide
Replacement Process
Replacing the headlight assembly on a 2001-2002 Kia Rio is a straightforward DIY job but does require removing the front bumper cover.
- Disconnect the Battery: Always start by disconnecting the negative battery terminal.
- Remove the Front Bumper Cover: This involves removing a series of clips and screws along the top edge (under the hood), in the wheel wells, and underneath the front of the car. Once all fasteners are removed, the bumper cover can be carefully pulled off.
- Unbolt the Headlight Assembly: With the bumper removed, you will have clear access to all the bolts (typically 10mm) holding the headlight assembly in place.
- Disconnect Electrical Connectors: Reach behind the assembly and unplug the main wiring harness.
- Install the New Assembly: Installation is the reverse of removal. Bolt the new assembly in place, reconnect the electrical plug, and reinstall the bumper cover.
Headlight Aiming (Required After Replacement)
You MUST aim your headlights after installing a new assembly. Failure to do so can blind other drivers and is illegal. The basic procedure is as follows:
- Park the car on a level surface about 25 feet away from a flat wall.
- Ensure tire pressures are correct.
- Turn on the low beams. You will see a distinct cutoff line for each headlight on the wall.
- Locate the adjustment screws on the back of the headlight assembly. There is typically one for vertical (up/down) adjustment and one for horizontal (left/right) adjustment.
- Turn the screws to align the beam's cutoff line to the proper height. A common rule of thumb is for the cutoff line to be about two inches lower on the wall than the center of the headlight bulb itself.
Cost Comparison
| Part Type | Estimated Price Range | Notes |
|---|---|---|
| New OEM | $175 - $260 per side | May be discontinued or have limited availability from dealers. |
| New Aftermarket | $40 - $75 per side | Widely available from online retailers. Quality and fit can vary significantly. |
| Used OEM | $50 - $100 per side | Good value, but requires careful inspection for damage, haze, and broken tabs. |
| Shop Labor | $100 - $200 | Typically 1-1.5 hours of labor, which includes removing the bumper and aiming the lights. |
Frequently Asked Questions (FAQ)
Can I just replace the bulb instead of the whole assembly?
Yes, if your only problem is a burnt-out bulb, you can replace just the 9003/H4 bulb. The entire assembly only needs to be replaced if the lens is hazy, cracked, or leaking moisture.
Will a headlight from a 2003 Kia Rio fit my 2002?
No, absolutely not. The 2003 Kia Rio was a facelifted model with completely different, larger headlights and a different bumper. The parts are not physically interchangeable.
Can I upgrade to LED or HID bulbs in my original headlight housing?
This is strongly discouraged. The halogen reflector and lens are designed for the specific size and position of a halogen filament. Installing an LED or HID bulb will result in an improper and unsafe beam pattern that scatters light, creates glare for oncoming traffic, and may be illegal.
Is it normal to see some fog inside the lens after a car wash?
A small amount of fine mist that disappears after turning the headlights on for 15-30 minutes is considered normal by Kia and is caused by condensation. However, if you see large water droplets or the moisture never goes away, the seal has failed and the assembly needs to be replaced.
Technical Specifications
OEM Part Numbers: 0K30A51030C 0K32A51030A 0K32A51030B 0K32A51040B 92101FD030 92102FD030
Headlight Technology: Halogen Main Bulb Type: 9003 / H4 (Dual Filament High/Low Beam)
We Have This Part in Stock

The information in this article is provided for general reference and educational purposes only. Vehicle specifications, procedures, and part compatibility can vary by production date, trim level, and region. Always consult your vehicle's factory service manual and verify part numbers before purchasing or performing repairs. Safety-critical components such as airbags, seat belts, and braking systems should be installed by a qualified professional.
- Kia Rio:
- 🛍️ Shop This Part
- Key Features and Specifications
- Symptoms of a Failing Headlight Assembly
- Known Issues, TSBs, and Recalls
- Buying a Used Headlight Assembly: What to Look For
- Replacement and Aiming Guide
- Replacement Process
- Headlight Aiming (Required After Replacement)
- Cost Comparison
- Frequently Asked Questions (FAQ)
- 🎟️ Get 5% Off