

1999-2003 Elantra Headlights: Avoiding the Critical 2000/2001 Split
This guide clarifies the major headlight differences between 1999-2000 and 2001-2003 Hyundai Elantra models to ensure you get the right part.
- The most critical factor is the model year split; 1999-2000 and 2001-2003 headlights are completely different and not interchangeable.
- These are standard halogen headlights. Upgrading to LED or HID bulbs in the stock housing is not recommended as it creates an unsafe beam pattern.
- When buying a used assembly, carefully inspect all plastic mounting tabs for cracks or breaks, as this is a common failure point.
- After replacing a headlight assembly, you must have the beam pattern professionally aimed or do it yourself to ensure safety and proper road illumination.
Critical Compatibility Warning: The most important thing to know is that headlight assemblies for 1999-2000 and 2001-2003 Hyundai Elantras are NOT interchangeable. These two periods represent two different vehicle generations with completely different front-end styling. You must purchase the assembly that matches your exact model year.
Critical Compatibility Warning: The most important thing to know is that headlight assemblies for 1999-2000 and 2001-2003 Hyundai Elantras are NOT interchangeable. These two periods represent two different vehicle generations with completely different front-end styling. You must purchase the assembly that matches your exact model year.
Two Different Headlights: 1999-2000 vs. 2001-2003
The Hyundai Elantra underwent a full redesign for the 2001 model year. This means the parts are distinct and cannot be swapped.
1999-2000 Hyundai Elantra (J2 Generation)
These models feature a more rounded headlight design. They are a single-piece unit compatible with both sedan and wagon body styles of this generation. The known OEM part numbers for this range include 92101-29550, 92101-29551, 92102-29050, 92102-29550, and 92102-29551.
2001-2003 Hyundai Elantra (XD Generation)
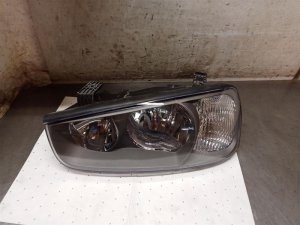
These models have a more angular, modern headlight design that incorporates the turn signal and side marker lamps. They fit both sedan and the 5-door hatchback (GT) models. The low beam bulb is an H7, and the high beam is an H1. Common OEM part numbers include 92101-2D120 and 92101-2D150 for the left side, and 92102-2D000 and 92102-2D150 for the right side. These are standard halogen headlights and do not require any external ballasts or LED drivers.
Symptoms of a Failing Headlight Assembly
- Dim or Yellowed Output: The most common issue is the plastic lens becoming hazy, cloudy, or yellow from UV exposure. This significantly reduces the amount of light that can pass through, making it hard to see at night.
- Moisture or Condensation Inside: If you see water droplets, fog, or a persistent haze inside the lens, the factory seal has failed. This can cause bulbs to burn out prematurely and will lead to corrosion of the reflective surfaces, further reducing light output.
- Flickering or Inoperative Lights: While often a bulb or wiring issue, corrosion on the bulb sockets or internal wiring within the assembly can cause intermittent or total failure.
- Cracked Lens or Housing: Physical damage from road debris or minor impacts can break the lens or rear housing, allowing moisture to enter and compromising the unit's structural integrity.
- Poor Beam Pattern: If the light on the road looks scattered, blotchy, or aims incorrectly, the internal reflectors may be damaged or the assembly itself might be loose or broken from its mounting points.
Known Issues, Recalls, and Technical Service Bulletins (TSBs)
For this specific generation of Elantra, there are no major recalls or TSBs directly related to the headlight assemblies themselves. However, general TSBs from Hyundai address the common issue of condensation in lamp assemblies.
TSB 25-BD-012H: This bulletin explains that minor condensation can be a normal occurrence due to temperature changes. It becomes a problem requiring service when large droplets form or water pools inside the housing. The TSB suggests that normal condensation can often be cleared by running the headlights for 20-30 minutes to evaporate the moisture. Some modern Hyundai vehicles use desiccant packs inside the assembly to absorb moisture, which can be replaced. While not explicitly mentioned for the 1999-2003 models, persistent moisture indicates a bad seal, which is a common failure point for aging headlights.
There was a significant recall (NHTSA Recall No. 09V-125) for 2001-2003 Elantras concerning corrosion of the front lower control arms in 'Salt Belt' states, but this does not involve the lighting system.
Buying a Used Headlight Assembly: What to Inspect
A used OEM headlight is often a better choice than a cheap aftermarket one due to superior plastic quality, better lens optics for a correct beam pattern, and more durable seals. Here’s what to check:
- Verify the Year Range: Double-check that the assembly is from the correct generation (1999-2000 or 2001-2003) for your car. They will not fit otherwise.
- Lens Clarity: Look for a clear, bright lens. Avoid any with heavy yellowing, hazing, or a sandblasted appearance from road debris. Minor hazing can sometimes be polished out, but deep crazing or internal cloudiness cannot.
- Check for Moisture: Inspect the inside of the lens carefully for any signs of water intrusion, like dried water spots, mineral deposits, or a tide line. This indicates a failed seal, and the unit will likely fog up again.
- Inspect All Mounting Tabs: This is critical. The plastic tabs and mounting points are brittle and often break during vehicle disassembly or minor accidents. Carefully check every tab to ensure it is present and free of cracks. A broken tab will prevent the headlight from being secured properly, leading to vibration and incorrect aim.
- Wiring and Connectors: Check the wiring harness pigtail and all bulb sockets. Ensure the connectors are not cracked, melted, or full of green corrosion.
- Reflector Condition: Look inside the lens at the chrome reflector. It should be bright and shiny. A dull, burnt, or peeling reflector will not project light correctly and is a sign of heat damage or long-term moisture exposure.
Replacement & Aiming
Replacement Overview
Replacing the headlight assembly on these Elantra models is a straightforward DIY job for most home mechanics. While procedures vary slightly, the general steps are similar:
- 2001-2003 Models: Accessing the bolts may require removing the front bumper cover. This typically involves removing several plastic clips on the top and bottom and a few screws in each wheel well. Once the bumper is off, the headlight is held in by a few 10mm or 12mm bolts.
- 1999-2000 Models: Replacement is generally simpler and may not require full bumper removal, but you will need to remove the front grille and any trim pieces to access the mounting bolts.
Pro Tip: When removing the assembly, it can be tight. Wiggle it gently; do not pry with a screwdriver, as you can easily crack the housing or the bumper paint. A video guide shows that some force and careful jiggling are needed.
Headlight Aiming (Required After Replacement)
Any time you replace a headlight assembly, you must check and adjust the aim. Failure to do so can blind other drivers or leave you with poor visibility. The adjustment is made via screws on the back of the headlight housing.
- Park the car on a level surface about 25 feet away from a flat wall.
- Turn on the low beams. The top of the beam's cutoff line should be slightly below the height of the center of the headlight bulb.
- Use a Phillips screwdriver to turn the adjustment gears on the back of the assembly. There will be one for vertical (up/down) adjustment and sometimes one for horizontal (left/right) adjustment.
- Adjust one headlight at a time, covering the other to see the beam pattern clearly.
| Part Type | Estimated Cost (Per Side) |
|---|---|
| New OEM | $170 - $240 |
| New Aftermarket | $55 - $100 |
| Used OEM | $40 - $90 |
| Shop Labor for Replacement | $75 - $150 |
Frequently Asked Questions
Can I put LED or HID bulbs in my original halogen headlights?
This is strongly discouraged. Halogen headlight reflectors are specifically designed for the size and position of a halogen filament. Putting a physically different light source like an LED or HID bulb in that housing will create an improper and dangerous beam pattern, causing excessive glare for oncoming traffic and poor road illumination for you. While kits are sold for this purpose, they are often not legal for on-road use.
Are the headlights the same for the sedan and hatchback/wagon?
Yes, for both the 1999-2000 and 2001-2003 generations, the headlight assemblies are the same for all body styles offered in North America (sedan, wagon, and 5-door hatchback).
Can I just replace the foggy plastic lens?
No, the headlight assembly is manufactured as a single, sealed unit. The lens is permanently bonded to the housing. To fix a foggy or damaged lens, the entire assembly must be replaced.
My dealer told me my 2001 Elantra headlights can't be adjusted. Is this true?
This is incorrect. While a forum user reported being told this by a dealer, the 2001-2003 Elantra headlights are adjustable. There are adjustment screws on the back of the housing for vertical and horizontal aiming, accessible with a Phillips screwdriver.
Technical Specifications
OEM Part Numbers: 92101-29550 92101-29551 92102-29050 92102-29550 92102-29551 92101-2D120 92101-2D150 92102-2D000 92102-2D150
Bulb Type (2001-2003): H7 Low Beam, H1 High Beam. Technology: Halogen. No external ballast or driver module required.
We Have This Part in Stock



The information in this article is provided for general reference and educational purposes only. Vehicle specifications, procedures, and part compatibility can vary by production date, trim level, and region. Always consult your vehicle's factory service manual and verify part numbers before purchasing or performing repairs. Safety-critical components such as airbags, seat belts, and braking systems should be installed by a qualified professional.
- Hyundai Elantra:
- 🛍️ Shop This Part
- Critical Compatibility Warning: The most important thing to know is that headlight assemblies for 1999-2000 and 2001-2003 Hyundai Elantras are NOT interchangeable. These two periods represent two different vehicle generations with completely different front-end styling. You must purchase the assembly that matches your exact model year.
- Two Different Headlights: 1999-2000 vs. 2001-2003
- 1999-2000 Hyundai Elantra (J2 Generation)
- 2001-2003 Hyundai Elantra (XD Generation)
- Symptoms of a Failing Headlight Assembly
- Known Issues, Recalls, and Technical Service Bulletins (TSBs)
- Buying a Used Headlight Assembly: What to Inspect
- Replacement & Aiming
- Replacement Overview
- Headlight Aiming (Required After Replacement)
- Frequently Asked Questions
- 🎟️ Get 5% Off