

2001-2007 Freestar, Windstar, Thunderbird & Monterey Fog Light Assembly: Damage, Moisture & Replacement
This guide covers the common failures, inspection tips, and simple replacement for the bumper-mounted fog light assembly shared by these Ford and Mercury vehicles.
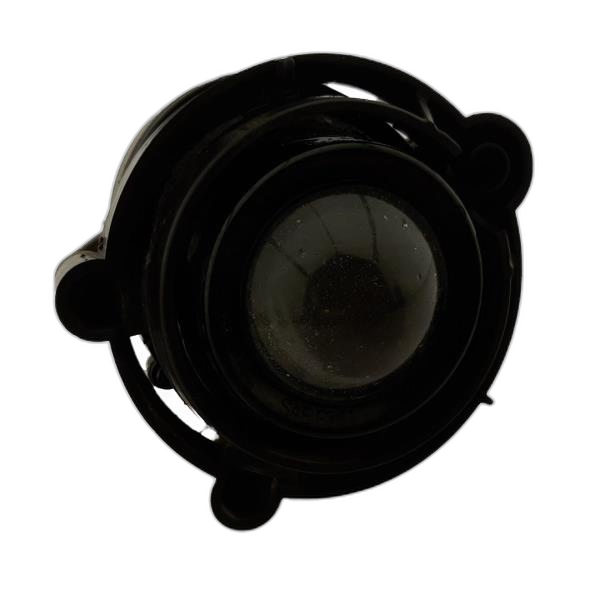
- This part is a Fog Light Assembly, not a headlight, and it fits the Freestar, Windstar, Thunderbird, and Monterey.
- Failure is almost always due to physical damage (cracks) or moisture intrusion from a bad seal.
- Replacement is extremely easy for a DIYer and typically requires only a screwdriver, with no need to remove the bumper.
- Used OEM parts are a great value, but inspect carefully for cracks and signs of prior moisture entry before buying.
Symptoms of a Failing Fog Light Assembly
Failure of this fog light is almost always due to physical damage or age. Here’s what to look for:
- Dim or Non-Functioning Light: The most obvious symptom is a light that won't turn on. This is usually just a burnt-out halogen bulb, but if replacement bulbs also fail to work, it could point to moisture intrusion that has corroded the electrical connector.
- Visible Cracks or Pitting: Being low on the bumper makes this assembly a target for rocks and road debris. Inspect the lens for cracks, chips, or heavy pitting that can reduce light output and allow water to enter.
- Moisture or Water Inside the Lens: If you see condensation, fogging, or standing water inside the housing, the seal has failed. This is a very common issue. A compromised seal will lead to chronic bulb failure and corrosion of the internal reflector.
- Hazy or Yellowed Lens: Over time, the plastic lens can become hazy or yellowed from UV exposure. This significantly reduces the amount of light that can pass through, making the fog light less effective.
Known Issues and Related Problems
Fog Light Specific Issues
The primary known issue for this specific part is its vulnerability. Its location on the bumper cover makes it extremely susceptible to being damaged by road debris, parking curbs, and even high water. Once the lens is cracked or the housing seal is broken, moisture entry is inevitable, leading to a cycle of blown bulbs and internal corrosion.
Related Vehicle Lighting Problems
While you are diagnosing a fog light issue, it's worth being aware of other common lighting system problems found on these vehicle platforms. An issue in one part of the system can sometimes be related to a broader electrical problem.
- Headlight Condensation: Like the fog lights, the main headlight assemblies on the Freestar and Windstar can develop leaks in their seals over time, allowing moisture to enter. This can be caused by aging gaskets or clogged breather vents on the back of the headlight housing. While a small amount of light fogging that clears on its own can be normal, persistent moisture indicates a problem.
- Dimming or Flickering Headlights: Some older Ford vehicles experienced issues with dimming or flickering headlights due to a faulty Lighting Control Module (LCM) or an overworked headlight switch. A recall (NHTSA Campaign ID: 15V861) was issued for a faulty LCM on various Ford models that could cause a sudden loss of headlights. While these specific models may not be on the recall list, the symptom of dimming or flickering lights could point to a failing alternator, a bad electrical ground, or a faulty headlight switch.
Pro Tip: If your headlights are dim, check the electrical connector pigtail right behind the bulb. These connectors can corrode over time, creating high resistance and reducing brightness. Replacing a corroded pigtail is an inexpensive fix that can dramatically improve light performance.
Buying a Used Fog Light Assembly: What to Inspect
A used OEM fog light is an excellent, budget-friendly option, as aftermarket quality can be inconsistent. Given the simplicity of this part, there is very little risk if you inspect it properly.
- Inspect the Lens: Hold the light up to a light source. Look for deep pits, stress fractures, or any cracks. Minor surface hazing can sometimes be polished, but a clear, damage-free lens is ideal.
- Check for Moisture Stains: Look for a "water line" or dried mineral deposits on the inside of the reflector bowl. This is a clear sign the assembly has had a leak in the past and should be avoided.
- Mounting Points: This assembly is typically held in by a single screw and locating tabs. Ensure the screw hole and all plastic tabs are intact and not cracked or broken. This is critical for a secure fit.
- Electrical Connector: Look at the socket where the bulb twists in. The contacts should be clean and free of any green or white corrosion.
Replacement Procedure Overview
Replacing this fog light assembly is a straightforward job that is very feasible for a DIY mechanic. While one forum user was incorrectly told by a dealer that the bumper had to be removed, this is not the case. Access is gained from behind or underneath the bumper.
- Access the Assembly: Depending on the vehicle, you may need to turn the steering wheel to one side to gain access through the wheel well liner, or you may be able to reach it from underneath the front of the vehicle.
- Disconnect Wiring: Reach behind the fog light and twist the bulb socket about a quarter-turn counter-clockwise, then pull it straight out of the housing.
- Remove the Assembly: The assembly is typically held in place by one or two Phillips head screws. Remove the screws, and the assembly should come out from the front of the bumper.
- Install the New Assembly: Installation is the reverse of removal. Seat the new assembly in the bumper, install the mounting screw(s), and plug the bulb socket back into the housing with a quarter-turn clockwise to lock it in.
Pro Tip: Before you fully install the new assembly, plug the bulb in and test the light to ensure it works. This saves you the trouble of having to remove it again if there's an issue with the bulb or connection.
Cost Comparison for a Fog Light Assembly
Replacing a damaged fog light is an inexpensive repair, especially if you do it yourself. Here are the typical costs for a single assembly:
| Part Type | Estimated Cost (per side) |
|---|---|
| New OEM | $50 - $75 |
| New Aftermarket | $20 - $35 |
| Used OEM | $25 - $45 |
| Shop Labor | $50 - $100 |
Frequently Asked Questions (FAQ)
Is this a headlight or a fog light?
This is a fog light assembly. It is a small, separate light located in the bumper cover, distinct from the main headlight housing which contains the low and high beams.
Why is my fog light always full of water?
If your fog light repeatedly collects moisture, its seal has failed. This is usually due to a crack in the lens or housing from a rock impact, or simply from the aging of the factory sealant. The only permanent solution is to replace the entire assembly.
Can I upgrade to brighter LED or Xenon bulbs?
Yes, aftermarket LED and Xenon bulb upgrades are available and are a popular modification, especially for the dim Thunderbird lights. However, be aware that the reflector housing was designed for a halogen bulb, so the beam pattern with an LED or Xenon bulb may not be ideal. Ensure you aim them properly to avoid glaring other drivers.
Do I need to aim the fog lights after replacement?
Generally, if you are replacing the assembly with an identical OEM or direct-fit aftermarket part, aiming is not required as it should fit into the bumper in a fixed position. However, if you notice the beam pattern is off, there is sometimes a small adjustment screw on the back of the housing to fine-tune the vertical angle.
Technical Specifications
OEM Part Numbers: 1F2Z13200AA 1W6Z13200AA 4F9Z-15200-AA
Bumper-mounted halogen fog lamp assembly.
We Have This Part in Stock





The information in this article is provided for general reference and educational purposes only. Vehicle specifications, procedures, and part compatibility can vary by production date, trim level, and region. Always consult your vehicle's factory service manual and verify part numbers before purchasing or performing repairs. Safety-critical components such as airbags, seat belts, and braking systems should be installed by a qualified professional.
- Ford Freestar:
- Ford Thunderbird:
- Ford Windstar:
- 🛍️ Shop This Part
- Symptoms of a Failing Fog Light Assembly
- Known Issues and Related Problems
- Fog Light Specific Issues
- Related Vehicle Lighting Problems
- Buying a Used Fog Light Assembly: What to Inspect
- Replacement Procedure Overview
- Cost Comparison for a Fog Light Assembly
- Frequently Asked Questions (FAQ)
- 🎟️ Get 5% Off