

Chrysler Concorde, LHS & Eagle Vision Headlight Guide: Decoding the 1996-2004 Fitment Splits
This guide clarifies the critical differences between headlight assemblies for the 1996-2004 Chrysler Concorde, 1999-2001 LHS, and 1996-1997 Eagle Vision to ensure you get the right part.
- There are two main, non-interchangeable headlight assemblies: one for 1996-97 Concorde/Vision and another for 1999-01 LHS/2002-04 Concorde.
- Owners of 1998-2001 Concordes must buy a specific headlight for their model; the parts in this guide will not fit.
- All factory headlights are standard halogen reflector types. No special ballasts or modules are needed.
- When buying used, the most critical inspection is for intact mounting tabs, as they are prone to breaking.
Compatibility Warning: Three Different Headlights
Before purchasing a headlight assembly for your Chrysler Concorde, LHS, or Eagle Vision, it is critical to understand that there are three distinct and non-interchangeable designs used across these models, even within the same vehicle generation. Buying the wrong assembly will result in a part that does not fit.
Critical Note for 1998-2001 Chrysler Concorde Owners: This guide covers two specific headlight types. A third, unique headlight assembly was used on the 1998-2001 Chrysler Concorde. The parts discussed here will NOT fit a 1998-2001 Concorde. You must source a part specifically listed for those years, such as OEM part number 4780011AH.
Group 1: 1996-1997 Chrysler Concorde & 1996-1997 Eagle Vision
These two first-generation LH-platform vehicles share the same headlight assembly.
- Years: 1996-1997
- Models: Chrysler Concorde, Eagle Vision
- Headlight Type: Halogen Reflector Style
- Bulb Type: These models use a single 9007 dual-filament bulb for both high and low beam functions within the same bulb.
- Identifying Features: Characterized by a smoother, more rounded appearance consistent with the first-generation LH body style.
- Known Part Numbers: 4856562, 4856563, CH2503111.
Group 2: 1999-2001 Chrysler LHS & 2002-2004 Chrysler Concorde
These second-generation LH-platform models share a distinct headlight assembly that is different from both the earlier models and the 1998-2001 Concorde.
- Years: 1999-2001 (LHS), 2002-2004 (Concorde)
- Models: Chrysler LHS, Chrysler Concorde (Limited, LX, LXi)
- Headlight Type: Halogen Reflector Style. No factory HID or Xenon options were offered.
- Bulb Types: These models use separate bulbs for high and low beams.
- Low Beam: 9006XS
- High Beam: 9005XS
- The assembly housing also contains the front turn signal bulb.
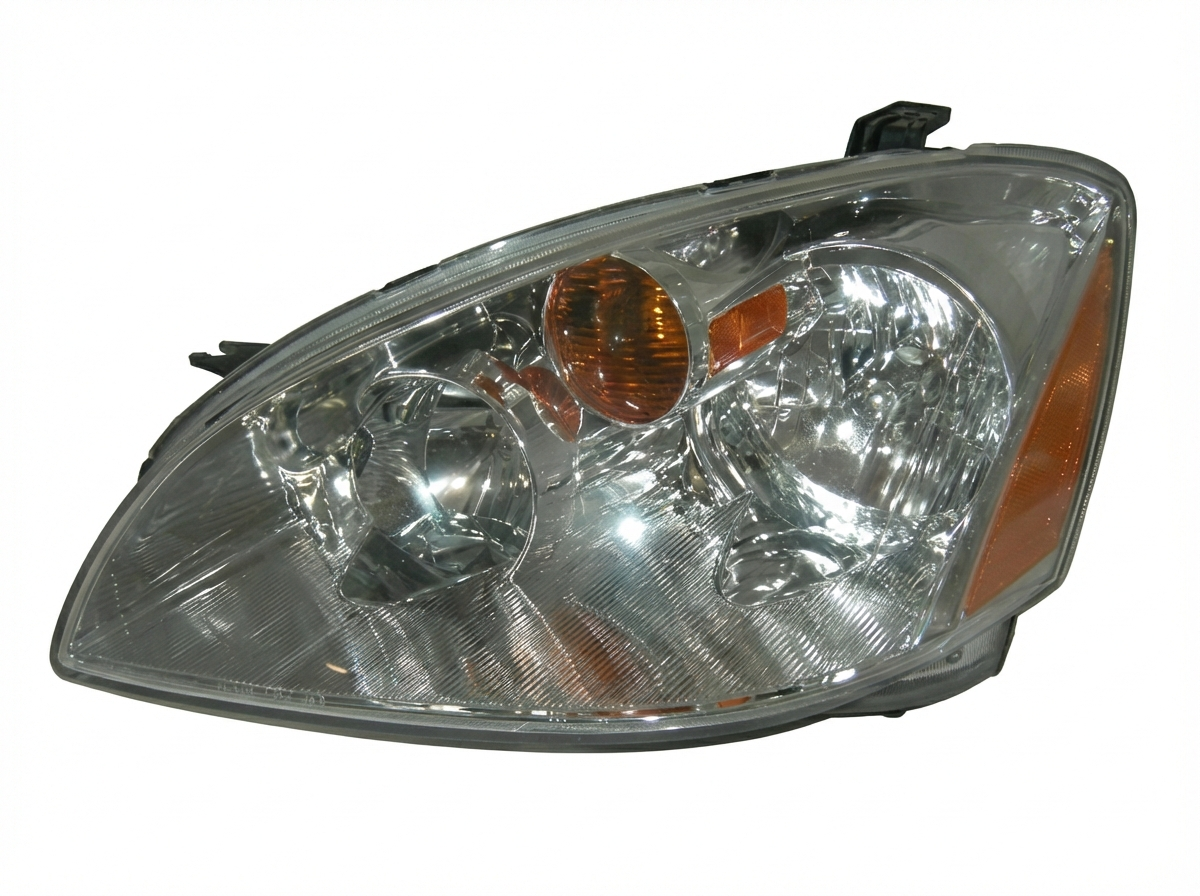
- Identifying Features: These assemblies have a distinctive look with a prominent, separate circular reflector for the high beam. They were used on the Concorde after its 2002 facelift, which adopted the front-end styling of the discontinued LHS.
- Known Part Numbers: 04780015AE, 4780015AC, 4780015AD, CH2502148.
Symptoms of a Failing Headlight Assembly
Failure isn't always a burnt-out bulb. The entire assembly can degrade over time, compromising safety and performance.
- Dim or Yellowed Appearance: The most common issue is the polycarbonate lens becoming cloudy, hazy, or yellow from UV sun damage and road debris. This significantly reduces the amount of light reaching the road, impairing nighttime visibility.
- Moisture or Condensation Inside: If you see water droplets, fog, or a 'fishbowl' effect inside the lens, the factory seal has failed. This moisture can cause corrosion on electrical connectors and dramatically shorten bulb life.
- Flickering Headlights: While often a bulb or wiring issue, flickering can sometimes be traced to a corroded or loose connection within the headlight assembly itself.
- Cracked Lens or Housing: Physical damage from impacts can break the lens or the rear housing, allowing moisture in and potentially causing the assembly to come loose.
- Broken Mounting Tabs: The plastic tabs that secure the assembly to the vehicle can become brittle and break, especially during bulb replacement or after a minor impact. This was a noted issue on the LHS, causing the entire assembly to become loose.
Buying a Used Headlight Assembly: What to Inspect
A used OEM headlight is often a better choice than a cheap aftermarket part due to superior materials, fit, and reflector quality. However, careful inspection is key.
- Check the Lens Clarity: Look for deep yellowing, hazing, or fine cracks (crazing). Minor hazing can often be polished out with a restoration kit, but severe UV damage is permanent.
- Inspect for Moisture Damage: Check for a faint white or chalky residue on the inside of the lens or on the chrome reflectors. This is a tell-tale sign that the assembly had water inside it at some point, which may have damaged the reflective surfaces.
- Verify All Mounting Tabs Are Intact: This is the most critical inspection point. Carefully check every mounting tab and clip point on the housing. These are often fragile and can be broken during removal from the donor vehicle. An assembly with broken tabs will not mount securely.
- Confirm the Adjuster Screws Work: Look for the aiming adjustment screws on the back of the housing. Ensure they are not stripped or seized. You will need these to properly aim the headlight after installation.
- Examine the Wiring Harness Connector: Look at the main electrical connector on the back of the housing. Check for any signs of melting, corrosion, or pushed-out pins, which could indicate a past electrical issue.
Recalls and Technical Service Bulletins (TSBs)
As of this writing, there are no active recalls or widely known TSBs from the NHTSA specifically for headlight failure on the 1996-2004 Concorde, 1996-1997 Vision, or 1999-2001 LHS. However, other Chrysler vehicles of the era have had recalls for headlight wiring connectors overheating. If you experience flickering or intermittent headlight operation, a faulty wiring harness connector should be considered a possible cause.
Headlight Assembly Replacement Overview
Replacing the headlight assembly on these vehicles is a moderately difficult job for a DIY mechanic, primarily because accessing the fasteners can be tricky.
Pro Tip: While some guides suggest you can replace the assembly by only accessing the top, many find it easier to remove the front bumper cover for unobstructed access to all bolts and connectors.
The general procedure for the second-generation models (LHS/Concorde) is as follows:
- Disconnect the negative battery terminal.
- Remove the plastic push pins and bolts securing the top of the front fascia and radiator cover.
- Loosen the upper radiator crossmember bolts to allow it to be gently pried up for clearance.
- Unscrew the two long jackscrews that hold the top of the headlight assembly in place. These are typically 7mm screws.
- Reach behind the assembly to disconnect the main electrical connector.
- Carefully maneuver the assembly up and out from under the loosened crossmember.
- Installation is the reverse of removal. Transfer any good bulbs from the old unit to the new one.
Warning: When installing new halogen bulbs, do not touch the glass with your bare fingers. The oils from your skin can create hot spots on the bulb, causing it to fail prematurely. Use gloves or a clean cloth to handle the bulb.
Aiming Your New Headlights
After installation, you MUST aim the headlights. Failure to do so can blind oncoming drivers or leave you with poor visibility.
- Park the vehicle on a level surface, 25 feet away from a flat wall or garage door.
- Turn on the low beams. The top of the brightest part of the beam pattern should be slightly below the height of the center of the headlight lens itself.
- On the back of the headlight assembly, you will find the adjuster screws. They are often accessible through small holes in the upper radiator support.
- Typically, a Torx T15 bit or a small socket is used to turn the adjusters. One screw will adjust the beam vertically (up/down) and another may be present for horizontal (left/right) adjustment.
- Adjust each headlight until the beam pattern is aimed correctly. The high beams are typically not separately adjustable.
| Part Type | Estimated Cost |
|---|---|
| New OEM (Mopar) | $135 - $250 per side |
| New Aftermarket | $80 - $310 per side |
| Used OEM | $50 - $120 per side |
| Shop Labor Cost | $100 - $250 |
Frequently Asked Questions (FAQ)
Can I put the 2002-2004 Concorde headlights on my 1998-2001 Concorde?
No. The 1998-2001 Concorde uses a completely different shape headlight, bumper, and grille. The 2002-2004 models received a front-end facelift and their parts are not interchangeable with the earlier second-generation cars.
Are these Halogen, HID, or LED headlights?
All of these vehicles came from the factory with standard Halogen reflector headlight assemblies. They do not use HID/Xenon ballasts or LED driver modules. While aftermarket LED or HID bulb kits can be installed, they were not original equipment.
Do I need to get the car programmed after replacing a headlight?
No. These are simple halogen headlights and require no electronic programming or calibration after installation. However, manual aiming is always required.
Why are my new bulbs pointing at the sky?
This is a common issue if the bulb is not seated correctly in the housing. The base of a headlight bulb has tabs that must align with notches inside the assembly. If it's not inserted and twisted correctly to lock it in place, the beam pattern will be completely wrong. Remove the bulb and reinstall it, ensuring the tabs are properly aligned.
Technical Specifications
OEM Part Numbers: 04780015AE 4780015AC 4780015AD 4856562 4856563
Lighting Technology: Halogen Reflector. Bulb Types (1996-97): 9007. Bulb Types (99-04 group): 9006XS (Low), 9005XS (High).
We Have This Part in Stock



The information in this article is provided for general reference and educational purposes only. Vehicle specifications, procedures, and part compatibility can vary by production date, trim level, and region. Always consult your vehicle's factory service manual and verify part numbers before purchasing or performing repairs. Safety-critical components such as airbags, seat belts, and braking systems should be installed by a qualified professional.
- Chrysler Concorde:
- Eagle Vision:
- Chrysler LHS:
- 🛍️ Shop This Part
- Compatibility Warning: Three Different Headlights
- Group 1: 1996-1997 Chrysler Concorde & 1996-1997 Eagle Vision
- Group 2: 1999-2001 Chrysler LHS & 2002-2004 Chrysler Concorde
- Symptoms of a Failing Headlight Assembly
- Buying a Used Headlight Assembly: What to Inspect
- Recalls and Technical Service Bulletins (TSBs)
- Headlight Assembly Replacement Overview
- Aiming Your New Headlights
- Frequently Asked Questions (FAQ)
- 🎟️ Get 5% Off