

2011-2015 Audi R8 Quarter Panel Trim: A Guide for the Spyder-Only Moulding
This guide covers the identification, inspection, and replacement of the unique rear quarter panel trim insert found only on first-generation R8 Spyder models.
- This part is for the 2011-2015 Audi R8 Spyder (Convertible) ONLY and will not fit the Coupe.
- New parts come primed and must be painted to match; used parts will also likely require painting.
- When buying a used part, the most critical inspection point is the integrity of the plastic mounting clips and tabs on the back.
- There are no specific recalls or TSBs for this part; failure is due to age, physical damage, or clip failure.
Critical Compatibility Warning: Spyder Models Only
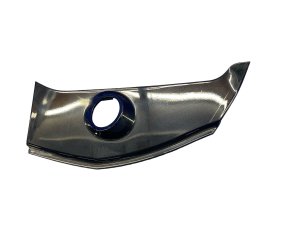
This part fits 2011-2015 Audi R8 Spyder (Convertible) models ONLY. It will not fit the Audi R8 Coupe. The body panels and trim between the two body styles are different in this area. Always verify you are purchasing for a Spyder before ordering. 🎬 See this Spyder panel removal walkthrough The part is often listed as a "Quarter Panel Insert Trim Cover".
Symptoms of a Failing Fender Moulding
Failure of this trim piece is always a physical and visual issue. You will not experience any warning lights or fault codes. Look for these common signs:
- Loose Fit or Rattling: The most common symptom is the moulding becoming loose. This can be caused by broken mounting clips or failing adhesive. You might hear a rattling or vibrating sound from the rear of the car, especially at speed.
- Visible Gaps: A noticeable gap between the trim piece and the car's body panel is a clear sign that it is no longer properly secured.
- Physical Damage: Look for cracks, deep scuffs, or missing chunks of plastic. This is typically caused by impacts from road debris or minor collisions.
- Fading or Discoloration: Over time, exposure to UV rays from the sun can cause the plastic to fade, turning it a dull gray or chalky color that no longer matches the rest of the vehicle's trim.
- Missing Piece: In severe cases, the entire trim piece can detach from the vehicle, leaving an unfinished-looking gap in the bodywork. A detached piece can become a hazard on the road.
Buying a Used Quarter Panel Trim
Due to the high cost and rarity of new OEM parts, a used OEM trim piece is often the best value. However, careful inspection is key. Aftermarket versions of this specific part are generally not available.
Inspection Checklist:
- Confirm the Part Number: Check for OEM part numbers 427853343 or the updated version 427853343B. The part may also have "GRU" at the end, such as 427853343B-GRU, which indicates it is a new, primed part that requires painting.
- Inspect All Mounting Points: This is the most critical step. Carefully examine the back of the trim piece. Ensure all plastic clips, tabs, and screw holes are intact and free of cracks. A part with broken mounting points will not install securely.
- Check for Cracks and Warping: Inspect the entire piece for any hairline cracks, especially around the edges and mounting points. Lay it on a flat surface to ensure it is not warped, which could cause fitment issues.
- Be Prepared to Paint: Used trim pieces will be colored to match their donor car. New OEM parts typically come in a primer finish (GRU). Unless you find a used part from a car with the exact same paint code, you must plan on having the part professionally painted to match your vehicle.
Pro Tip: To find your Audi's paint code, check the paper sticker located in the front trunk (frunk) area or sometimes in the passenger footwell. Matching this code is essential for a perfect paint job.
Known Issues, TSBs, and Recalls
As of mid-2026, there are no specific recalls or Technical Service Bulletins (TSBs) from Audi or the NHTSA related to the quarter panel trim on the 2011-2015 R8 Spyder. Any issues with this part, such as looseness or detachment, are typically due to aging plastic clips, adhesive failure, or physical damage from an external impact, rather than a manufacturing defect.
Replacement Overview
Replacing this trim piece is a moderately difficult task that a patient DIYer can accomplish. It requires care to avoid damaging the paint or the new trim piece.
- Difficulty: 3/5 (Moderate)
- Estimated Time: 0.5 - 1 hour
- Tools Required: Plastic trim removal tools, Torx bit set or socket set.
General Steps:
- Access Fasteners: Some fasteners may be hidden. You may need to partially remove the rear wheel well liner 🎬 Watch: Audi R8 side panel removal process to access screws holding the trim in place.
- Remove Screws: Locate and remove any Torx or standard screws securing the trim to the body.
- Pry Carefully: Using a plastic trim removal tool, gently pry the moulding away from the body. Start at one end and work your way along the piece, releasing the plastic clips as you go. Do not use a metal screwdriver, as it will scratch the paint.
- Clean the Surface: Once the old trim is removed, thoroughly clean the mounting surface on the vehicle's body. Remove any old adhesive residue or dirt to ensure the new part sits flush.
- Install the New Trim: Align the clips on the new trim piece with the holes in the body. Press firmly and evenly until each clip snaps into place. Reinstall any screws that were removed.
Caution: The plastic clips can be brittle and break easily, especially on older vehicles. Work slowly and apply steady pressure. If a clip on the new or used part breaks, it will not mount securely.
Cost of Replacement
Prices can vary based on condition and supplier. Since aftermarket options are not available, your choices are limited to new or used OEM parts.
| Part Type | Estimated Cost |
|---|---|
| New OEM (Primed) | $95 - $120 |
| New Aftermarket | Not Available |
| Used OEM | $30 - $90 |
| Shop Labor | $100 - $200 |
Note: Costs are estimates as of mid-2026 and do not include the cost of painting the part, which can add $100-$250 depending on the shop.
Frequently Asked Questions (FAQ)
Will this trim piece fit my Audi R8 Coupe?
No. This specific quarter panel trim is designed exclusively for the 2011-2015 Audi R8 Spyder (Convertible). The body structure and panels are different from the Coupe model.
Does the replacement part come painted?
Generally, no. New OEM parts typically come in a primed finish (often designated with a 'GRU' suffix in the part number) and must be painted to match your car. Used parts will be the color of the car they came from, so unless you find an exact color match, you should plan to have it repainted.
Can a broken mounting tab be repaired?
It is not recommended. While some high-strength plastic epoxies might work for a temporary fix, the vibration and stress on the part mean such a repair is likely to fail. A secure fit depends on intact mounting points, so replacing the part is the only reliable solution.
Why can't I find a cheaper aftermarket version?
The Audi R8 is a low-production, high-performance vehicle. The demand for this specific trim piece is not high enough for most aftermarket companies to invest in the expensive tooling and manufacturing process required to produce it.
Helpful Videos
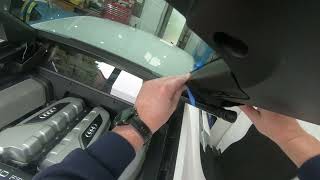

Technical Specifications
OEM Part Numbers: 427853343 427853343B 427853343BGRU
Material: Plastic Finish: Primed (New OEM) or Painted (Used) Fitment: Rear Quarter Panel, Spyder models only
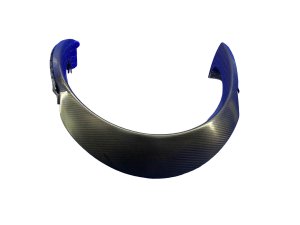
We Have This Part in Stock

The information in this article is provided for general reference and educational purposes only. Vehicle specifications, procedures, and part compatibility can vary by production date, trim level, and region. Always consult your vehicle's factory service manual and verify part numbers before purchasing or performing repairs. Safety-critical components such as airbags, seat belts, and braking systems should be installed by a qualified professional.
- Audi R8:
- 🎬 Helpful Videos
- 🛍️ Shop This Part
- Critical Compatibility Warning: Spyder Models Only
- Symptoms of a Failing Fender Moulding
- Buying a Used Quarter Panel Trim
- Inspection Checklist:
- Known Issues, TSBs, and Recalls
- Replacement Overview
- General Steps:
- Cost of Replacement
- Frequently Asked Questions (FAQ)
- 🎟️ Get 5% Off