

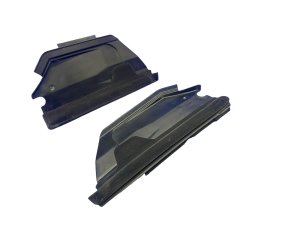
1999-2005 Porsche 911 (996) Rear Quarter Trim Panel: Fixing Rattles & Replacement
Your definitive guide to diagnosing annoying cabin noises, inspecting used panels, and replacing the rear interior side trim on 996 Carrera Coupe models.
- This panel is for Coupe models ONLY and will not fit Convertibles or Targas.
- The most common failure is rattling caused by broken plastic mounting clips on the back of the panel.
- When buying a used panel, the single most important check is to ensure all mounting clips and tabs are intact.
- Replacement is a complex DIY job, requiring the removal of the rear seats and other trim pieces.
Symptoms of a Failing Rear Trim Panel
Since this is a cosmetic panel, 'failure' doesn't mean the car won't run. Instead, failure relates to noises, appearance, and fit. The symptoms are often a major annoyance for owners of the 996-generation 911.
- Rattling or Creaking Noises: This is the most common complaint. Noises typically come from the rear seat or C-pillar area and are most noticeable on rough roads. The sound is usually caused by old, brittle plastic mounting clips breaking, allowing the panel to vibrate against the car's metal body or adjacent trim pieces.
- Visible Peeling or Stickiness: Many 996 interiors used a soft-touch coating on plastic panels. With age and exposure to heat and UV rays, this coating can degrade, becoming sticky to the touch or peeling away, revealing the shiny black plastic underneath.
- Cracked Plastic: The main body of the panel can become brittle over two decades. A panel may develop stress cracks, especially around the mounting points or speaker grille.
- Loose Fit: You may be able to physically move the panel with your hand, or see a noticeable gap between it and the window, headliner, or B-pillar trim. This is a clear sign of broken mounting clips.
Pro Tip: Before assuming a rattle is from the main panel, check the speaker grille. The two small screws holding it can loosen, causing a high-frequency buzz. Also, check that the rear seatbacks are securely latched; a loose seat can cause noises that sound like they're coming from the trim.
Buying a Used 996 Rear Quarter Trim Panel
A used OEM panel is often the only cost-effective replacement option, as new panels can be extremely expensive. Careful inspection is critical to getting a good part.
Step 1: Verify Vehicle Compatibility
Warning: These panels are for Coupe models only. They have a completely different shape and mounting system from the trim pieces found in 911 Convertible or Targa models. Do not purchase a panel from a convertible, as it will not fit.
Step 2: Inspect All Mounting Points (Most Important)
Flip the panel over. This is the most important part of your inspection. The panel is held in place by a series of plastic clips and integrated tabs that slot into the car's body. These clips are often white, yellow, or grey. Check that every single clip and tab is present and not cracked or broken. If even one or two are missing, the panel will not sit flush and will almost certainly rattle. Do not buy a panel with broken mounting points, as repairing them effectively is nearly impossible.
Step 3: Check the Cosmetic Condition
Closely examine the face of the panel under good light. Look for:
- Peeling: Check the edges and high-touch areas for any lifting or bubbling of the top surface material.
- Scratches and Gouges: Deep scratches in the plastic or leather are permanent.
- Stickiness: If the panel has the soft-touch coating, feel the surface to ensure it hasn't started to break down and become tacky.
Step 4: Match Your Interior Color and Material
The 996 was offered with several interior colors, including Black, Graphite Grey, Savannah Beige, and Boxster Red. Furthermore, cars could be optioned with standard plastic trim or a full leather interior, where these panels would be wrapped in leather. Ensure the color and material of the used panel are an exact match for your car's interior.
Replacement Guide Overview
Replacing the rear quarter trim panel is a time-consuming job that requires careful work to avoid breaking more plastic parts. It is considered moderately difficult for a DIYer due to the number of components that must be removed first.
- Installation Difficulty: 4 out of 5
- Estimated Time: 2-3 hours
A high-level overview of the process involves:
- Removing the rear seat bottoms (they typically pull straight up).
- Removing the rear seat backs (held by bolts at the bottom).
- Removing the lower B-pillar trim where the front seatbelt passes through.
- Removing the speaker grille from the quarter panel (usually two Torx screws).
- Removing a Phillips head screw located deep inside the seatbelt slot.
- Carefully prying the panel away from the body. Start at one edge and work your way around, using plastic trim removal tools to release the clips without scratching the panel.
Warning: The plastic on a 20+ year-old car is extremely brittle. The main panel clips, as well as clips on adjacent trim pieces, can break easily during removal. Work slowly and use proper plastic trim removal tools.
Known Issues, TSBs, and Recalls
There are no official recalls or Technical Service Bulletins (TSBs) from Porsche or the NHTSA related to these specific interior panels for the 1999-2005 Porsche 911. The common issues of rattling and material degradation are considered wear-and-tear items. The automotive community has extensively documented these problems and solutions on forums like Rennlist and Pelican Parts.
Cost Comparison
| Part Type | Estimated Cost |
|---|---|
| New OEM | $450 - $700+ per side |
| Used OEM | $75 - $250 per side |
| New Aftermarket | Not commonly available (only re-covering kits) |
| Shop Labor for Installation | $250 - $400 |
Frequently Asked Questions
Why is my Porsche 996 rattling from the rear of the cabin?
A rattle from the rear is very commonly caused by this interior quarter panel. The plastic mounting clips break over time, allowing the panel to vibrate against the car's chassis. Before replacing the panel, you can try applying felt tape to the contact points between the panel and the body to dampen the noise.
Is this part the same for a Coupe and a Convertible?
No. The part is completely different and not interchangeable. The panels described here (996543479 and 996543480) are for Coupe models only.
Can I just glue a broken mounting tab back on?
It is generally not recommended. The stress and vibration will likely cause the glued tab to break again quickly. A panel with all its original, intact mounting points is the only reliable and long-lasting solution to ensure a secure, rattle-free fit.
How can I fix a rattling panel without replacing it?
If the panel is rattling but the clips are not completely broken, you can remove it and apply strips of high-quality felt tape or foam to the back of the panel where it makes contact with the car's body. This can effectively cushion the panel and stop the noise. This is a popular DIY fix in the Porsche community.
Technical Specifications
| Specification | Value |
|---|---|
| Vehicle Fitment | 1999-2005 Porsche 911 (996 Generation) |
| Body Style | Coupe Only |
| OEM Part Number (Left) | 996543479 / 996.543.479 |
| OEM Part Number (Right) | 996543480 / 996.543.480 |
Technical Specifications
OEM Part Numbers: 996543479 996543480 99654347900 99654348000
Fits Coupe models only. Material can be standard plastic, soft-touch coated plastic, or leather-wrapped depending on vehicle options.
We Have This Part in Stock

The information in this article is provided for general reference and educational purposes only. Vehicle specifications, procedures, and part compatibility can vary by production date, trim level, and region. Always consult your vehicle's factory service manual and verify part numbers before purchasing or performing repairs. Safety-critical components such as airbags, seat belts, and braking systems should be installed by a qualified professional.
- Porsche 911:
- 🛍️ Shop This Part
- Symptoms of a Failing Rear Trim Panel
- Buying a Used 996 Rear Quarter Trim Panel
- Step 1: Verify Vehicle Compatibility
- Step 2: Inspect All Mounting Points (Most Important)
- Step 3: Check the Cosmetic Condition
- Step 4: Match Your Interior Color and Material
- Replacement Guide Overview
- Known Issues, TSBs, and Recalls
- Cost Comparison
- Frequently Asked Questions
- Technical Specifications
- 🎟️ Get 5% Off