

2008-2023 Dodge Challenger Fender: Standard vs. Widebody Fitment Guide
This guide covers the critical differences between standard and Widebody Challenger fenders, helping you avoid the most common and costly purchasing mistake.
- The most critical factor is fitment: standard body fenders and Widebody fenders are not interchangeable. Verify your model before buying.
- Used OEM fenders generally offer better fit and alignment than new aftermarket parts, but must be inspected for hidden damage and rust.
- Replacement is a manageable DIY task, with the main challenge being the careful alignment of panel gaps before final tightening.
- Expect to pay for painting, as new fenders come primered and used fenders rarely match perfectly.
Key Reasons for Replacement

Since fenders are exterior body panels, the most common reasons for replacement are due to physical damage rather than mechanical failure. This includes:
- Collision Damage: Dents, creases, and punctures from minor accidents are the primary reason for fender replacement.
- Rust/Corrosion: While not a widespread problem, rust can form, especially in areas where paint has been chipped or scratched. The lower edge near the rocker panel and the inner wheel arch are common spots to check. A Technical Service Bulletin (TSB) exists for aluminum panel corrosion on some models, which involves specific repair procedures.
- Poor Panel Gaps: Previous improper installation or damage can lead to misaligned fenders, creating uneven gaps with the hood, door, and bumper. Some owners have reported panel gap issues from the factory.
- Cosmetic Upgrades: Some owners may replace standard fenders with aftermarket versions to change the vehicle's appearance, though this guide focuses on OEM replacement.
Critical Compatibility Warning: Standard vs. Widebody Models
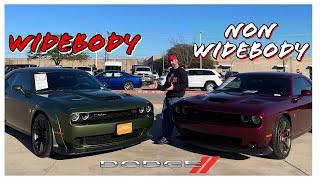
The single most important factor when purchasing a 2008-2023 Challenger fender is understanding the difference between a standard body and a Widebody. The two are NOT interchangeable.
- Standard Fenders: Fit the majority of Challenger models, including SXT, GT, R/T, and Scat Pack (non-Widebody).
- Widebody Fenders: Are significantly wider (adding 3.5 inches of total width) to accommodate larger wheels and tires. These are found on models like the R/T Scat Pack Widebody, SRT Hellcat Widebody, SRT Hellcat Redeye Widebody, and Demon. 🎬 Watch this comparison of Challenger Widebody vs standard models
A Widebody fender will not bolt onto a standard body car without extensive modifications to the bumper, fender liners, and potentially other components. Always verify which body style your vehicle has before ordering.
Buying a Used Fender: What to Check

A used OEM fender is often a better choice than a new aftermarket part because it guarantees correct fitment, material strength, and mounting points. However, inspect any used part carefully before buying.
Inspection Checklist:
- Verify Body Style: First and foremost, confirm it is for a standard body Challenger and not a Widebody. Widebody fenders have a pronounced flare and are visibly wider.
- Check for Hidden Repairs: Look for signs of previous bodywork. Run a small magnet along the surface; it won't stick to areas with thick body filler (Bondo). Check the back of the fender for sanding marks, overspray, or repair patches.
- Inspect All Mounting Points: Carefully check every hole and tab where the fender bolts to the car. Look for cracks, stress marks, or elongated holes, which can indicate past damage or a difficult installation. Pay special attention to the plastic rivet points used by Chrysler.
- Examine for Rust: Inspect the lower rear edge that meets the rocker panel and the inner lip that curves into the wheel well. Surface rust can often be treated, but deep or flaking rust is a major red flag.
- Confirm the Correct Side: Ensure you are buying for the correct side of the vehicle (LH for Driver Side, RH for Passenger Side).
Known Issues, TSBs, and Recalls

While there are no recalls specifically for the fender itself, some related issues and TSBs exist:
- TSB for Aluminum Corrosion: Technical Service Bulletin 31-001-25 REV. A addresses corrosion or bubbling on aluminum body panels, which can include fenders on some vehicles. It outlines a specific repair process involving grinding, sanding, and using an anti-corrosion pen.
- TSB for Paint Peeling: TSB 23-040-22 addresses paint peeling on the front bumper near the fender on certain models, requiring a specific repainting procedure. While not on the fender itself, it's a related cosmetic issue.
- No Major Recalls: Searches of the NHTSA database show numerous recalls for the Dodge Challenger, including for airbags, seatbelts, and instrument clusters, but none directly involve the fenders.
Cost Comparison for a Single Fender
Prices can vary based on your location, the part's condition, and whether it is pre-painted. Labor costs for painting and installation are a significant factor.
| Part Type | Estimated Cost (Part Only) | Notes |
|---|---|---|
| New OEM | $370 - $580 | Unpainted. Guarantees perfect fitment. Price varies by specific part number and dealer. |
| New Aftermarket | $150 - $400 | Often unpainted. Fitment can be inconsistent, potentially requiring more labor to align. |
| Used OEM | $150 - $400 | Can be a great value, especially if found in the correct color. Condition varies widely. |
| Shop Labor (Installation) | $150 - $300 | For installation only. Does not include painting. |
| Shop Labor (Paint & Match) | $200 - $500+ | Cost to paint a new or used fender to match your vehicle's color. |
Replacement Overview
Replacing a Dodge Challenger fender is a moderately simple job for a DIYer with basic tools. The most critical part of the process is achieving proper panel alignment with the door, hood, and bumper cover.
- Difficulty: 2.5 out of 5
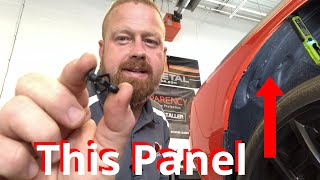
- Estimated Time: 1.5 - 2.5 hours (not including painting) 🎬 Watch how to remove a Challenger fender panel step by step
- Common Tools: Socket set (10mm is common), trim removal tools, hammer and straight pick (for plastic rivets), floor jack, and jack stands.
General Steps:
- Partially remove the front bumper cover fasteners to allow it to flex away from the fender.
- Remove the front wheel and the plastic fender liner to access bolts inside the wheel well.
- Open the door to access bolts located in the door jamb area.
- Under the hood, remove the bolts along the top edge of the fender.
- Some models use plastic rivets that must be carefully removed, often by driving the center pin out.
- With an assistant supporting the fender to prevent it from scratching the door, carefully detach it from the vehicle.
- When installing the new fender, loosely attach all bolts first. Align the panel gaps with the hood and door before fully tightening everything.
Pro Tip: When installing the new fender, use painter's tape on the edges of the door and bumper cover to prevent accidental scratches during alignment.
Frequently Asked Questions (FAQ)
How can I be 100% sure a fender will fit my Challenger?
First, verify if you have a standard or Widebody model. Widebody models (like Hellcat Widebody, Demon, Scat Pack Widebody) have large, obvious fender flares. Second, use your vehicle's VIN when ordering from a dealer or provide it to a used parts seller to confirm compatibility. OEM part numbers have suffixes (e.g., AB, AC, AD) that denote revisions, but later versions are typically backward compatible.
Is a used OEM fender better than a new aftermarket one?
Often, yes. A used OEM fender is made from the same tooling as your car's original parts, ensuring a much better fit. Aftermarket fenders can have issues with body lines not lining up perfectly, which requires more labor to correct. However, a used fender must be inspected carefully for hidden damage or rust.
Do I have to paint a replacement fender?
Unless you find a used fender in the exact same color and in perfect condition, yes. New fenders, both OEM and aftermarket, are typically shipped with only a black primer (e-coat) and must be painted to match your car and protect the steel from rust.
Is replacing a fender a difficult DIY job?
For someone with basic mechanical skills, it is a manageable project. The process involves removing the wheel, fender liner, and several bolts. The most challenging part is not the unbolting, but carefully aligning the new panel to ensure even gaps with the surrounding body panels.
Helpful Videos
Technical Specifications
OEM Part Numbers: 04816164AB 4816164AC 4816164AD 4816164AE 4816164AF 4816164AG 4816164AH 68174998AB 68660686AA 04816165AB 4816165AC 4816165AD 4816165AE 4816165AF 4816165AG 4816165AH 68174999AB 68275471AA 68660687AA
Material: High-grade steel. Finish: Primed (e-coat), requires painting. Note: Part numbers ending in '4' (e.g., 4816164xx) are typically for the right/passenger side, while those ending in '5' (e.g., 4816165xx) are for the left/driver side. Letter suffixes (AB, AC, etc.) indicate revisions.

The information in this article is provided for general reference and educational purposes only. Vehicle specifications, procedures, and part compatibility can vary by production date, trim level, and region. Always consult your vehicle's factory service manual and verify part numbers before purchasing or performing repairs. Safety-critical components such as airbags, seat belts, and braking systems should be installed by a qualified professional.
- Dodge Challenger: