

2015-2020 Ford F-150 Window Switch: Why They Fail and How to Buy the Right One
This guide covers common failures, troubleshooting steps, and the critical details you need to know to find a compatible replacement master window switch for your F-150.
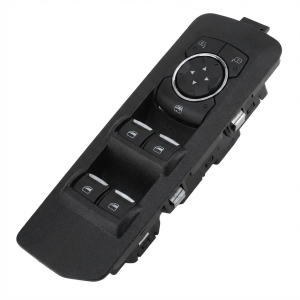
- Compatibility is critical. You must visually match your original switch's button layout, especially for features like power-folding mirrors.
- Before replacing a completely dead switch, always check Fuse #25 (30A) in the passenger footwell fuse box first.
- Failure is often caused by water intrusion from known leak points in the F-150, such as the A-pillars or sunroof drains.
- Replacement is a very easy DIY job that takes less than 15 minutes and only requires a trim tool and a T10 Torx driver.
Symptoms of a Failing 2015-2020 F-150 Window Switch
When the master window switch begins to fail, the symptoms can range from a minor annoyance to a complete loss of function. Because the switch controls multiple components, a failure can be confusing. Here are the most common signs, from most to least common:
- One or More Windows Stop Working: You might find that the driver's window works, but you can't control the passenger window, or that the front windows work but the rears do not. If a single window doesn't work from the master switch but works from its own door switch, the master switch is the likely culprit.
- Complete Failure: The entire switch panel may appear dead. None of the window or power mirror buttons will respond. In this case, it's critical to check the fuse first before replacing the switch.
- Intermittent Operation: The buttons may work one moment and not the next. This can be caused by failing internal contacts and often gets worse over time.
- Power Mirrors Unresponsive: Since the power mirror controls are integrated, a failing switch can prevent you from adjusting one or both side mirrors.
- Broken Buttons: The plastic rocker switches themselves can physically break from use, making it impossible to operate a window.
Pro Tip: Before you buy a new switch, check Fuse #25 (a 30A fuse) in the fuse box located in the passenger footwell area. This fuse protects the Driver Door Module (DDM), which powers the switch. If this fuse is blown, the entire switch panel will be dead. This simple check can save you time and money.
Known Issues: Water Intrusion
A leading cause of electrical problems in the 2015-2020 F-150, including window switch failure, is water intrusion. Several owners report water leaking into the cabin, particularly around the A-pillars (the pillars on either side of the windshield). This moisture can travel down into the door wiring and damage electronic modules like the master window switch.
Ford has issued Technical Service Bulletins (TSBs) for similar water leak issues, such as TSB 15-0081, which addresses leaks at the A-pillars or windshield seal on 2015 models. Leaks from clogged panoramic sunroof drains are also a known issue that can cause water to enter the cabin and affect electronics. If you are replacing a failed switch, it is wise to inspect the area around the A-pillar and the door's weather seal for any signs of moisture to prevent repeat failures.
Buying a Used Door Window Switch: A Buyer's Guide
Purchasing a used OEM window switch is a smart way to save money, as they are significantly cheaper than new dealer parts and often more reliable than low-quality aftermarket alternatives. However, careful verification is essential.
1. Confirming Compatibility (The Most Important Step)
Ford produced several versions of this switch. Installing the wrong one can result in intermittent function or non-working buttons. To ensure you get the right part, you must match your original switch exactly.
- Cab Configuration: The most basic difference is between a 2-door Regular Cab and a 4-door SuperCab or SuperCrew. A 4-door truck will have a switch with four window buttons.
- Power-Folding Mirrors: Higher trim levels like Lariat, King Ranch, and Platinum often feature power-folding mirrors. Switches for these trucks have an extra button to fold and unfold the mirrors. Carefully compare the button layout in the product photos to your original switch.
- Telescopic Trailer Mirrors: Some trucks are equipped with power-telescoping trailer tow mirrors, which use a different switch variation.
Warning: Do not rely on part numbers alone. While the service part number is often FL3Z-14529-BA, there are multiple variations under this and other numbers like FL3Z-14529-DA. The only way to guarantee fitment is to visually match the button configuration and, if possible, the engineering number printed on the sticker of your original switch (it will look something like FL3T-14B133-AEW).
2. Physical Inspection
When inspecting a used switch, check for the following:
- Button Feel: Press each button. They should have a solid, tactile click for both up and down positions. Mushy or sticky buttons are a red flag.
- Physical Damage: Look for cracks in the housing or broken rocker switches. Ensure the white graphics on the buttons are not excessively worn off.
- Connector Pins: Check the electrical connector pins on the back. They should be straight, clean, and free of any green or white corrosion, which would indicate water damage.
Cost Comparison: New vs. Used F-150 Window Switch
The cost for a driver's master window switch can vary significantly depending on the source.
| Part Type | Estimated Price Range |
|---|---|
| New OEM (Dealer) | $88 - $142 |
| New Aftermarket | $55 - $80 |
| Used OEM (Recycled) | $35 - $60 |
| Shop Labor Cost | $50 - $80 |
How to Replace the Driver's Door Window Switch (DIY Guide)
Replacing the master window switch is a simple DIY job that usually takes less than 15 minutes and requires minimal tools.
- Difficulty: 1/5 (Beginner)
- Tools Required: Plastic trim removal tool, T10 Torx driver.
Step-by-Step Instructions:
- Pry Up the Bezel: Using a plastic trim removal tool to avoid scratching the door panel, carefully pry up the trim piece that holds the switch. Start from the back (near the rear of the door) and work your way forward.
- Disconnect the Connector: Once the bezel is loose, lift it up and locate the electrical connector on the underside of the switch. Press the release tab and pull the connector straight out.
- Remove the Switch: Turn the bezel over. You will see three T10 Torx screws holding the switch module to the bezel. Remove these screws. The old switch will now come free.
- Install the New Switch: Place the new switch into the bezel and secure it with the three T10 Torx screws. Do not overtighten.
- Reconnect and Test: Plug the electrical connector back into the new switch until it clicks. Before snapping the bezel back into place, turn the ignition to the 'On' position and test all window and mirror functions.
- Reinstall the Bezel: Align the front tabs of the bezel with the slots in the door panel, then press down firmly on the rear until it snaps securely into place.
Frequently Asked Questions (FAQ)
My window goes all the way up and then comes back down a few inches. Is the switch bad?
This is a common issue known as "bounce-back" and it is usually not caused by a bad switch. It means the window's auto-reverse system needs to be reset. This often happens after the battery has been disconnected or has a low charge. To fix it, roll the window all the way down, then roll it all the way up and hold the switch in the 'up' position for 3-5 seconds after it closes. This recalibrates the motor.
Do I need to program a new window switch?
No, the switch itself does not require programming. It is a plug-and-play part. However, after installation, you may need to perform the window reset procedure described above to restore the "auto up/down" functionality.
Why do only my rear windows work from the master switch?
This indicates a partial failure inside the switch module. The internal circuits for the front windows have likely failed, while the circuits for the rear windows are still functional. The only solution is to replace the entire switch assembly.
Is it better to buy a used OEM switch or a new aftermarket one?
For a part with complex electronics like this, a used OEM switch is often a better choice. OEM parts are built to Ford's specific standards and have undergone rigorous testing. While some high-quality aftermarket parts exist, many cheaper versions are known for premature failure or causing intermittent issues. A used OEM switch provides factory quality at a lower price point.
Technical Specifications
OEM Part Numbers: FL3Z-14529-BA FL3Z-14529-DA FL3Z-14529-AC FL3Z-14529-CB FL3T-14B133-AEW
Varies by vehicle options (Regular Cab/SuperCrew, Power-Fold Mirrors, Telescopic Mirrors). Requires visual confirmation.
We Have This Part in Stock



The information in this article is provided for general reference and educational purposes only. Vehicle specifications, procedures, and part compatibility can vary by production date, trim level, and region. Always consult your vehicle's factory service manual and verify part numbers before purchasing or performing repairs. Safety-critical components such as airbags, seat belts, and braking systems should be installed by a qualified professional.
- Ford F-150:
- 🛍️ Shop This Part
- Symptoms of a Failing 2015-2020 F-150 Window Switch
- Known Issues: Water Intrusion
- Buying a Used Door Window Switch: A Buyer's Guide
- 1. Confirming Compatibility (The Most Important Step)
- 2. Physical Inspection
- Cost Comparison: New vs. Used F-150 Window Switch
- How to Replace the Driver's Door Window Switch (DIY Guide)
- Frequently Asked Questions (FAQ)
- 🎟️ Get 5% Off