

2016-2020 Jaguar XF Dashboard Trim: Fixing Rattles, Matching Finishes, and Replacement
This guide covers the common issues with the 2016-2020 Jaguar XF dashboard trim, focusing on how to fix rattles, verify the correct 'Morse Code' aluminum finish, and inspect a used part before buying.
- Compatibility is critical. You must match the 3-character 'TRIM' code from the sticker in the driver's door jamb to ensure the 'Morse Code' finish matches.
- When buying used, the most important inspection is to check that all plastic mounting tabs on the back of the part are present and intact.
- Rattles are a common issue and can often be traced to a loose trim piece, which can sometimes be fixed with foam tape or silicone.
- Be aware of a major safety recall (NHTSA 17V-678) for the digital instrument cluster on 2016-2018 models, which can go blank while driving.
Symptoms of Failing Dashboard Trim
Failure of the dashboard trim is typically not a mechanical breakdown but rather a cosmetic or fitment issue. Owners are most likely to notice audible or visual problems.
- Rattling or Buzzing Sounds: The most common complaint is a persistent rattling, creaking, or buzzing noise coming from the dashboard area, especially when driving on uneven roads. This is often caused by a trim piece that has a broken mounting clip or has worked itself loose over time, allowing it to vibrate against adjacent panels.
- Visible Scratches or Peeling: The surface of the trim, particularly aluminum finishes, can be susceptible to deep scratches or gouges from keys, bags, or jewelry. Over time, the protective clear coat may begin to peel or delaminate, creating a cloudy or flaky appearance.
- Loose Fit or Gaps: You may notice that a piece of trim is no longer sitting flush with the rest of the dashboard. This can manifest as an uneven gap, or the part may feel loose to the touch. This is almost always due to one or more broken or disengaged mounting clips.
- Damaged Air Vents: Since many trim pieces have integrated air vents, a failure can include broken vent louvers that no longer direct air properly or a damaged adjustment mechanism.
Known Issues, TSBs, and Recalls
While there are no specific recalls for the aluminum dashboard trim itself, owners of the 2016-2020 Jaguar XF should be aware of several related dashboard issues.
Instrument Cluster Recall: NHTSA 17V-678
A significant safety recall was issued for some 2016-2018 Jaguar XF models equipped with the virtual instrument cluster. The Thin Film Transistor (TFT) screen could intermittently go blank while driving, causing the loss of critical information like the speedometer. The fix involves a software update performed by a Jaguar dealer. While not a trim issue, it is a critical dashboard-related problem for this vehicle generation.
Dashboard Rattles and Creaks
Rattles are a common complaint among XF owners. While a loose trim piece is a likely cause, noises can also come from loose wiring harnesses behind the dash or contact between panels in the vehicle's underlying structure (bulkhead). A Technical Service Bulletin (JTB00604NAS) was issued for the related Jaguar F-Pace for a creak caused by bulkhead panel contact, which requires a specific procedure to fix and could be misdiagnosed as a simple trim rattle.
Leather Dashboard Shrinking and Bubbling
Many Jaguar XF models, particularly from the previous generation but still relevant, suffer from an issue where the leather dashboard covering shrinks and pulls away from the windshield, causing bubbles and waves. This is caused by heat and sun exposure breaking down the original bonding agent. While this article focuses on the aluminum trim, it's a widespread, well-documented dashboard issue for the XF model line that owners should be aware of as a sign of potential sun damage to all interior components.
Pro Tip: To help prevent sun damage to your dashboard and trim, consider using a quality windshield sunshade, especially if the car is parked outside for long periods in hot climates.
Buying a Used Dashboard Trim: What to Inspect
Buying a used OEM trim piece is an excellent way to save money, but careful inspection is key to getting a quality part. Aftermarket copies of specific, high-end trim finishes like 'Morse Code' aluminum are virtually nonexistent, making used OEM the best choice over a new dealer part.
1. Verify Compatibility: The Trim Code is Crucial
Jaguar offered several interior trim options for the XF, including different wood veneers and aluminum finishes like 'Morse Code' and 'Dark Hex'. Simply buying a part that 'looks close' is a recipe for a mismatched interior. You must verify the exact trim package your vehicle has.
To do this, locate the vehicle identification sticker on the driver's side door jamb. On this sticker, you will find a three-character code labeled 'TRIM'. This code specifies your car's exact interior color and trim combination. When buying a used part, ensure the donor vehicle has the same trim code.
2. Physical Inspection Checklist
Once you've confirmed the trim code matches, physically inspect the part for the following:
- All Mounting Tabs Intact: This is the most critical check. Flip the trim piece over and inspect every single plastic mounting tab and clip receiver. Look for any that are broken, cracked, or show white stress marks. The initial part data for this guide noted a broken tab, which is a common issue. While a single broken tab on a large piece with many mounting points might be acceptable, a broken key tab can prevent the part from sitting flush and lead to rattles.
- Surface Finish and Clear Coat: Examine the face of the trim under good light. Look for deep scratches or gouges that your fingernail catches on. For aluminum parts, check for any signs of the clear coat peeling or bubbling, which can appear as cloudy spots.
- No Cracks or Bends: Flex the part gently to check for any hidden cracks. Ensure the piece is not bent or warped, which could indicate it was removed improperly or stored incorrectly.
- Air Vent Operation: If the trim piece includes air vents, operate the louvers and directional controls. They should move smoothly without sticking or feeling loose and floppy.
Cost Comparison: New vs. Used
Replacing a piece of dashboard trim can vary widely in cost depending on the source of the part. Labor costs are generally low if it's an easily accessible piece.
| Part Source | Estimated Cost | Notes |
|---|---|---|
| New OEM | $150 - $400+ | Price from a Jaguar dealership. Varies by specific trim piece. Can be very expensive. |
| Used OEM | $50 - $150 | Obtained from a recycled vehicle. Offers the best value, providing a genuine part at a significant discount. |
| New Aftermarket | Not Generally Available | Specific, patterned interior trim pieces are rarely replicated by aftermarket manufacturers. |
| Shop Labor | $75 - $225 | Typically 0.5 to 1.5 hours of labor. A professional shop will have the right tools to avoid breaking clips. |
Dashboard Trim Replacement Overview
Replacing a section of dashboard trim is a manageable DIY job for those with patience and the right tools. The entire dashboard does not need to be removed for most individual trim pieces.
- Difficulty: 2/5 (Easy to Moderate)
- Estimated Time: 0.5 - 1.5 hours
- Required Tools: Plastic trim removal tool kit, possibly a Torx screwdriver set (T20/T25).
The general process involves using plastic pry tools to carefully release the metal clips holding the trim piece to the dashboard. Some pieces may also be secured by hidden Torx screws, often located after removing an adjacent part like a vent or another trim piece. Always start by prying gently from an edge. If you meet heavy resistance, stop and look for a screw you may have missed. When installing the new piece, line up all the clips and press firmly and evenly until each one clicks into place.
Warning: Never use a metal screwdriver or other hard tool to pry on dashboard pieces. You will permanently damage or scratch the trim and the surrounding soft-touch dashboard material.
Frequently Asked Questions (FAQ)
How do I fix a rattling dashboard trim piece?
First, identify the exact source of the rattle by pressing on different areas of the dash while driving (have a friend help). If it's a trim piece, you can try to remove it and apply small pieces of felt or foam tape to the contact points. Some owners have also had success applying a small amount of clear silicone to the clips to dampen vibrations before reinstalling.
Can I install a different trim finish, like wood instead of aluminum?
Yes, it is physically possible to swap your 'Morse Code' aluminum trim for a wood or Dark Hex set. However, to maintain a consistent look, you would need to replace all the corresponding trim pieces throughout the cabin, including on the doors and center console. This can be a costly and time-consuming project.
Is a used trim piece with one broken mounting tab still usable?
It depends on the location of the tab. If the piece has 8-10 mounting points and the broken tab is in the middle, it will likely still mount securely. However, if the broken tab is on a corner or is one of only a few key locating tabs, the part may not sit flush and will probably rattle. It's always best to find a part with all tabs intact.
How should I clean the 'Morse Code' aluminum trim?
Use a high-quality microfiber towel with a gentle interior cleaning spray. Never use abrasive cleaners, polishes, or rough paper towels, as these can easily scratch the clear coat and dull the finish. Spray the cleaner onto the towel, not directly onto the dash, to avoid getting liquid into electronics.
Technical Specifications
OEM Part Numbers: GX63046A63B GX63-046A63-BC T2H5522
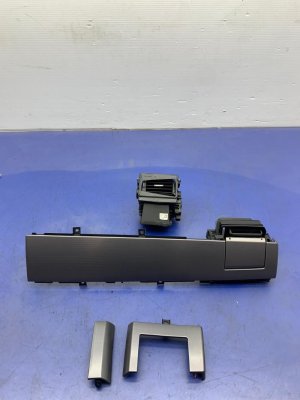
Finish: 'Morse Code' Aluminum. Part of a 4-piece dashboard and vent set.
We Have This Part in Stock

The information in this article is provided for general reference and educational purposes only. Vehicle specifications, procedures, and part compatibility can vary by production date, trim level, and region. Always consult your vehicle's factory service manual and verify part numbers before purchasing or performing repairs. Safety-critical components such as airbags, seat belts, and braking systems should be installed by a qualified professional.
- Jaguar XF:
- 🛍️ Shop This Part
- Symptoms of Failing Dashboard Trim
- Known Issues, TSBs, and Recalls
- Instrument Cluster Recall: NHTSA 17V-678
- Dashboard Rattles and Creaks
- Leather Dashboard Shrinking and Bubbling
- Buying a Used Dashboard Trim: What to Inspect
- 1. Verify Compatibility: The Trim Code is Crucial
- 2. Physical Inspection Checklist
- Cost Comparison: New vs. Used
- Dashboard Trim Replacement Overview
- Frequently Asked Questions (FAQ)
- 🎟️ Get 5% Off