

2023-2026 Genesis GV60 Dashboard Air Vent Guide: Rattles, Failures, and Replacement
An in-depth look at the common failure points of the GV60's dashboard air vents, what to inspect on a used part, and how to handle replacement.
- The most common failure symptoms are rattling noises and broken or stuck louvers.
- Replacement requires careful removal of large dashboard trim panels, making it an intermediate-level DIY job.
- When buying a used part, it is critical to inspect all mounting tabs for damage and to match the OEM part number exactly, including any color-code suffixes.
- No specific recalls or TSBs have been issued for the GV60 air vent assemblies, indicating failures are not a widespread, systemic problem.
Symptoms of a Failing Dashboard Air Vent Assembly
A failing air vent in a Genesis GV60 can range from a minor annoyance to a noticeable functional problem. Because some vents are electronic, symptoms can be more complex than simple physical breakage.
- Rattling or Buzzing Noises: The most common complaint for many modern vehicles is rattling from the dashboard area. This can be caused by loose internal components within the vent assembly, a broken mounting tab, or interference with other dash components. The noise may be constant or only appear when driving over rough surfaces.
- Stuck or Broken Louvers: The adjustable slats (louvers) that direct airflow can become stiff, difficult to move, or break entirely. This is often due to physical damage, such as from an air freshener or phone mount clipped to the vent.
- Failure to Open/Rotate: For motorized vents, a failure in the small electric motor or its wiring can cause the vent to remain stuck in the closed position when the vehicle is started. This prevents airflow from that vent entirely.
- Weak Airflow: Even if the fan is blowing hard, a blockage within the vent assembly itself or a louver that has broken and fallen into the duct can restrict airflow. This is different from a system-wide airflow issue, which is more likely related to a clogged cabin air filter.
- Visible Damage: Cracks in the vent housing, broken trim pieces, or missing louvers are clear signs that the assembly needs replacement.
Known Issues, TSBs, and Recalls for 2023-2026 Genesis GV60
As a relatively new vehicle, the Genesis GV60 does not have a long history of widespread, specific failures related to its dashboard air vents. Searches for recalls and Technical Service Bulletins (TSBs) did not reveal any issues specifically targeting the air vent assemblies themselves.
- Recalls: There are recalls for the 2023-2026 GV60, but they pertain to other components like the instrument panel display software, rear driveshafts, and windshield molding. None of these directly involve the physical air vent assemblies.
- Technical Service Bulletins (TSBs): Genesis has issued TSBs for issues like seat track play, battery management software, and connectivity problems, but none were found that specifically address air vent failures or noises.
- Owner Complaints: Forum discussions and owner complaints sometimes mention general dashboard rattles or creaking noises, which can be difficult to pinpoint. These are not always traced back to the vent assembly but are a possibility. Some owners have reported rattles from the headliner or trunk area. 🎬 Watch: Owner discusses common Genesis GV60 quality issues
Pro Tip: When diagnosing a dashboard rattle, try gently pressing on various trim pieces, including the air vent surrounds, while the noise is occurring. If pressing on the vent assembly stops the noise, you have likely found the source.
Buying a Used GV60 Dashboard Air Vent Assembly
Purchasing a used OEM air vent assembly is an excellent way to save money over a new part from the dealer. However, careful inspection is key to getting a good part.
What to Inspect Before You Buy
- Check All Mounting Tabs: This is the most critical inspection point. The assembly is held in the dashboard by a series of plastic tabs. If even one is cracked or broken, the vent may not sit securely and will likely rattle.
- Verify Part Numbers: The GV60 has several different vent assemblies for left, right, and center positions. Part numbers like 84782-CU100-JW9 and 84790-CU100 are specific to a certain location and color. Always match the part number from your old vent to the replacement part exactly. The suffix (e.g., JW9) often denotes the color code, which is important for matching your interior trim.
- Inspect the Louvers: Gently move the louvers with your finger. They should move smoothly and hold their position. Check that the small wheel or tab used for adjustment is present and functional. Ensure none of the individual slats are missing or broken.
- Examine the Electrical Connector: For motorized vents, inspect the electrical connector and any visible wiring for damage. The pins should be straight and free of corrosion.
- Ask About the Donor Vehicle: If possible, find out the mileage of the vehicle the part came from. A part from a low-mileage vehicle is always preferable.
Cost Comparison
Prices for a complex, model-specific part like the GV60 air vent can be high, especially from a dealer. This makes a used OEM part a compelling value.
| Part Type | Estimated Cost |
|---|---|
| New OEM | $1,400 - $2,100+ |
| New Aftermarket | Not Widely Available |
| Used OEM | $150 - $400 |
| Shop Labor | $200 - $400 |
Note: Prices are estimates and can vary based on supplier, location, and the specific vent being replaced. Labor costs can be higher if significant dashboard disassembly is required.
Replacement Overview (Difficulty: 3/5)
Replacing a dashboard air vent on a modern vehicle like the GV60 is an intermediate-level job that requires patience and the right tools to avoid damaging the surrounding dashboard trim.
Warning: Before beginning any work, disconnect the vehicle's 12V battery. The dashboard contains sensitive electronics and airbag modules. Accidentally triggering an airbag can cause serious injury.
General Steps:
- Remove Surrounding Trim: Using plastic trim removal tools is essential to avoid scratching or cracking the dashboard panels. The process typically involves prying off side panels, the main decorative fascia across the dash, and potentially parts of the center console or instrument cluster surround.
- Disconnect Electrical Connectors: Once you have access, carefully disconnect any electrical connectors attached to the back of the vent assembly. These connectors will have small release tabs that must be pressed.
- Unfasten the Old Vent: The vent assembly is usually held in by screws or clips. Remove the fasteners and carefully pull the old assembly out of the dashboard.
- Install the New Vent: Position the replacement assembly and secure it with the original fasteners. Reconnect the electrical connector and test its function (if motorized) before reassembling the dashboard.
- Reassemble Dashboard: Carefully reinstall all trim panels in the reverse order of removal, ensuring all clips snap securely into place.
Frequently Asked Questions
Can I replace just a single broken louver or adjustment tab?
No, the air vent is sold as a complete assembly. The individual louvers and adjustment mechanisms are not typically available as separate service parts. You will need to replace the entire vent unit.
Do I need to program the new vent after installation?
No, the dashboard air vent assemblies are typically plug-and-play components. They do not require any special programming or calibration after being installed. The vehicle's climate control module will operate them automatically.
Is a rattling air vent a safety concern?
Generally, no. A rattling vent is an annoyance but does not pose a direct safety risk or affect the vehicle's drivability. However, if a piece of the vent breaks off and falls into the HVAC ducting, it could potentially impede the function of a blend door actuator over time, but this is rare.
Why are new OEM vents for the GV60 so expensive?
The high cost is due to the complexity of the part. The assemblies often include integrated electronics for motorized operation, specific color and trim finishes to match the luxury interior, and a design unique to the GV60 model. This complexity, combined with lower production volumes compared to a mass-market car, drives up the price.
Helpful Videos

Technical Specifications
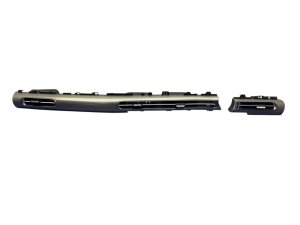
OEM Part Numbers: 84782-CU100-JW9 84790-CU100 84787-CU100-JW9 84782-CU000-JW5 84787-CU000-JW5
Varies by part number. Assemblies are specific to location (left, right, center) and may include electronic motors for automated rotation. Color codes are often included in the part number suffix.
We Have This Part in Stock

The information in this article is provided for general reference and educational purposes only. Vehicle specifications, procedures, and part compatibility can vary by production date, trim level, and region. Always consult your vehicle's factory service manual and verify part numbers before purchasing or performing repairs. Safety-critical components such as airbags, seat belts, and braking systems should be installed by a qualified professional.
- Genesis GV60:
- 🎬 Helpful Videos
- 🛍️ Shop This Part
- Symptoms of a Failing Dashboard Air Vent Assembly
- Known Issues, TSBs, and Recalls for 2023-2026 Genesis GV60
- Buying a Used GV60 Dashboard Air Vent Assembly
- What to Inspect Before You Buy
- Cost Comparison
- Replacement Overview (Difficulty: 3/5)
- General Steps:
- Frequently Asked Questions
- 🎟️ Get 5% Off