

2018-2023 Wrangler & 2020-2023 Gladiator Console Panel: Fixing Dead USB Ports & Window Switches
This guide covers common failures, part numbers, and step-by-step replacement for the central switch panel and media hub in your Jeep Wrangler JL or Gladiator JT.
- The most common failure is the USB media hub, causing intermittent CarPlay/Android Auto. This is addressed by TSB 08-020-24, which points to a faulty internal cable.
- Before buying a used panel, you MUST verify it matches your vehicle's configuration (with or without the optional factory auxiliary switches).
- Diagnose simple issues first: always check fuses (e.g., F11, F105) and try a different, high-quality USB cable before assuming the hardware is bad.
- Replacement can be simple (media hub only) or complex (full console removal). The TSB repair requires removing the entire center console to replace the faulty USB cable.
Symptoms of a Failing Control Console Switch Panel
Failures in this panel can manifest in several ways, from minor annoyances to a complete loss of function for multiple components. The issues are almost always electrical in nature.
1. Intermittent or Dead USB Ports (Media Hub Failure)
This is the most widely reported problem with this assembly. You may find that Apple CarPlay or Android Auto disconnects randomly, or the USB ports fail to charge your device. Often, the connection drops when the vehicle hits a bump or when the phone cable is wiggled. In many cases, the ports may stop working entirely. This issue is so common that it prompted a Technical Service Bulletin (TSB).
2. Inoperative Power Window Switches
One or more power window switches may become unresponsive. This can happen to a single switch or all of them at once. Sometimes, this is part of a larger electrical issue where the entire center stack of buttons blinks or becomes non-functional. Before assuming the switch panel is bad, it's wise to check the related fuses.
3. 12V Power Outlet Not Working
The 12-volt "cigarette lighter" style power outlet may stop providing power. This circuit is fused separately from the USB ports, so it's possible for it to fail on its own. The cause is typically a blown fuse or a failure of the outlet itself.
Pro Tip: Before replacing any parts, always check the fuses first. A flickering center stack or multiple simultaneous failures can sometimes be resolved by pulling and resetting the appropriate fuse, such as the F105 (10A) fuse for the ICS/HVAC module.
Known Issues, Recalls, and Technical Service Bulletins (TSBs)
While there are no recalls specifically for the switch panel itself, there is a critical TSB that addresses the most common failure point.
TSB 08-020-24: Intermittent Floor Console USB Port
This TSB directly addresses complaints of Apple CarPlay/Android Auto not working or intermittently connecting when a device is plugged into the media hub. The bulletin applies to both the 2018-2023 Jeep Wrangler and 2020-2023 Jeep Gladiator.
- Cause: The official cause is a "misfit USB cable" that runs from the back of the media hub, through the center console, to a connection point under the passenger seat. This cable is prone to failure, causing the unreliable connection.
- Solution: The official repair is to replace this internal USB cable (Part Number 68658437AA). This is not a simple fix, as it requires the complete removal of the center console to access and route the new cable. The flat-rate labor time for this repair is 0.9 hours.
- Owner Experience: Some owners have reported that even after the TSB repair was performed by a dealer, the problem persisted, suggesting that the media hub module itself can also be a point of failure.
Buying a Used Control Console Switch Panel: A Buyer's Guide
A used OEM panel can be a cost-effective solution, but careful inspection is key to avoiding common pitfalls.
1. Verify Compatibility: Auxiliary Switches are Key
This is the most important step. Jeep offered an optional factory auxiliary switch bank (a row of four switches for accessories like off-road lights) that replaces the small storage cubby on the panel. This guide and the associated part are for models WITHOUT the factory auxiliary switches. Before buying, confirm the seller's photos match your vehicle's configuration. A panel with auxiliary switches has a completely different wiring harness and will not be a direct swap.
2. Physical Inspection Checklist
- Button Action: Press each window switch. They should have a solid, tactile click without feeling sticky or loose.
- Port Condition: Look inside the USB and AUX ports. Check for bent pins, corrosion, or debris. The ports should be clean and the surrounding plastic free of cracks.
- Mounting Tabs: Inspect the back of the panel for any broken plastic clips or mounting tabs. These are essential for a secure, rattle-free installation.
- Cosmetic Wear: Check for deep scratches or worn-off button graphics, which can indicate heavy use.
3. The USB Cable Risk
Be aware that a used panel assembly will likely come with the original, failure-prone internal USB cable. If you are buying a used part to solve an intermittent CarPlay issue, you may be buying the same problem. For this specific issue, it may be better to purchase a new OEM media hub module separately or be prepared to perform the TSB and replace the internal cable yourself.
4. Why Used OEM is a Good Choice
For a part like this, a used OEM panel is often superior to a cheap, new aftermarket one. The fit, finish, and color of the plastic will perfectly match your Jeep's interior, which is not always the case with aftermarket parts. Furthermore, the switchgear and electronics are built to factory standards, ensuring proper communication with the vehicle's body control module.
Cost to Replace the Control Console Switch Panel
Costs can vary depending on which component has failed and whether you do the work yourself.
| Part/Service | Estimated Cost | Notes |
|---|---|---|
| New OEM Media Hub Module | $105 - $150 | Part only (e.g., Mopar 68505684AA). This is often all that's needed for USB issues. |
| New OEM Full Switch Panel | $170 - $220 | Part only, includes window switches. |
| New Aftermarket Switch Panel | $160 - $180 | From brands like Duralast or Dorman. Fit and color match may not be perfect. |
| Used OEM Panel/Hub | $75 - $150 | Price varies by condition and source. Carries the risk of having the same USB cable fault. |
| Shop Labor (Media Hub Only) | $50 - $100 | A quick job, typically less than an hour of labor. |
| Shop Labor (Full Console Removal) | $100 - $200 | Required for TSB cable replacement or full panel swap. |
Step-by-Step Replacement Guide
The replacement difficulty depends entirely on what you need to replace. Swapping just the media hub is easy, while replacing the whole panel or the TSB cable requires removing the entire center console.
Difficulty Level 2/5: Replacing the Media Hub Only
This procedure is for when you suspect the USB/AUX module itself is faulty. It takes about 15-30 minutes.
- Pry off the HVAC control panel: Using a plastic trim removal tool, carefully pry around the edges of the climate control panel that sits directly above the switch panel. It is held in by clips.
- Remove the retaining screw: With the HVAC panel out of the way, you will see a single fastener (often a 7mm screw) at the top of the media hub assembly. Remove it.
- Remove the media hub: The hub can now be pulled out. It is held by four clips, so you may need to use your trim tool to gently pry it forward.
- Disconnect and swap: Unplug the electrical connectors from the back of the old hub, plug them into the new one, and slide the new hub into place until it clicks.
- Reassemble: Re-install the retaining screw and snap the HVAC control panel back into place.
Difficulty Level 3/5: Full Center Console Removal
This procedure is required to replace the entire switch panel assembly or to perform the USB cable replacement outlined in TSB 08-020-24. It takes about 1-1.5 hours.
- Remove shift knobs: Pull up the leather boot around the main gear shifter and the 4WD shifter. Use a T25 Torx driver to loosen the set screw on the side of each knob, then pull the knobs straight up and off.
- Remove trim and bolts: Use a trim tool to pop off the plastic trim piece around the shifter base. Then, locate and remove the four 10mm bolts holding the console down: two at the front near the footwells and two at the rear. You will need to slide the front seats to access all of them.
- Lift and disconnect: You can now lift the entire center console up and back. Be careful, as several wires are still attached.
- Unplug connectors: Reach under the passenger side of the lifted console and unplug the three electrical connectors for the switch panel and media hub.
- Remove the console: The console can now be fully removed from the vehicle, giving you access to the switch panel and the USB cable for replacement.
- Installation: Installation is the reverse of removal. Be sure to reconnect all electrical plugs before bolting the console back down.
Frequently Asked Questions (FAQ)
Can I upgrade my standard panel to one with the factory auxiliary switches?
This is a complex upgrade. The auxiliary switch panel requires a different wiring harness, a power distribution module under the hood, and likely programming changes to the vehicle's computer. While aftermarket kits exist to add switches, simply swapping the OEM panel is not a plug-and-play process.
Do I need to disconnect the battery to replace the switch panel?
It is always a best practice to disconnect the negative battery terminal before working on any vehicle electronics to prevent accidental shorts. While the replacement can be done without it, disconnecting the battery is the safest method.
Why do my USB ports fail but the window switches and 12V outlet still work?
This is because they are largely separate systems within the same housing. The USB media hub has its own dedicated wiring (including the failure-prone TSB cable) and connects to the infotainment system, while the 12V outlet is on a simple fused power circuit. The window switches communicate with the Body Control Module. A failure in one system usually does not affect the others.
Is the switch panel the same for 2-door and 4-door Jeep Wranglers?
Yes, for the JL generation (2018-2023), the center dash switch panel is the same for both 2-door and 4-door models. The part is also shared with the Jeep Gladiator (JT). The primary difference is whether the vehicle is equipped with the optional auxiliary switches.
Technical Specifications
OEM Part Numbers: 68658437AA (USB Cable from TSB) 68505684AA (Media Hub Module) 68453786AB (Media Hub Module) 68321019AF (Panel without Aux Switches, may be superseded)
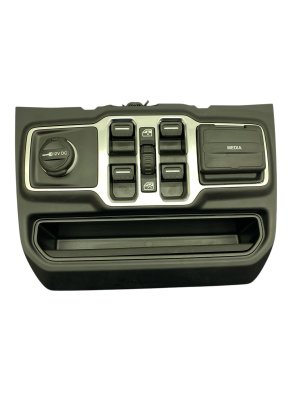
Panel is designed for models without the factory auxiliary switch bank. Contains power window switches, media hub (USB/AUX), and one 12V power outlet.
We Have This Part in Stock

The information in this article is provided for general reference and educational purposes only. Vehicle specifications, procedures, and part compatibility can vary by production date, trim level, and region. Always consult your vehicle's factory service manual and verify part numbers before purchasing or performing repairs. Safety-critical components such as airbags, seat belts, and braking systems should be installed by a qualified professional.
- Jeep Gladiator:
- Jeep Wrangler:
- 🛍️ Shop This Part
- Symptoms of a Failing Control Console Switch Panel
- 1. Intermittent or Dead USB Ports (Media Hub Failure)
- 2. Inoperative Power Window Switches
- 3. 12V Power Outlet Not Working
- Known Issues, Recalls, and Technical Service Bulletins (TSBs)
- TSB 08-020-24: Intermittent Floor Console USB Port
- Buying a Used Control Console Switch Panel: A Buyer's Guide
- 1. Verify Compatibility: Auxiliary Switches are Key
- 2. Physical Inspection Checklist
- 3. The USB Cable Risk
- 4. Why Used OEM is a Good Choice
- Cost to Replace the Control Console Switch Panel
- Step-by-Step Replacement Guide
- Difficulty Level 2/5: Replacing the Media Hub Only
- Difficulty Level 3/5: Full Center Console Removal
- Frequently Asked Questions (FAQ)
- 🎟️ Get 5% Off