

2014-2019 Toyota 4Runner Rear Console Panel: A Guide to Damage and Replacement
This guide covers the common issues, inspection points for used parts, and DIY replacement for the rear center console panel in the 5th generation Toyota 4Runner.
- Failure is almost always physical damage; check for broken mounting tabs on used parts as the top priority.
- If power outlets don't work, check the 'P/OUTLET' fuse in the interior fuse box before replacing the panel.
- Replacement is extremely easy for DIYers, requiring only a plastic trim tool and about 15 minutes.
- The correct OEM part number for the common black panel is 58923-35030-C0.
Symptoms of a Failing or Damaged Rear Console Panel
Failure of this panel is almost always due to physical damage rather than mechanical breakdown. Because of its location, it's susceptible to kicks from rear passengers, damage from cargo, or general wear and tear.
- Visible Cracks or Scratches: Deep gouges, stress marks (often whiteish on the black plastic), or full cracks are the most common issue.
- Broken Mounting Tabs: The panel is secured by plastic clips or tabs. If these break, the panel will be loose, rattle, or may not stay in place at all.
- Inoperative Power Outlets or USB Ports: The outlets themselves can fail, but it's more common for the issue to be a blown fuse or a disconnected wiring harness. If only the rear outlets are dead, it could be a loose connector behind the panel.
- Damaged A/C Vents: The louvers (fins) inside the air vents can break, preventing passengers from directing airflow. The vent assembly itself might also be cracked.
- Loose Fit and Rattles: Even without visible cracks, worn or broken clips can cause the panel to vibrate and create annoying rattling noises while driving.
Known Issues, Recalls, and Technical Service Bulletins (TSBs)
As of this writing, there are no specific recalls or Technical Service Bulletins (TSBs) issued by Toyota or the NHTSA for the rear console trim panel itself. Most recalls for the 2014-2019 4Runner pertain to more critical systems like fuel pumps, airbags, and exterior accessory labels. While some owners report issues with the power outlets not working, this is often traced to a blown fuse (such as the 15A P/OUTLET fuse) or a bad connection, rather than a systemic defect with the panel.
Pro Tip: If your power outlets stop working, always check the fuse box first. There is a fuse box located under the steering column on the driver's side; the fuse diagram on the cover or in the owner's manual will identify the correct fuse for the power outlets. This can save you the cost of a replacement panel.
Buying a Used 2014-2019 4Runner Rear Console Panel
A used OEM panel is an excellent choice, as it guarantees a perfect fit and color match at a fraction of the cost of a new one. However, careful inspection is key.
What to Inspect Before You Buy
- All Mounting Tabs Intact: This is the most critical inspection point. Flip the panel over and carefully check every single mounting tab and clip location. Even one broken tab can cause a poor fit or rattles. Compare it to photos of a new part if you're unsure.
- Condition of Vents and Outlets: Ensure the A/C vent louvers move freely and aren't broken. Check the power outlets for any signs of corrosion, foreign objects, or physical damage.
- Check for Cracks vs. Scratches: Distinguish between surface-level scuffs, which are cosmetic, and deep cracks that compromise the panel's structure. Minor scuffs can often be cleaned or minimized, but cracks cannot be repaired effectively.
- Verify Included Components: Confirm that the panel you are buying includes the vents and power outlets. These are typically part of the assembly, but a seller might remove them.
Verifying Fitment and Part Numbers
The primary part number for the black rear console panel for 2014-2019 4Runners is 58923-35030-C0. The `-C0` suffix designates the color code for black. While black is the most common color, ensure it matches your vehicle's interior trim if other colors were offered.
Cost Comparison: New vs. Used
| Part Type | Estimated Cost |
|---|---|
| New OEM | $75 - $115 |
| New Aftermarket | Not commonly available |
| Used OEM | $50 - $100 |
| Shop Labor | $50 - $100 |
Replacement Guide (DIY Difficulty: 1/5)
Replacing this panel is a very simple job that requires minimal tools and can be completed in under 15 minutes. The entire panel is held in by clips.
- Prepare Your Tools: You will only need a plastic trim removal tool (a flathead screwdriver wrapped in tape can work, but is not recommended as it can scratch the plastic).
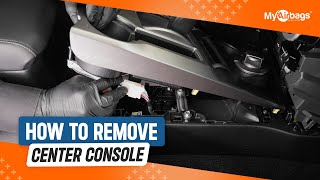
- Pry the Panel Off: Start at the bottom edge of the panel. Insert your plastic pry tool into the seam between the panel and the main console body and gently pry outwards. You will hear the clips pop as they release. Work your way up both sides until the panel is loose. 🎬 Watch: Step-by-step center console removal guide
- Disconnect Electrical Connectors: Before fully removing the panel, reach behind it and locate the wiring harness connected to the power outlets. Press the small release tab on the connector and pull it straight out to disconnect it.
- Install the New Panel: Connect the electrical harness to the new panel, making sure it clicks securely into place. Align the clips on the new panel with the slots on the console body. Starting from the top, press firmly around the edges of the panel until all clips snap into place.
Frequently Asked Questions (FAQ)
Can I replace just the broken power outlet or A/C vent?
While it may be technically possible to remove and replace just the individual components, they are generally not sold separately by Toyota. The entire rear panel is sold as a single assembly (part number 58923-35030-C0). It is almost always easier and more cost-effective to replace the entire panel assembly, especially when buying a used part.
What tools do I need to replace the rear console panel?
You only need a plastic trim removal tool or a pry tool. Using a dedicated plastic tool is highly recommended to avoid scratching or damaging 🎬 See how to safely remove console trim the surrounding console plastics during removal.
Are the rear USB ports and 12V outlets on the same fuse?
The 12V "cigarette lighter" style outlets are typically on a dedicated fuse, often labeled 'P/OUTLET' in the fuse panel. The USB ports may be on a different circuit. If your 12V outlets are not working but the USB ports are (or vice-versa), it strongly suggests a blown fuse is the culprit for the non-functional outlets.
How do I avoid breaking the clips when removing the old panel?
The key is to apply steady, even pressure with a plastic pry tool. Start from the bottom and work your way around the panel, releasing one clip at a time. Avoid pulling or yanking on one corner, as this can concentrate stress and snap the plastic clips or the panel itself.
Helpful Videos

Technical Specifications
OEM Part Numbers: 58923-35030-C0 5892335030C0
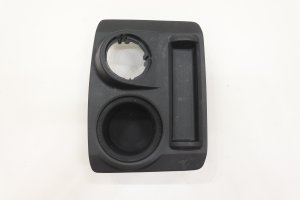
Material: Plastic Color Code: C0 (Black) Integrated Components: Rear A/C Vents, Power Outlet Sockets
We Have This Part in Stock



The information in this article is provided for general reference and educational purposes only. Vehicle specifications, procedures, and part compatibility can vary by production date, trim level, and region. Always consult your vehicle's factory service manual and verify part numbers before purchasing or performing repairs. Safety-critical components such as airbags, seat belts, and braking systems should be installed by a qualified professional.
- Toyota 4Runner:
- 🎬 Helpful Videos
- 🛍️ Shop This Part
- Symptoms of a Failing or Damaged Rear Console Panel
- Known Issues, Recalls, and Technical Service Bulletins (TSBs)
- Buying a Used 2014-2019 4Runner Rear Console Panel
- What to Inspect Before You Buy
- Verifying Fitment and Part Numbers
- Cost Comparison: New vs. Used
- Replacement Guide (DIY Difficulty: 1/5)
- Frequently Asked Questions (FAQ)
- 🎟️ Get 5% Off