

2017-2022 Maserati Levante Console Trim: Fixing Sticky Buttons, Matching Finishes, and Replacement
This guide covers the common cosmetic failures of the Maserati Levante center console trim, how to choose the right used part, and how to permanently fix the infamous sticky button issue.
- The most common failure is a sticky, gummy surface caused by the breakdown of the factory soft-touch coating; this can be permanently fixed by stripping and repainting the part.
- When buying a used panel, you must exactly match the finish (wood, carbon, etc.) and check the back for broken mounting tabs.
- Replacement is a straightforward DIY project that involves prying the panel up, disconnecting wires, and swapping components.
- There are no recalls for the trim panel itself, but be aware of other unrelated software and wiring recalls for the 2017 Levante.
Symptoms of Console Trim Panel Failure
Failure of the Levante's console trim is almost always cosmetic or related to the controls it houses. Because these panels are a focal point of the interior, even minor flaws can be very noticeable.
Most Common Symptom: Sticky or Gummy Surfaces
By far the most common issue is the soft-touch coating on the plastic trim and buttons becoming sticky, tacky, or gummy. This is not caused by dirt or a spill. It is a chemical breakdown of the rubberized coating itself, a problem common to many Italian cars of this era. The process is accelerated by heat and UV exposure. The sticky surface attracts dust, fingerprints, and lint, quickly making the console look dirty and feel unpleasant to touch.
Other Symptoms of Failure
- Peeling or Bubbling Finish: The clear coat over wood or carbon fiber trim can begin to peel, bubble, or delaminate. On models with leather-wrapped console sections, the leather can shrink and pull away at the seams.
- Scratches and Scuffs: Normal wear and tear from keys, phones, or rings can cause deep scratches or scuffs in the panel's finish.
- Malfunctioning Dials or Buttons: The main rotary dial for volume and climate can sometimes stop responding, even if the controls on the steering wheel still work. This may be a failure in the dial mechanism itself, a loose connection, or a blown fuse.
- Cracked Plastic or Broken Tabs: The underlying plastic structure can crack from impact, and the mounting tabs on the back can break during removal, causing the panel to fit loosely or rattle.
Pro Tip: The sticky button issue can be permanently fixed. The process involves removing the panel, chemically stripping the degraded rubber coating, and refinishing the part with a durable interior trim paint. This is a popular DIY project.
Buying a Used Maserati Levante Console Trim Panel
Given the high cost of a new OEM panel, a used part in excellent condition offers significant savings. However, careful inspection is critical to getting a part that is a true upgrade.
1. Match the Finish and Options EXACTLY
Maserati offered several console finishes for the Levante. The most important step is to ensure the part you're buying matches your vehicle's original trim package.
- Wood Finishes: Available in several grains and shades. Compare photos in bright, direct light.
- Carbon Fiber: Ensure the weave pattern and gloss level match your other interior pieces.
- Piano Black / Gloss Black: This finish is prone to fine scratches; look for a part with minimal surface wear.
Verify that the button layout matches your car's options (e.g., with or without specific features). It is often easier to swap your existing switches into the new trim panel than to find a panel with the exact same switches in perfect condition.
2. Physical Inspection Checklist
- Check for Stickiness: Ask the seller directly if any part of the trim or the surrounding buttons feels sticky or tacky. If buying online, look for a dusty or lint-covered appearance in photos, which is a tell-tale sign of a sticky surface.
- Inspect for Scratches and Peeling: Look closely at high-contact areas. For wood or carbon fiber, check the edges for any signs of the clear coat lifting or peeling.
- Examine the Back: This is crucial. Ask for clear photos of the back of the panel. Look for any broken, cracked, or repaired mounting tabs. A panel with broken tabs will not sit flush and may cause rattles.
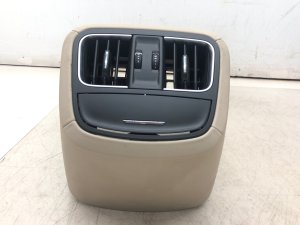
- Confirm Part Numbers (If Possible): Part numbers can vary by finish and model year. Some known part numbers for console components include 670043373 (cup holder trim). The number 670049101 is for the rear console air vent, not the main front trim.
3. Why Used OEM is the Best Choice
For a vehicle like the Maserati Levante, there are virtually no aftermarket console trim panels available. A used OEM panel is the only practical alternative to a new one. A high-quality used part that has been properly inspected offers the same fit, finish, and quality as a new part for a fraction of the price.
Replacement Overview & Difficulty
- Difficulty Rating: 2 out of 5 (Requires patience and care, but no special tools)
- Estimated Time: 0.5 - 1.0 hours
- DIY Feasible: Yes
Replacing the center console trim panel is a straightforward job that most DIYers can handle. The main steps involve:
- Prying the Panel Up: Using plastic trim removal tools to avoid scratching surrounding surfaces, carefully pry the console panel upwards. It is held in by several clips. Forum users note clips are located at the rear and near the center USB port door.
- Disconnecting Electronics: Once the panel is loose, you will see several electrical connectors for the switches and control modules attached to the underside. Carefully disconnect each one. They all have small release tabs that must be pressed.
- Transferring Components: The switches and control modules are typically screwed onto the back of the trim panel. You will need to unscrew them from your old panel and transfer them to the new one.
- Installation: Connect all electrical plugs to the new panel, position it correctly, and press down firmly to engage all the mounting clips.
Warning: Be gentle when prying and handling the panel. The mounting clips and the panel itself can be brittle and break if too much force is used.
Vehicle-Specific Issues: Recalls & TSBs
There are no recalls or Technical Service Bulletins (TSBs) directly related to the physical console trim panel. However, several recalls exist for the 2017 model year Levante that owners should be aware of:
- NHTSA 17V161000: An engine software issue could cause the transmission to shift to neutral or the engine to shut off at very low speeds (approx. 2 mph). The fix is a software update.
- NHTSA 17V046000: The front seat wiring harness could rub during seat adjustment, potentially causing an electrical short and increasing fire risk. The fix involves inspecting and replacing the harness if needed.
- Recall 327/B: A software bug in the entertainment-telematics module (ETM) could disable the backup camera in temperatures below freezing. The fix is a software update.
Cost Comparison
The cost of a new OEM console trim panel from a Maserati dealer can be extremely high, making used parts a very attractive option.
| Part Type | Estimated Cost |
|---|---|
| New OEM | $800 - $1,300+ (Varies by finish) |
| Used OEM | $60 - $400 (Varies by condition and finish) |
| New Aftermarket | Not Generally Available |
| Shop Labor | $100 - $200 |
Frequently Asked Questions (FAQ)
How can I permanently fix the sticky buttons on my existing panel?
The best permanent fix is to remove the panel, use denatured alcohol or a similar solvent to strip off the failing rubberized coating, and then repaint the plastic with a high-quality automotive interior paint like SEM Trim Black. This leaves a durable, hard plastic finish that will not become sticky again. For buttons with icons, you can either carefully clean around them or purchase replacement decals online.
Can I just replace the buttons or do I have to replace the whole trim panel?
The buttons and switches are individual components that are screwed to the back of the main trim panel. While you can't typically buy just the buttons from Maserati, you can transfer your old buttons to a new or used trim panel. If your only issue is a single broken switch, you may be able to find that individual part from a used parts seller.
Is the carbon fiber console trim a common upgrade?
Yes, upgrading from a standard wood or piano black finish to the sportier carbon fiber trim is a popular modification. Because it's a direct swap, it's a relatively easy way to change the interior's appearance. However, be prepared for the high cost of the carbon fiber part, even on the used market.
My volume dial on the console stopped working. Is the trim panel the problem?
Not necessarily. While the dial is housed in the panel, the failure could be the dial's internal mechanism, a loose electrical connection, or a blown fuse. The first step is to check the fuses for the infotainment system. If the fuses are good, the next step is to remove the panel to check the connector on the back of the dial assembly. If that is secure, the dial module itself has likely failed and needs to be replaced.
Technical Specifications
OEM Part Numbers: 670043345 670049101 670043373 670048844
Part number 670049101 refers to the rear console air vent assembly. Part number 670043373 refers to the cup holder trim surround. The other numbers are associated with main console components. Compatibility is primarily determined by finish (Wood, Carbon Fiber, Piano Black) and model year.
We Have This Part in Stock

The information in this article is provided for general reference and educational purposes only. Vehicle specifications, procedures, and part compatibility can vary by production date, trim level, and region. Always consult your vehicle's factory service manual and verify part numbers before purchasing or performing repairs. Safety-critical components such as airbags, seat belts, and braking systems should be installed by a qualified professional.
- Maserati Levante:
- 🛍️ Shop This Part
- Symptoms of Console Trim Panel Failure
- Most Common Symptom: Sticky or Gummy Surfaces
- Other Symptoms of Failure
- Buying a Used Maserati Levante Console Trim Panel
- 1. Match the Finish and Options EXACTLY
- 2. Physical Inspection Checklist
- 3. Why Used OEM is the Best Choice
- Replacement Overview & Difficulty
- Vehicle-Specific Issues: Recalls & TSBs
- Cost Comparison
- Frequently Asked Questions (FAQ)
- 🎟️ Get 5% Off