

2021-2025 Honda Odyssey Console Panel: 115V Outlet Issues and Trim Guide
A guide to the Touring and Elite-specific console trim panel, diagnosing power outlet failures, and what to check when buying a used part.
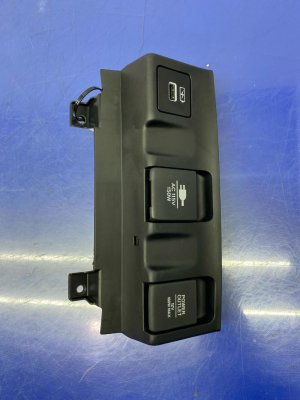
- This panel with the 115V AC outlet is only found on 2021-2025 Honda Odyssey Touring and Elite trims.
- If the outlet stops working, always check the fuse first before assuming the part has failed.
- When buying a used panel, inspecting the mounting tabs on the back is more critical than minor cosmetic scratches on the front.
- Replacement is a simple DIY task requiring only basic plastic trim tools and less than an hour.
Variant Warning: Touring & Elite Trims Only
Important: This console trim panel, which includes the 115-Volt/150-Watt AC power outlet, was only factory-installed on 2021-2025 Honda Odyssey Touring and Elite trim levels. Lower trims like the EX, EX-L, and Sport do not have the necessary wiring or the specific opening in the console to support this feature. Retrofitting this panel to a lower trim level is not a simple plug-and-play operation and would require extensive custom wiring.
Symptoms of Failure
Failure of this panel can be either electrical or physical. Because it is a simple component, diagnosis is usually straightforward.
1. 115V Power Outlet Not Working
The most common failure is when a device plugged into the AC outlet does not receive power. Before assuming the panel or outlet is bad, always check the simple things first:
- Check the Fuse: Consult your owner's manual for the location of the fuse related to the power inverter or accessory outlets. A blown fuse is a common and easy fix.
- Check the Device: Ensure the device you are plugging in works in another outlet and does not draw more than 150 watts. Exceeding the 150-watt limit will cause the circuit protection to trip, and the outlet will not provide power.
- Check the Indicator Light: The outlet has an indicator light that should illuminate when it is active. If the light is off, it points to a lack of power to the unit.
If the fuse is good and the device is within the power limits, the failure could be in the outlet itself, the wiring behind it, or the power inverter that converts the vehicle's DC power to AC power.
2. Physical Damage
As a trim piece in a high-traffic area, the panel is susceptible to cosmetic and structural damage. This includes deep scratches, scuffs from daily use, or cracks from impacts. While usually cosmetic, a severe crack could create a sharp edge or compromise the mounting of the power outlet.
3. Rattling Noises
If you hear rattling or buzzing noises from the center console area, it could be due to broken mounting tabs on the back of the trim panel. These tabs are essential for securing the panel tightly against the console structure. Over time, or during improper removal, they can become brittle and break, resulting in a loose fit.
Buying a Used Console Trim Panel
Purchasing a used OEM panel is an excellent way to save money, especially for cosmetic repairs. Here’s what to inspect before you buy:
- Verify the Part: First, ensure you are buying the correct panel for a Touring or Elite model with the 115V outlet opening.
- Inspect the Face: Look for deep gouges, cracks, and heavy wear. Minor surface scratches are common and can often be polished or accepted as normal wear for a used part.
- Flip it Over (Most Important): The back of the panel is more important than the front. Carefully inspect all mounting tabs and clip receivers. Ensure none are cracked, stressed, or broken off. A panel with even one broken tab may not sit flush and could be the source of future rattles.
- Check the Outlet Port: Look at the power outlet itself. Check for any foreign objects, signs of corrosion, or burn marks inside the plug area. The plastic surround should be intact.
- Ask About the Wiring Pigtail: If possible, get the panel with a few inches of the original wiring connector (the "pigtail") attached. This can make installation or repair much easier if your existing connector is damaged.
Known Issues, TSBs, and Recalls
As of mid-2026, there are no specific recalls or Technical Service Bulletins (TSBs) for the front console trim panel or the 115V outlet on 2021-2025 Honda Odyssey models.
Pro Tip: A TSB for 2018-2020 models with audio issues required the removal of the lower console panels to access wiring. This indicates that the panels are relatively easy to remove for service. Additionally, a recall (NHTSA 20V066000 / Honda T6U) was issued for 2018-2020 models due to the third-row accessory outlet wiring being pinched, which could cause a short. While this is not the same part, it shows the importance of ensuring all console wiring is routed correctly during reinstallation to avoid similar issues.
Cost Comparison
The cost can vary depending on whether you need the entire panel or just the outlet component.
| Part/Service | Estimated Cost |
|---|---|
| New OEM Panel Assembly | $100 - $200 (estimate) |
| New OEM Outlet Component (39113-THR-A31) | $40 - $60 |
| Used OEM Panel Assembly | $50 - $120 |
| Shop Labor for Installation | $90 - $180 |
Replacement Overview (Difficulty: 1/5)
Replacing this panel is a beginner-friendly DIY job that typically takes less than 30 minutes.
- Get the Right Tools: You will need a set of plastic (non-marring) trim removal tools. A Phillips head screwdriver or a 10mm socket may also be needed.
- Remove Surrounding Trim: Use the plastic pry tools to carefully unclip and remove any adjoining trim pieces. On many Honda models, the side panels of the console must be gently pulled away first.
- Locate Fasteners: Look for any screws holding the panel in place. Often, these are hidden under small rubber mats inside storage cubbies.
- Disconnect Electrical Connector: Once the panel is loose, reach behind it and locate the electrical connector for the power outlet. Press the release tab and gently pull the connector apart.
- Install the New Panel: Connect the electrical harness to the new panel, line up all the mounting tabs, and gently press it into place until the clips engage. Reinstall any screws and surrounding trim pieces.
Part Numbers and Technical Specifications
- Outlet Component OEM Part Number: 39113-THR-A31 (This is for the outlet/USB unit itself, not the entire plastic panel).
- Power Rating: 115 Volts AC / 150 Watts maximum.
Frequently Asked Questions (FAQ)
My 115V outlet stopped working. What's the first thing I should check?
Before replacing any parts, check the fuse. The power outlet is designed to protect itself, and a blown fuse is the most common reason for it to stop working, especially if a device drawing too much power was plugged in.
Can I install this 115V outlet panel in my Odyssey EX-L?
This is not recommended. The lower trim levels lack the specific factory wiring harness and power inverter needed to run the 115V outlet. While physically possible, it would require significant, costly, and complex custom electrical work.
Is the power inverter part of this panel?
No. This panel houses the outlet you plug into. The power inverter, which is a separate module that converts your car's 12V DC power to 115V AC power, is located elsewhere, typically mounted securely behind the dashboard or under a seat.
How do I avoid breaking the clips when removing the panel?
Always use plastic trim removal tools, never a metal screwdriver. Apply steady, even pressure. Try to identify where the clips are located by feel or by looking at a diagram/replacement part, and pry as close to the clip location as possible. Do not attempt this in very cold weather, as the plastic will be more brittle.
Technical Specifications
OEM Part Numbers: 39113-THR-A31 (Outlet/USB Component)
Power Outlet Rating: 115 Volts AC, 150 Watts
We Have This Part in Stock




The information in this article is provided for general reference and educational purposes only. Vehicle specifications, procedures, and part compatibility can vary by production date, trim level, and region. Always consult your vehicle's factory service manual and verify part numbers before purchasing or performing repairs. Safety-critical components such as airbags, seat belts, and braking systems should be installed by a qualified professional.
- Honda Odyssey:
- 🛍️ Shop This Part
- Variant Warning: Touring & Elite Trims Only
- Symptoms of Failure
- 1. 115V Power Outlet Not Working
- 2. Physical Damage
- 3. Rattling Noises
- Buying a Used Console Trim Panel
- Known Issues, TSBs, and Recalls
- Cost Comparison
- Replacement Overview (Difficulty: 1/5)
- Part Numbers and Technical Specifications
- Frequently Asked Questions (FAQ)
- 🎟️ Get 5% Off