

2021-2025 Ford Bronco Console Trim: Fixing Scratches, Rattles, and Fitment
A guide to identifying damage, choosing the right used part, and replacing the center console trim on manual transmission Ford Broncos without wireless charging.
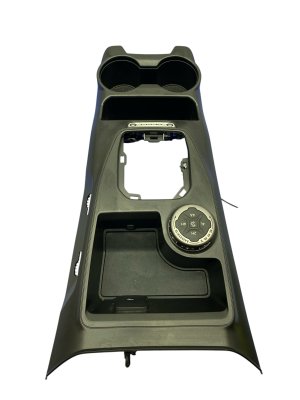
- Compatibility is critical: This guide focuses on panels for manual transmissions without wireless charging (Part No. M2DZ-78044D90-FA). Verify your specific configuration before buying.
- Inspect used parts for broken mounting tabs on the underside; this is more important than minor surface scratches.
- Failure is cosmetic or structural (scratches, rattles), not mechanical. The most common complaint is that the plastic scratches easily.
- Replacement is a simple DIY job for most owners, requiring only basic trim tools and about an hour of time.
Symptoms of a Damaged Console Trim Panel
Since this is a trim piece, 'failure' is almost always cosmetic or structural. You won't see any dashboard warning lights, but the symptoms can be annoying and decrease the value and enjoyment of your vehicle.
- Scratches and Scuffs: The most common issue. Owners report the plastic is prone to scratching from keys, phones, or even normal use around the cupholders and shifter area.
- Rattles and Squeaks: A loose-fitting panel or broken mounting clips can cause persistent noises, especially when driving on rough roads. Forum users often complain about various interior rattles, and the center console is a frequent suspect.
- Broken Mounting Tabs: The panel is held in place by a series of plastic clips and tabs. If the panel was removed incorrectly or stressed, these can break, leading to a poor fit, gaps, and rattles.
- Cracks or Gouges: Physical impact from a sharp object can crack or take a chunk out of the plastic, which is difficult to repair invisibly.
- Stains or Discoloration: Spills or the use of harsh chemical cleaners can permanently stain or discolor the plastic finish.
Known Issues, TSBs, and Recalls
As of this writing, there are no specific recalls for the main center console trim panel itself. However, the Bronco platform has had several Technical Service Bulletins (TSBs) related to interior rattles.
- General Rattles: Ford has issued TSBs for rattles originating from the roof (TSB 22-2142) and tailgate (TSB 23-2163), indicating a sensitivity to noise issues in the vehicle's construction. While not directly for the console, it highlights that owners are sensitive to these noises, and a loose console panel can be a primary cause.
- Subwoofer Rattle: TSB 23-2241 addresses a rattle from the rear loadspace trim panel on vehicles with the factory subwoofer, caused by poor clip retention. This points to clip design being a potential source of noise issues elsewhere in the interior.
Pro Tip: Many owners on forums like Bronco6G.com report successfully eliminating minor console squeaks and rattles by applying felt tape or small foam pads to the contact points and clips on the underside of the panel during installation.
Buying a Used Console Trim Panel: What to Check
Given the high cost of a new OEM panel, a used one is an excellent value. However, you must inspect it carefully.
1. Verify Compatibility Above All Else
Warning: This is the most critical step. The console panel is specific to the transmission and options. The part numbers listed, particularly M2DZ-78044D90-FA, are for models with a manual transmission and without the optional wireless phone charger. Panels for automatic transmissions or those with wireless charging have different cutouts and will not fit. Always match the part number exactly or verify with the seller using your vehicle's VIN.
2. Inspect All Mounting Points
Turn the panel over and carefully inspect every single mounting tab and clip receiver. Look for hairline cracks, stress marks (white discoloration in the plastic), or completely broken tabs. A panel with even one broken key mounting tab may not sit flush and could be the source of future rattles.
3. Check the Surface Finish
Examine the entire top surface under good lighting. Look for deep scratches that your fingernail catches on, as these cannot be polished out. Minor scuffs may be acceptable and can sometimes be hidden with an interior detailer product. Check for any discoloration or chemical stains.
4. Why Used OEM is the Best Choice
For a large, fit-critical piece like this, a used OEM (Original Equipment Manufacturer) panel is almost always superior to a new aftermarket part. Aftermarket options are typically limited to stick-on covers or overlays, not full replacement panels. A used OEM panel guarantees a perfect match for color, texture, and fitment, using the original, higher-quality plastic Ford specified.
Cost of Replacing a Ford Bronco Console Panel
| Part Type | Estimated Cost | Notes |
|---|---|---|
| New OEM (M2DZ-78044D90-FA) | $225 - $340 | Price from Ford dealership parts counters or online stores. |
| New Aftermarket | $60 - $180 | Generally only available as stick-on overlays (e.g., carbon fiber look), not full replacement panels. |
| Used OEM | $100 - $200 | Dependent on condition and source. Offers the best value. |
| Shop Labor | $100 - $200 | Estimated 1.0-1.5 hours of labor at a professional shop. |
Installation Guide (Difficulty: 2/5)
Replacing the console trim panel is a straightforward job that most DIYers can handle with basic tools. The process generally takes about an hour.
- Tools Needed: Plastic trim removal tool kit, 7mm socket or driver.
- Pry Up Side Panels: Using a plastic trim tool to avoid scratches, carefully pry off the smaller trim pieces on the sides of the center console in the footwell area.
- Remove Screws: Locate and remove any retaining screws. There are typically screws inside the center console storage bin under the armrest and sometimes in the footwell area.
- Lift the Panel: Gently pull up on the main console trim panel, starting from the rear and working your way forward. You will feel the clips release. You may need to move the gear shifter to its rearmost position to get enough clearance to lift the panel up and over it.
- Disconnect Switches (If Necessary): While the panel itself does not include switches, you may need to disconnect the electrical connectors from the switches that are mounted *in* the panel to remove it fully. These have small release tabs that need to be pressed.
- Install New Panel: Installation is the reverse of removal. Align the new panel, connect any electrical connectors, and press down firmly to engage all the clips. Reinstall the screws and side panels.
OEM Part Numbers and Variants
The center console is made of several pieces. The main top panel discussed here is just one part. Be sure you are ordering the correct piece for your repair.
- M2DZ-78044D90-FA: The main top console panel for manual transmission models without wireless charging.
- M2DZ-78045A36-AB: This is the main console lower structure or box.
- M2DZ-98045E24-AA: This is the rear trim panel of the console, often with USB ports.
There are many other part number variations for automatic transmission models (like M2DZ-78044D90-DC or M2DZ-78044D90-EA) and for different trim levels and options. Always verify fitment with your VIN.
Frequently Asked Questions (FAQ)
Will this console panel fit my Bronco Sport?
No, this part is only for the full-size Ford Bronco. The Bronco Sport is a completely different vehicle and uses different interior parts.
Can I add a wireless charger to my Bronco by swapping the console panel?
No, simply changing the trim panel is not enough. The wireless charging system requires additional modules and wiring harnesses that are not present on non-equipped vehicles. You would need to install a complete charging kit.
My console is just rattling. Do I need to replace the whole thing?
Not necessarily. First, check if something inside the console bin or cupholders is making noise. If not, the noise may be from a loose clip. You can try removing the panel as described in the installation section and applying felt tape to the clips and edges where plastic parts touch. This often solves minor rattle issues without the cost of a new panel.
How can I protect my new console panel from scratches?
Consider applying a high-quality matte or satin finish paint protection film (PPF) to the high-wear areas. You can also purchase pre-cut vinyl or plastic overlays that stick on top of the factory panel, though these alter the appearance. Being mindful of placing sharp objects like keys on the console is the easiest prevention method.
Technical Specifications
OEM Part Numbers: M2DZ-78044D90-FA M2DZ78044D90FA M2DZ-78045A36-AB M2DZ78045A36AB M2DZ-98045E24-AA M2DZ98045E24AA
Material: Acrylonitrile Butadiene Styrene (ABS) Plastic. Finish: Varies by trim level (typically textured black/grey).
We Have This Part in Stock





The information in this article is provided for general reference and educational purposes only. Vehicle specifications, procedures, and part compatibility can vary by production date, trim level, and region. Always consult your vehicle's factory service manual and verify part numbers before purchasing or performing repairs. Safety-critical components such as airbags, seat belts, and braking systems should be installed by a qualified professional.
- Ford Bronco:
- 🛍️ Shop This Part
- Symptoms of a Damaged Console Trim Panel
- Known Issues, TSBs, and Recalls
- Buying a Used Console Trim Panel: What to Check
- 1. Verify Compatibility Above All Else
- 2. Inspect All Mounting Points
- 3. Check the Surface Finish
- 4. Why Used OEM is the Best Choice
- Cost of Replacing a Ford Bronco Console Panel
- Installation Guide (Difficulty: 2/5)
- OEM Part Numbers and Variants
- Frequently Asked Questions (FAQ)
- 🎟️ Get 5% Off