

2020-2025 Corvette C8 Console Trim Panel: Solving Rattles and Speaker Compatibility
This guide covers common issues, part variations between 1LT, 2LT, and 3LT trims, and how to choose the right used console trim panel for your C8 Corvette.
- Compatibility is critical: The panel is different for 1LT (no speaker) vs. 2LT/3LT (with speaker). Verify your car's trim before buying.
- Inspect used parts for broken clips. The panel's secure, rattle-free fit depends entirely on intact mounting tabs.
- Rattles are a common complaint but can often be fixed with felt tape or by securing wires, without needing to replace the entire panel.
- For 3LT trims, you must match both the speaker configuration and the specific leather color/material for a proper replacement.
Symptoms of a Failing Console Trim Panel
Since this is a trim piece, failure is typically related to cosmetic issues, damage, or noise rather than mechanical breakdown. Here are the most common symptoms owners report:
- Rattles and Buzzing Noises: This is the most frequent complaint. A rattle or buzz from the center console area, especially over rough roads, often points to a loose trim panel. The cause is usually a broken or improperly seated mounting clip, or a wiring harness vibrating against the back of the panel.
- Visible Damage: Scratches, scuffs, and gouges are common from regular use, such as from keys, phones, or passenger contact. On 3LT models with leather-wrapped interiors, there have been some owner reports of leather delaminating or shrinking on dash components, an issue that could potentially affect leather-wrapped console panels as well.
- Poor Fitment: The panel may appear loose, have uneven gaps with surrounding trim, or lift up at the edges. This is a clear sign that the mounting clips are broken or have come loose.
- Audio System Issues: If your Corvette has the 14-speaker Bose system, a malfunctioning or dead speaker within this panel will create a noticeable hole in the sound stage. You might hear distortion, popping, or no sound at all from this specific location.
Pro Tip: Before blaming the panel itself for a rattle, check the storage compartments. Items like sunglasses, coins, or garage door openers are common culprits for noise in the center console area.
Known Issues, TSBs, and Recalls
As of mid-2024, there are no specific recalls or Technical Service Bulletins (TSBs) issued by General Motors for the C8 Corvette's center console trim panel itself. However, the C8, particularly early 2020 models, has been noted by owners for various interior fit-and-finish issues, including panel gaps and rattles. While GM has not issued a specific bulletin for this panel, dealers may address severe rattles or fitment problems under the vehicle's bumper-to-bumper warranty on a case-by-case basis. A TSB was released for a faulty center console release button, but this is a separate component from the main trim panel.
Buying a Used Console Trim Panel
Purchasing a used OEM console trim panel is an excellent way to save money, especially if your original is simply damaged cosmetically. However, careful inspection is critical to ensure you get a good part that fits correctly.
Warning: The single most important factor is compatibility with your car's trim level. The panel is different between audio system options. Failure to verify this will result in a part that does not fit or function correctly.
Compatibility Checklist:
- 1LT Trim (10-Speaker Bose System): The 1LT model has the standard 10-speaker audio system. Its console trim panel does not have a speaker grille. Do not buy a panel with a speaker grille if you have a 1LT.
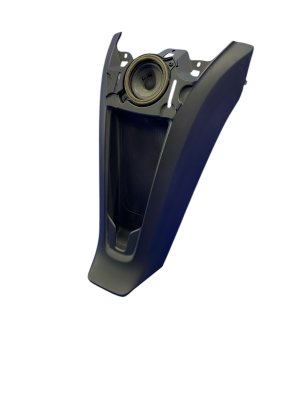
- 2LT & 3LT Trims (14-Speaker Bose System): The 2LT and 3LT models come standard with the upgraded 14-speaker Bose Performance Series audio system. The console panel for these trims must have the integrated speaker grille to be correct.
- 2LT vs. 3LT Material Finish: While both 2LT and 3LT have the speaker, the 3LT features a more luxurious interior with additional leather and specific stitching. When buying a used panel for a 3LT, closely inspect the material (leather vs. standard plastic/vinyl) and stitching color to ensure it matches your interior perfectly.
Physical Inspection Checklist:
- Check All Mounting Clips: Flip the panel over and inspect every single mounting clip and tab. These are essential for a secure, rattle-free fit. If any are broken, cracked, or missing, the panel will not sit flush and will almost certainly cause noise.
- Inspect the Speaker Grille: On 2LT/3LT panels, check that the speaker grille is not dented, cracked, or separated from the panel.
- Examine the Surface: Look for deep scratches, scuffs, or signs of delamination (on leather 3LT parts). Minor surface scuffs may be acceptable depending on your standards and the price, but deep gouges cannot be repaired.
- Verify the Speaker (If Present): If you are buying a panel with the speaker included, check that the speaker cone is not torn and that the electrical connector is intact and free of corrosion.
Cost Comparison
Prices can vary based on condition, source, and whether the integrated speaker is included. The following are estimates as of late 2024.
| Part Type | Estimated Cost | Notes |
|---|---|---|
| New OEM | $250 - $450 | Price varies by trim (1LT, 2LT, 3LT) and color. Ordered from a Chevrolet dealership. |
| Used OEM | $100 - $250 | Highly dependent on condition and compatibility. Best value if inspected carefully. |
| New Aftermarket | $75 - $500+ | Typically cosmetic overlays (e.g., carbon fiber stick-on pieces) or full carbon replacements, not direct functional replacements. |
| Shop Labor | $120 - $360 | Expect 1-2 hours of labor at a professional shop for removal and installation. |
Installation Guide
Replacing the center console trim panel is moderately difficult and requires care to avoid damaging the plastic parts. A set of plastic interior pry tools is essential.
- Difficulty: 3 out of 5
- Estimated Time: 1-2 hours
- DIY Feasible: Yes, for those with prior experience with interior trim removal.
General Steps:
- Disconnect the Battery: As a safety precaution, disconnect the negative terminal of the battery, as you will be working near electrical components.
- Remove Surrounding Trim: Using plastic pry tools, you may need to remove adjacent trim pieces first to gain access to the main panel's clips and fasteners. This can include side panels or the upper console surround.
- Release the Clips: Carefully pry around the edges of the panel to release the retaining clips. Pull gently and evenly to avoid breaking them. There may also be 7mm or 10mm bolts securing the console assembly that need to be removed.
- Disconnect Electrical Connectors: If you have a 2LT or 3LT, be prepared to disconnect the speaker wire harness. There may be other connectors for features like the wireless phone charger that are attached to the console assembly.
- Install the New Panel: Connect the electrical harnesses to the new panel, align all the clips with their corresponding slots, and press firmly and evenly until the panel snaps securely into place. Reinstall any bolts and surrounding trim pieces.
- Reconnect Battery: Reconnect the battery and test all functions, including the speaker.
Frequently Asked Questions (FAQ)
Can I install a 2LT/3LT panel with a speaker in my 1LT Corvette?
No, this is not recommended. The 1LT model lacks the factory wiring and amplifier channel to power the extra speaker. While the panel might physically fit, the speaker would be non-functional.
My console is rattling. Do I need to replace the whole panel?
Not necessarily. The first step is to have the panel removed and inspected. Often, the rattle can be fixed by adding felt tape to contact points, securing a loose wiring harness, or replacing a single broken clip rather than the entire panel.
Why is a used OEM panel better than a cheap aftermarket one?
Used OEM (Original Equipment Manufacturer) panels are guaranteed to fit exactly like the factory part, using the same clip locations and materials. Most aftermarket options for this part are stick-on overlays for appearance, not true replacements. A used OEM part ensures proper fitment and avoids the rattles and gaps common with poorly made aftermarket pieces.
Will the leather on a 3LT trim panel match a used part?
It should be very close, but be aware of potential color fading from sun exposure. When buying a used leather panel, compare it to your car's interior in good lighting. Because 3LT interiors come in many specific color combinations, you must match the exact color name (e.g., Adrenaline Red, Natural Dipped) for a perfect result.
Technical Specifications
OEM Part Numbers: 84254556
Varies by trim level. Panels for 2LT and 3LT trims incorporate a speaker grille for the 14-speaker Bose Performance Series audio system. Panels for 3LT trims may be wrapped in leather with custom stitching.
We Have This Part in Stock




The information in this article is provided for general reference and educational purposes only. Vehicle specifications, procedures, and part compatibility can vary by production date, trim level, and region. Always consult your vehicle's factory service manual and verify part numbers before purchasing or performing repairs. Safety-critical components such as airbags, seat belts, and braking systems should be installed by a qualified professional.
- Chevrolet Corvette: