

BMW M3 & M4 Console Trim Guide (2015-2020): Fixing Delamination and Rattles
Your guide to diagnosing, replacing, and buying a used center console trim panel for the F80 M3 and F82/F83 M4.
- The most common failure is cosmetic: the carbon fiber layer delaminating from the plastic base due to heat and adhesive failure.
- When buying a used panel, the most critical check is to inspect the underside for any broken or cracked mounting tabs, which will cause rattles.
- Replacement is a simple DIY task requiring only basic trim tools and Torx drivers, with a difficulty rating of 2 out of 5.
- The console trim is fully interchangeable between the 2015-2018 F80 M3 and the 2015-2020 F82/F83 M4, but will not fit a standard 3-Series or 4-Series.
Symptoms of a Failing Console Trim Panel
Failure of the console trim panel is almost always cosmetic or structural, rather than electrical. Since the panel itself contains no wiring, symptoms relate to its physical condition. Owners of a 2015-2018 BMW M3 or 2015-2020 BMW M4 may notice the following issues.
Carbon Fiber Delamination or Peeling
The most common issue, especially with the optional carbon fiber trim, is the top carbon layer separating from the plastic base. This often starts at a corner or edge and can lift up. It is caused by the failure of the factory adhesive, often accelerated by high interior temperatures from sun exposure. Once it starts, the peeling will typically get worse over time.
Rattles or Loose Fit
A rattling or loose-fitting console panel is usually caused by broken or weakened mounting tabs on the underside of the trim. This can happen from age and vibration, but it is most common after the panel has been removed for other service and then improperly reinstalled. A panel that doesn't clip in securely will move and vibrate against the center console structure, creating annoying noises, especially over rough roads.
Scratches, Stickiness, and Wear
Like any high-touch surface, the console trim is susceptible to cosmetic damage. Scratches from keys, rings, or other objects are common. Some BMW interior plastics from this era use a soft-touch coating that can become sticky or peel over time, especially when exposed to certain interior cleaning chemicals or oils from skin. While this is more common on door handles, it can affect the console trim as well.
Known Issues, TSBs, and Recalls
While there are several safety recalls for the F80 M3 and F82/F83 M4, none apply to the center console trim panel. This part is not considered a safety item. There are no known Technical Service Bulletins (TSBs) from BMW specifically addressing failures of this trim piece. However, forum discussions among owners have highlighted a few common, non-safety-related problems:
- Adhesive Failure on Carbon Fiber: The tendency for the carbon fiber layer to delaminate is the most widely reported issue. Some owners have successfully repaired this by removing the panel, cleaning the old adhesive, and re-bonding the layers with a strong, high-temperature epoxy or windshield adhesive.
- Fitment Gaps: Some owners have reported minor fitment issues or gaps from the factory on carbon fiber interior pieces, though this is not universal.
- Broken Clips After Removal: The plastic mounting clips are fragile. If the panel is removed to install an aftermarket stereo, run wiring, or for any other reason, the clips can easily break if not handled carefully, leading to a poor fit and rattles upon reinstallation.
Pro Tip: When removing the console trim, always use a set of plastic pry tools, not a screwdriver. Start by prying from an accessible edge and work your way around, applying gentle, even pressure to release the clips without breaking them.
Buying a Used Console Trim Panel: What to Check
A used OEM (Original Equipment Manufacturer) panel is an excellent way to replace a damaged one, often for significantly less than a new part. Because fit and finish are critical for this part, a used OEM piece is often a better choice than a cheap aftermarket alternative. Before buying, carefully inspect the following:
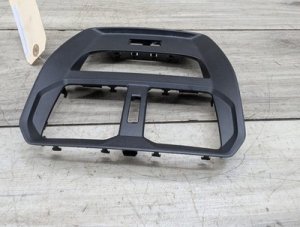
- All Mounting Tabs Intact: This is the most critical inspection point. Turn the panel over and check every single mounting tab and clip location. Ensure none are cracked, bent, or broken off. A panel with even one broken tab may not sit flush or could develop a rattle.
- No Delamination: For carbon fiber panels, look closely at all edges and around the cutouts for the iDrive controller and shifter. Check for any signs that the carbon layer is lifting or separating from the plastic base.
- Surface Condition: Check photos carefully for deep scratches, scuffs, or discoloration. Look for signs of chemical damage, which might appear as a dull or sticky-looking patch.
- Verify the Finish: BMW offered several trim finishes. Confirm you are buying the correct one to match the rest of your car's interior, whether it's the standard aluminum-look, gloss carbon fiber, or specialty trims like Alcantara.
- Confirm Part Numbers: If possible, match the part number from your old trim piece to the used one you intend to buy. The primary M Performance carbon fiber piece for DCT models is part number 51162358358.
Replacement Guide (DIY)
Replacing the console trim panel is a straightforward DIY job that can be completed with basic tools. The difficulty is approximately 2 out of 5.
- Estimated Time: 30-60 minutes
- Tools Required: Plastic trim removal tool kit, T10 and T15 Torx drivers.
Step-by-Step Walkthrough Summary
- Using a plastic pry tool, carefully lift up the main center console piece that surrounds the iDrive controller.
- Once the clips release, lift the piece slightly and disconnect the main electrical connector for the iDrive controller underneath. Set this piece aside.
- You will now see an exposed Torx screw (usually a T15) that secures the shifter trim piece. Remove this screw.
- Gently lift the shifter trim panel. It is also held in by clips. Do not pull it far, as there are wires connected underneath.
- Disconnect the electrical connectors for the shifter illumination and the driving mode buttons.
- The small electronics module for the shift logic buttons is attached to the underside of the trim with two T10 Torx screws. Transfer this module to the new trim panel.
- Installation is the reverse of removal. Connect all electronics, clip the new shifter trim in place, reinstall the T15 screw, and finally, reconnect and reinstall the main iDrive controller trim.
Warning: While forum users report that disconnecting the battery is not necessary for this procedure, it is always the safest practice when working with vehicle electronics to prevent accidental shorts.
Cost Comparison for M3 & M4 Console Trim
Prices can vary based on finish (standard vs. carbon fiber) and condition. The carbon fiber M Performance option is the most common replacement.
| Part Type | Estimated Cost | Notes |
|---|---|---|
| New OEM (M Performance Carbon Fiber) | $240 - $280 | Part number 51162358358 for DCT models. |
| New OEM (Alcantara CS Version) | $1,800+ | A rare and very expensive option from the M3/M4 CS models. |
| New Aftermarket (Carbon Fiber) | $150 - $700 | Wide range in quality. Full replacements are more expensive than simple stick-on overlays. |
| Used OEM (Carbon Fiber) | $175 - $250 | Based on eBay listings for a single console piece in good condition. |
| Shop Labor | $100 - $200 | Typically 0.5 to 1.0 hours of labor at an independent shop. |
Frequently Asked Questions (FAQ)
Is the console trim panel the same for the BMW M3 and M4?
Yes, for the generations specified (2015-2018 F80 M3 and 2015-2020 F82/F83 M4), the center console and its trim panels are identical and interchangeable.
Can I repair my peeling carbon fiber trim instead of replacing it?
Yes, a repair is possible if you are comfortable with DIY projects. It involves removing the panel, carefully separating the carbon layer, scraping off all the old failed adhesive from both surfaces, and re-applying a strong, high-temperature adhesive like 3M windshield adhesive or a quality two-part epoxy. The piece must be clamped firmly while the adhesive cures.
Will a trim panel from a standard BMW 3-Series or 4-Series fit my M3/M4?
No, it will not be a direct fit. While the overall shape is similar, the cutouts for the M-specific DCT shifter and the unique arrangement of the driving dynamic control buttons are different from those on a standard F30/F32 model. You must use a panel designed specifically for the F80/F82/F83 M models.
My panel is rattling. What's the first thing I should check?
First, press firmly around the edges of the panel to see if it clips back into place. If it feels loose, it's likely that one or more mounting clips are not engaged or are broken. You will need to remove the panel to inspect the clips on the underside. Sometimes, a panel that was removed for a previous repair was simply not clipped back in all the way.
Technical Specifications
OEM Part Numbers: 51162358358 (M Performance Carbon Fiber for DCT) 51-16-7-993-069 (Alcantara for CS models) 51169232083 (Fineline Anthracite Wood Trim - Note: Also fits non-M models, verify button cutouts)
Material finishes include aluminum-look plastic, gloss carbon fiber over a plastic base, and Alcantara over a plastic base.
We Have This Part in Stock



The information in this article is provided for general reference and educational purposes only. Vehicle specifications, procedures, and part compatibility can vary by production date, trim level, and region. Always consult your vehicle's factory service manual and verify part numbers before purchasing or performing repairs. Safety-critical components such as airbags, seat belts, and braking systems should be installed by a qualified professional.
- BMW M3:
- BMW M4:
- 🛍️ Shop This Part
- Symptoms of a Failing Console Trim Panel
- Carbon Fiber Delamination or Peeling
- Rattles or Loose Fit
- Scratches, Stickiness, and Wear
- Known Issues, TSBs, and Recalls
- Buying a Used Console Trim Panel: What to Check
- Replacement Guide (DIY)
- Step-by-Step Walkthrough Summary
- Cost Comparison for M3 & M4 Console Trim
- Frequently Asked Questions (FAQ)
- 🎟️ Get 5% Off